Apppointment Buddy
By Accrete InfoSolutions Technologies LLP
v1.0
** Thank you for choosing Apppointment Buddy **
If you have any issue regarding Appointment Buddy plugin, contact us on developer@accreteinfo.com
Overview
Appointment Buddy is simple & easy yet efficient for accepting online appointment bookings on your Wordpress Site. It is integrated with PayPal & Stripe payment process.
Who can use Appointment Buddy?
- Consultant
- Spa & Salon
- Clinic
- Photographer
- Dentist
- Laywers
- And many more…
Requirements
What are the server requirements to use Appointment Buddy Plugin?
- PHP Version: 5.6 or greater
- MySQL Version: 5.7 or greater
- The mod_rewrite Apache module
What are the system requirements to use Appointment Buddy Plugin?
- WordPress 4.6x and greater
Installation
Two ways to install Appointment Buddy Plugin in your WordPress site:
- Directly uploading the plugin folder in Wordpress plugin folder
- Purchase and download the plugin from our CodeCanyon page.
- Extract appointment-buddy.zip from the downloaded archive.
- Unzip the Appointment Buddy WordPress plugin
- Upload the entire appointment-buddy/ directory to the /wp-content/plugins/ directory
- Activate the Appointment Buddy plugin through the Plugins menu in WordPress
- Configure the settings at the administration menu >> Appointment Buddy >> Settings.
- To add the appointment form into some content or post or page, use the shortcode “[appointment-form]”. Just add the shortcode and it’s done.
- By uploading zip file directly from admin panel
- Purchase and download the plugin from our CodeCanyon page.
- Extract appointment-buddy.zip from the downloaded archive.
- Log in as admin to your WordPress website.
- In Plugins, click Add New and Upload. Select the appointment-buddy.zip file and click Install Now.
- In your WordPress dashboard > Installed Plugins, activate the Appointment Buddy WordPress Plugin.
- After successful installation, go to Appointment Buddy License.
License Verification
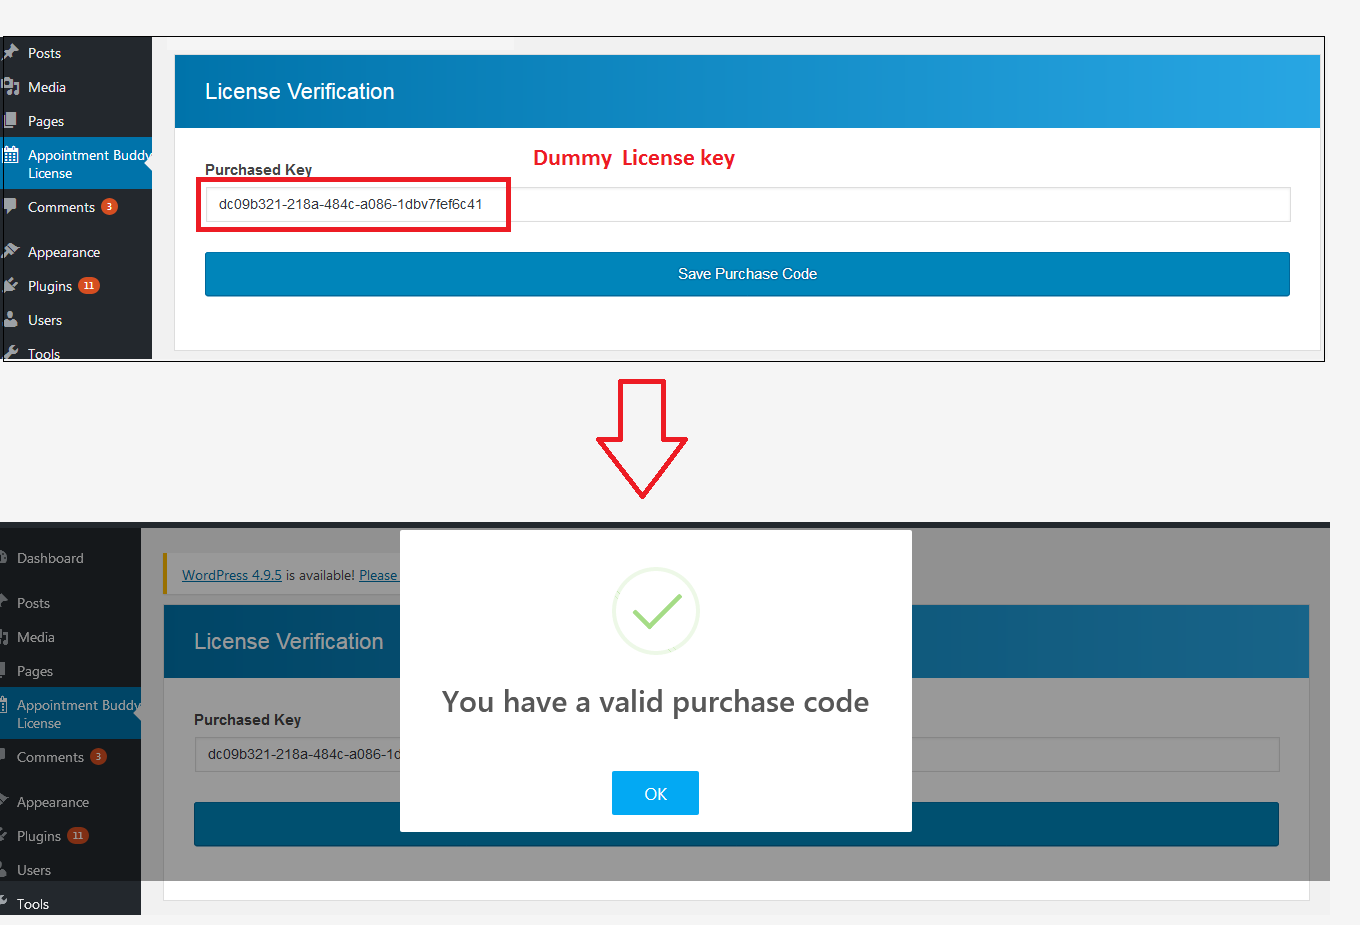
As you activate the Appointment Buddy Plugin, click on “Appointment Buddy License” menu. You will ask to enter License Purchase Code if you are activating the plugin for the first time. You need to enter your Purchase Code here to activate your copy of plugin in the below screen.
Image 1:
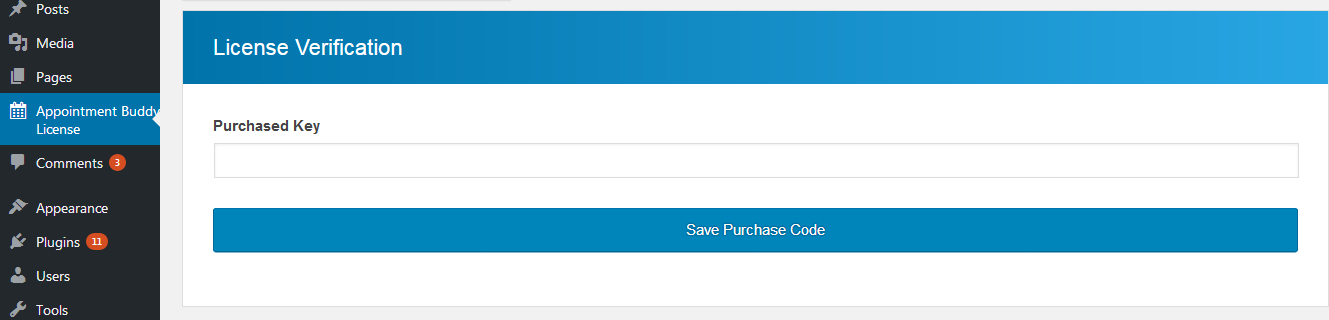
Image 2:
Core Features
- Simple, Easy and Efficient appointment booking engine
- Mobile friendly backend so manage your business from mobile
- Control almost everything with "Advance Configuration Options"
- Manage unlimited staff, services, time slots, etc.
- Setup Business Hours / Time Slots to suit your business
- Easy to install & integrate
- Create service, Setup service price
- Grow and manage your customers
- Easy Integration with PayPal & Stripe Payment System
- Offline Payment
- Complete customization to set up fees on basis of services and staff
- Appointments are visible in Calendar & List view
- Google calendar synchronization
- Instant Email Notifications
- Customize Notification
- Manage bookings according to staff's slots
- Book appointment with configured time slots
- Holiday management
- Export all data into CSV & PDF files
- Built-In email notifications for booked appointments
- Fast and friendly support
- Multilingual support
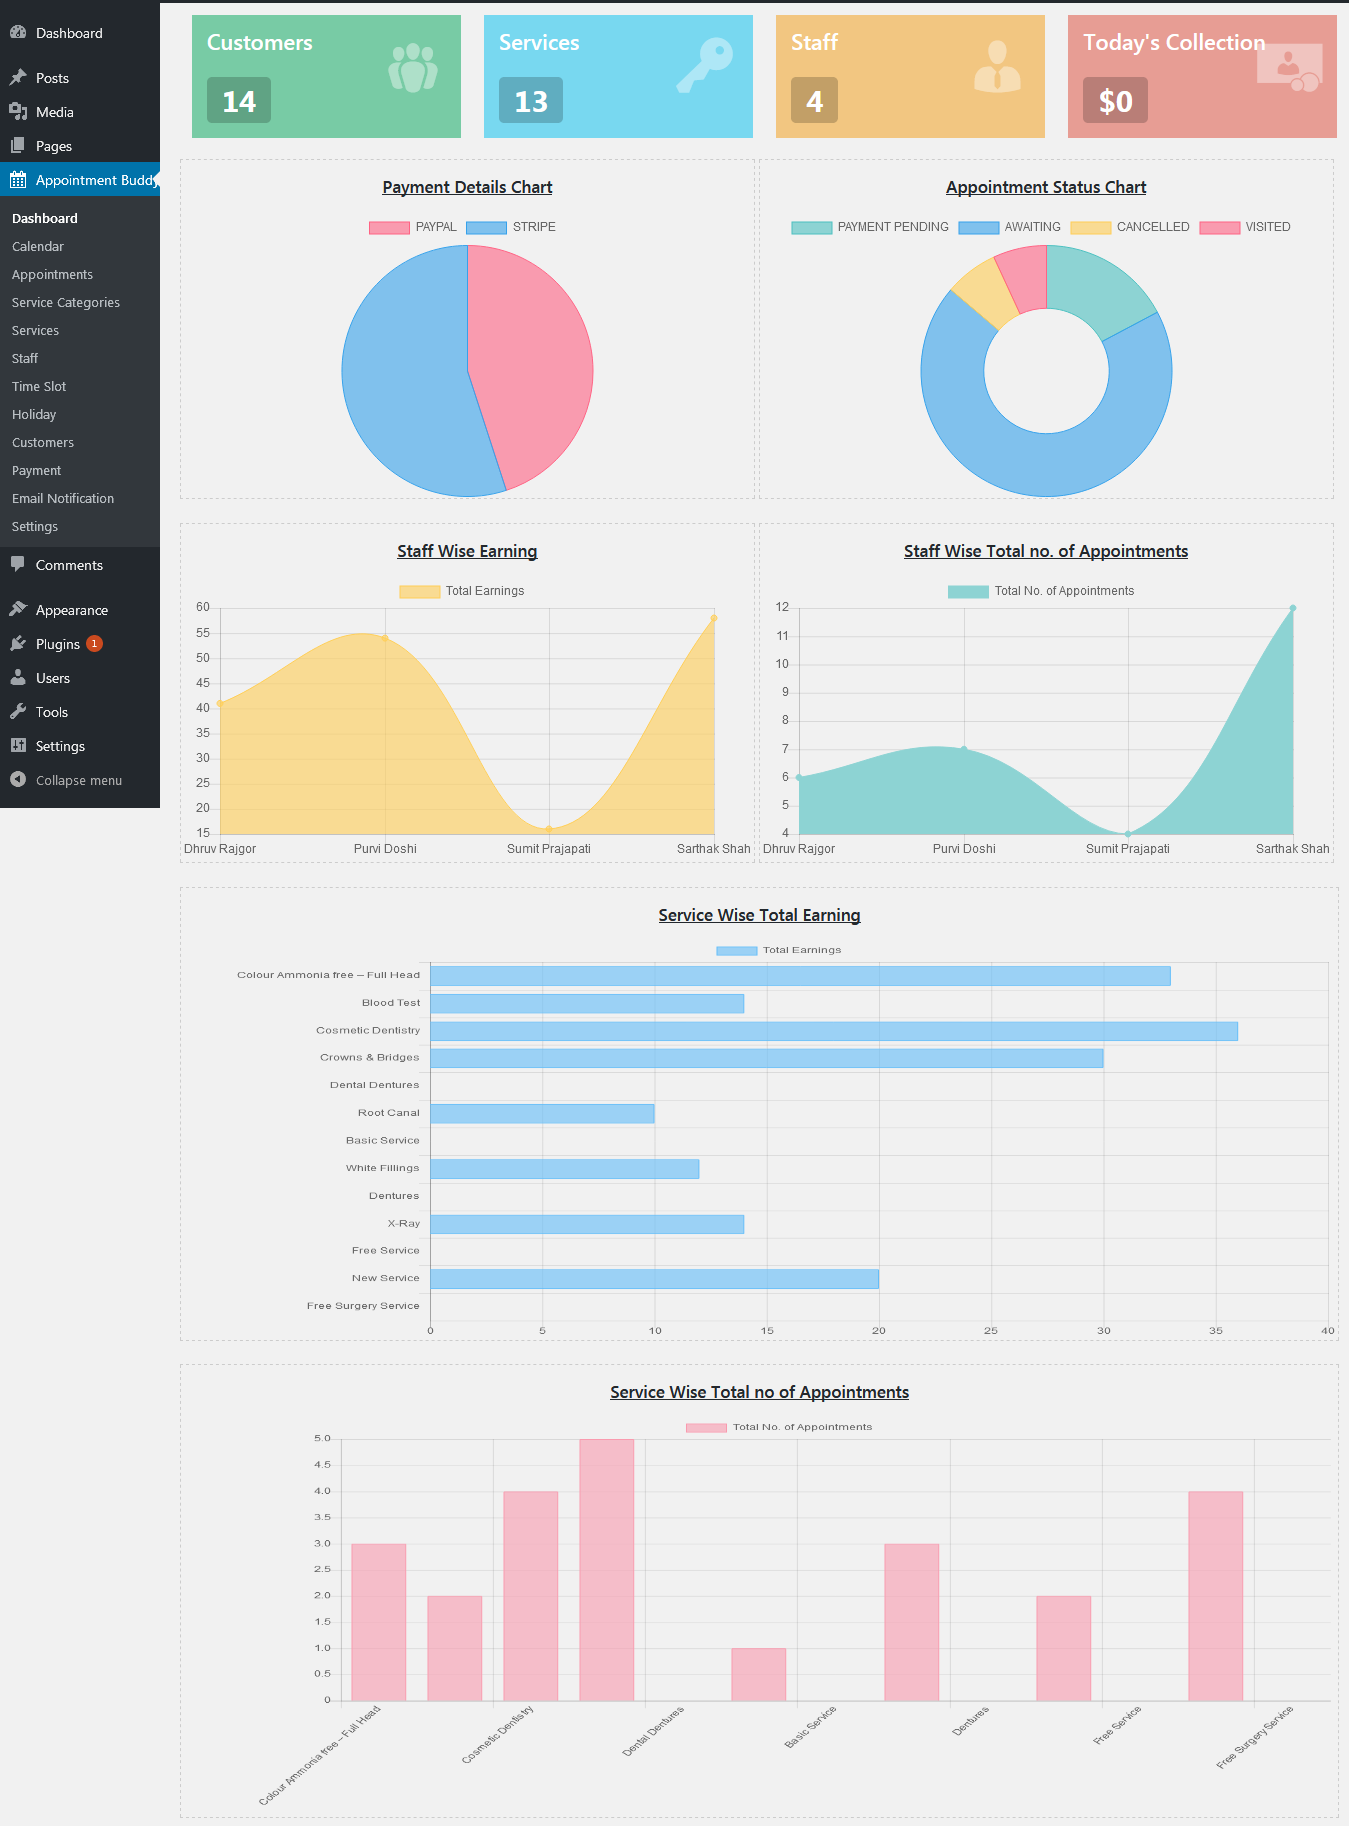
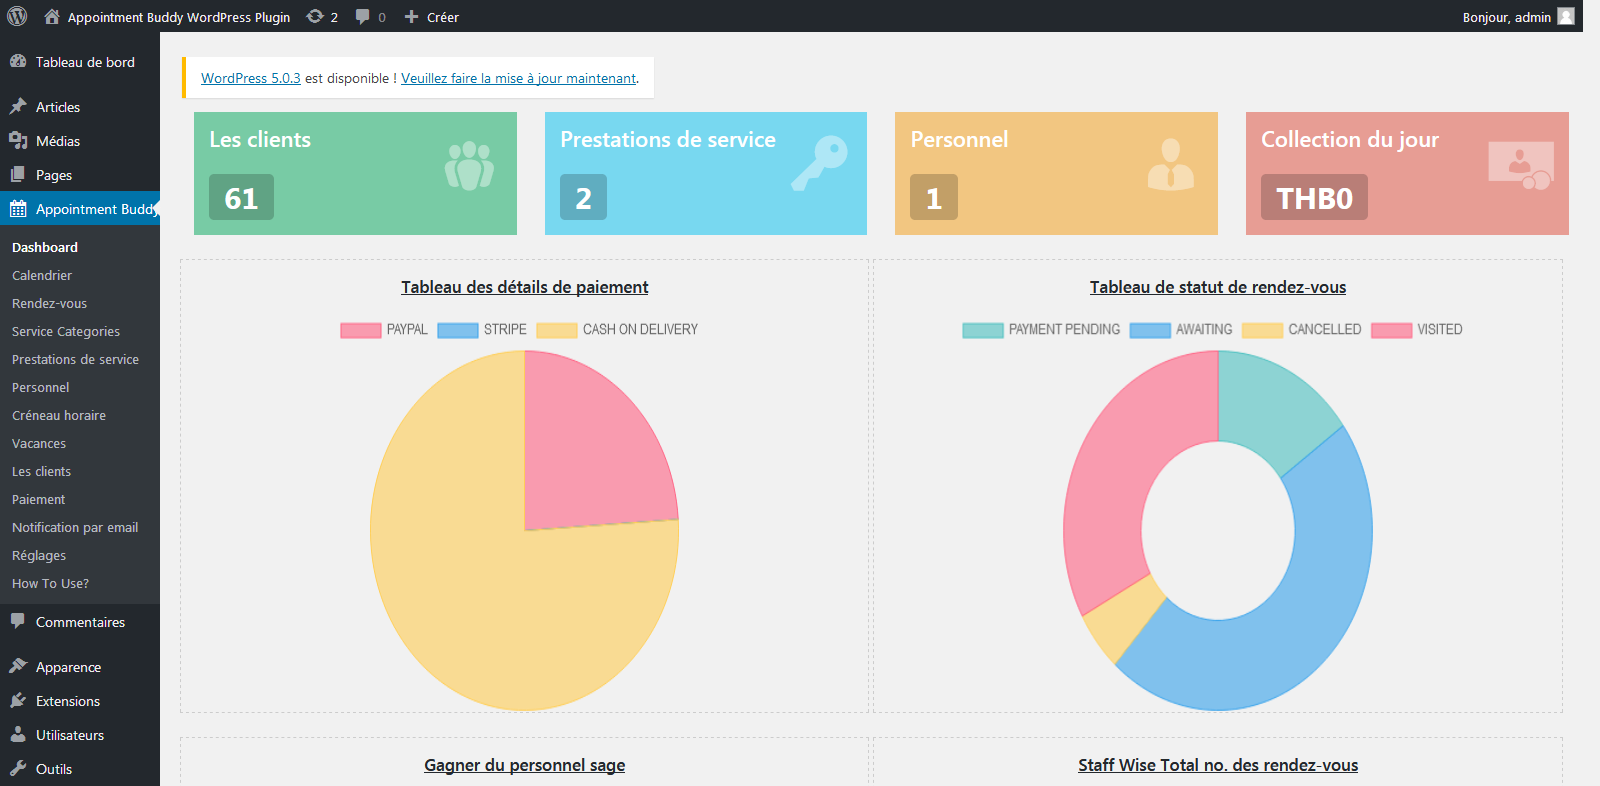
Dashboard
As you open Appointment Buddy Plugin, the first screen you will see is the dashboard. The dashboard provides a brief information about how you organization is performing. For example today’s total collections, no. of customers, staff wise / service wise earning and many more… From dashboard you can judge & major decisions for your organization.
Calendar
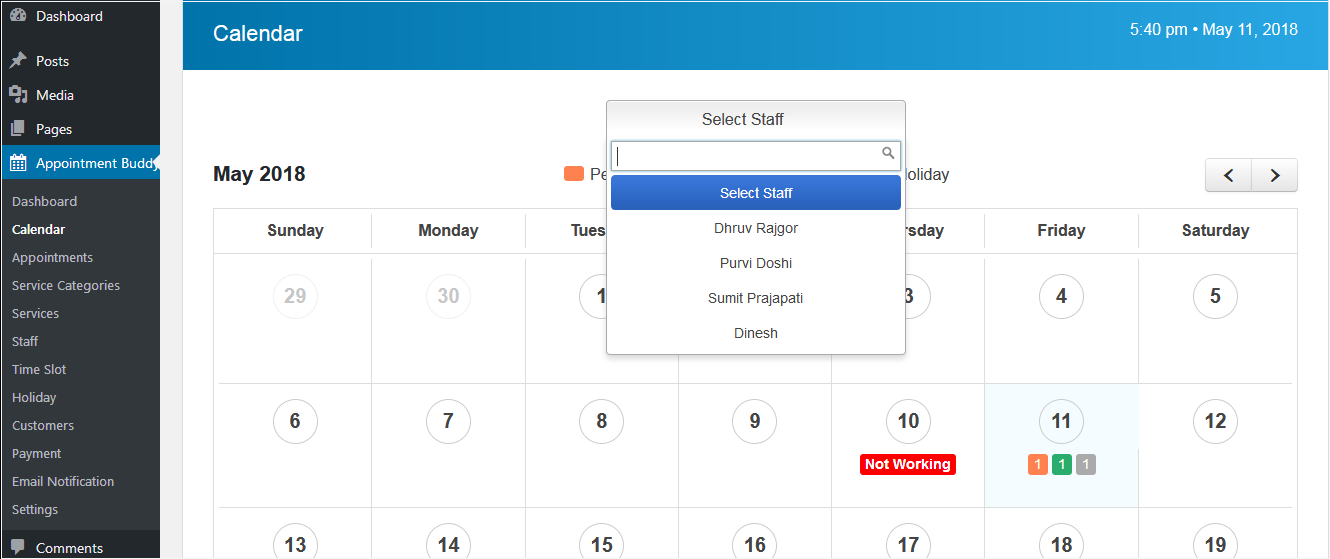
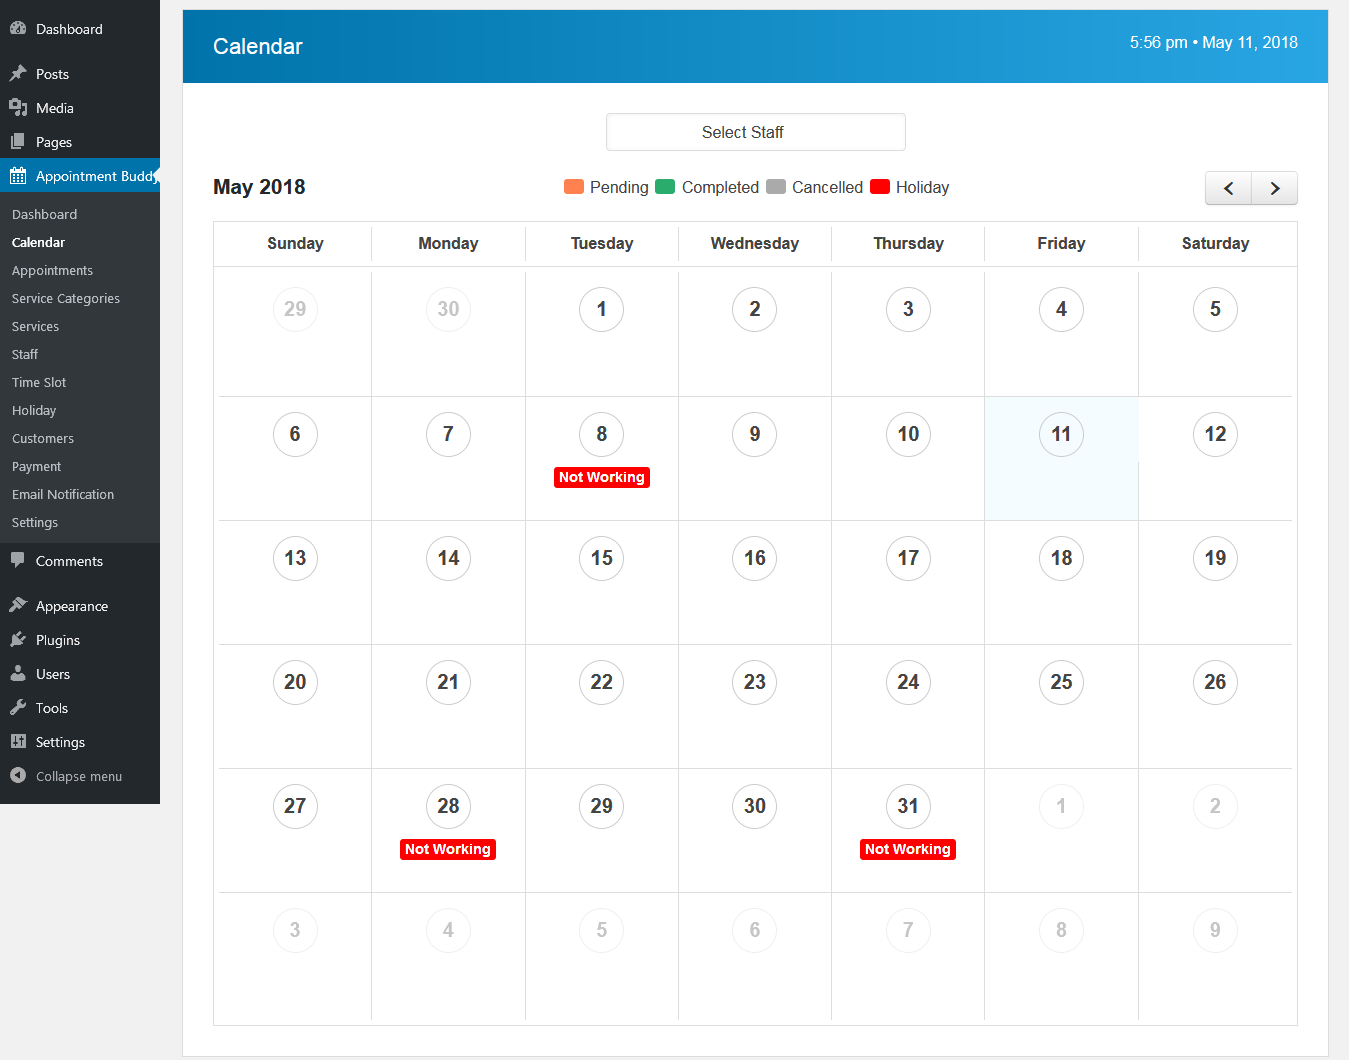
In Calendar Menu, you can see the calendar in month view. All the appointments will be visible on calendar. For administrator, he/she will be viewing all the appointments booked in the system. For staff, he/she will be viewing particular his/her appointments booked. Calendar includes holidays, pending appointments, visited/completed appointments, cancelled appointments. Legends will describe the classification of appointments shown in calendar.
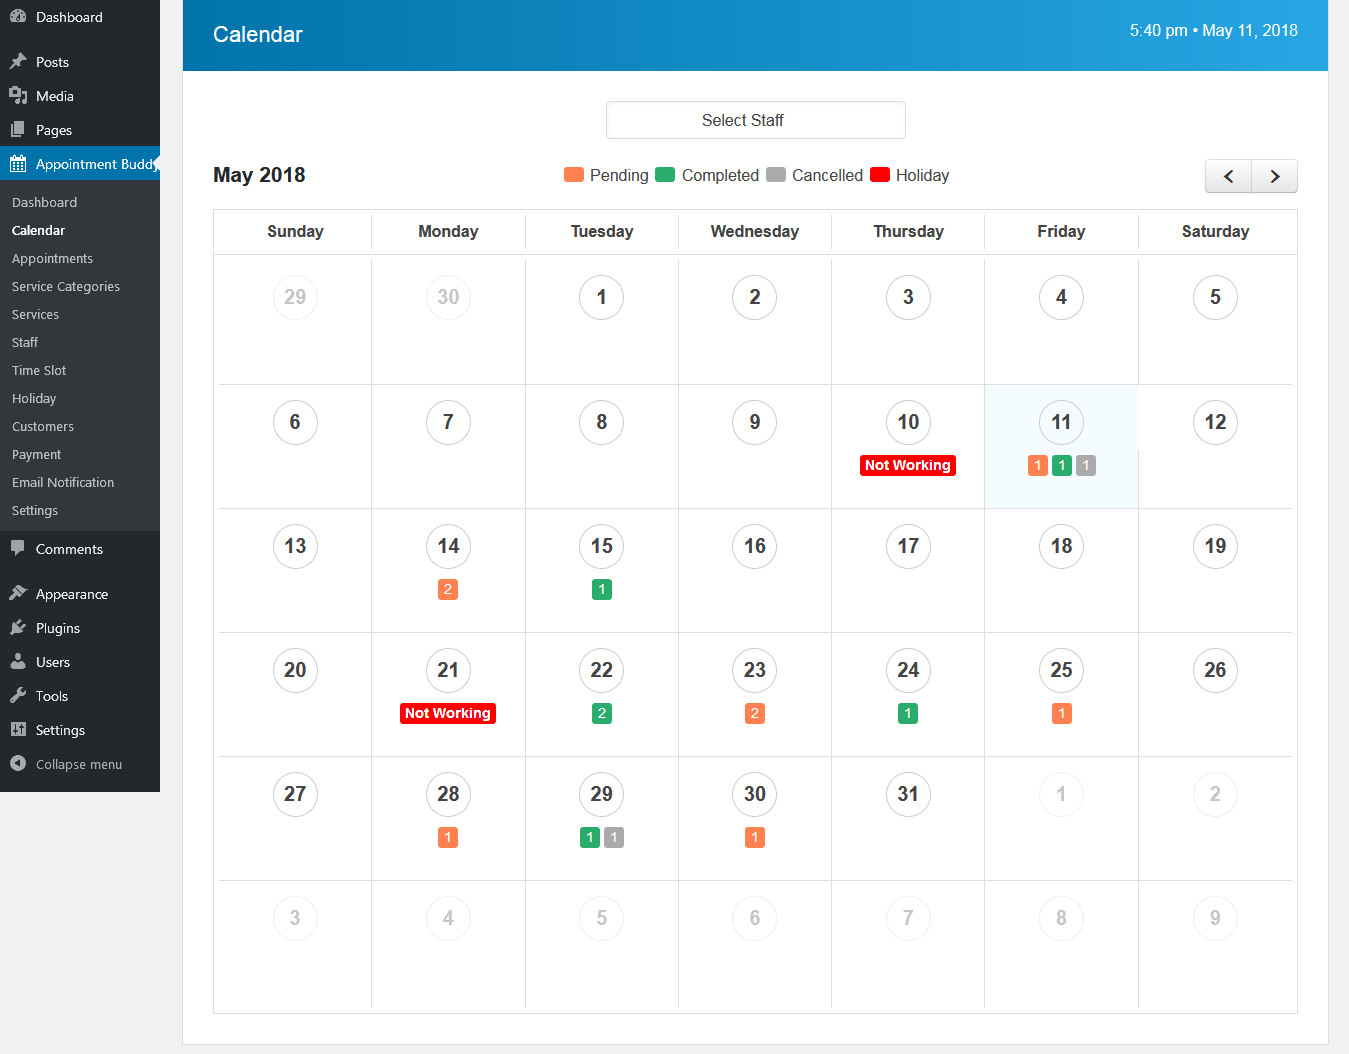
You can see a red box with title “Not Working” will be visible in calendar. These red boxes are the holidays added by you in system of your organizations. Appointment Buddy plugin will not allow booking an appointment on a holiday date.
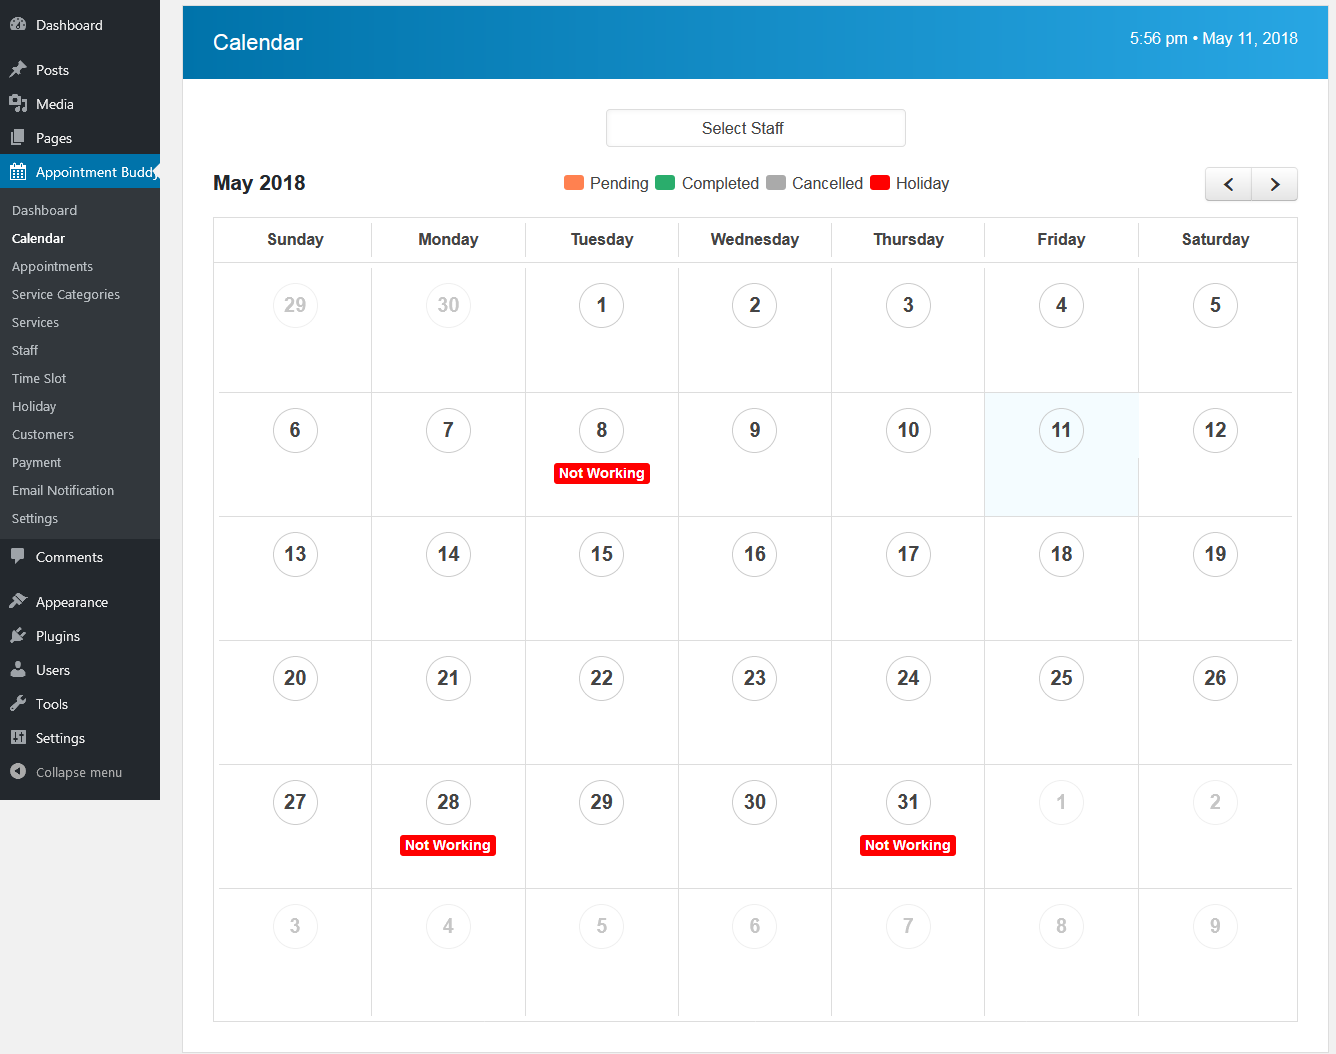
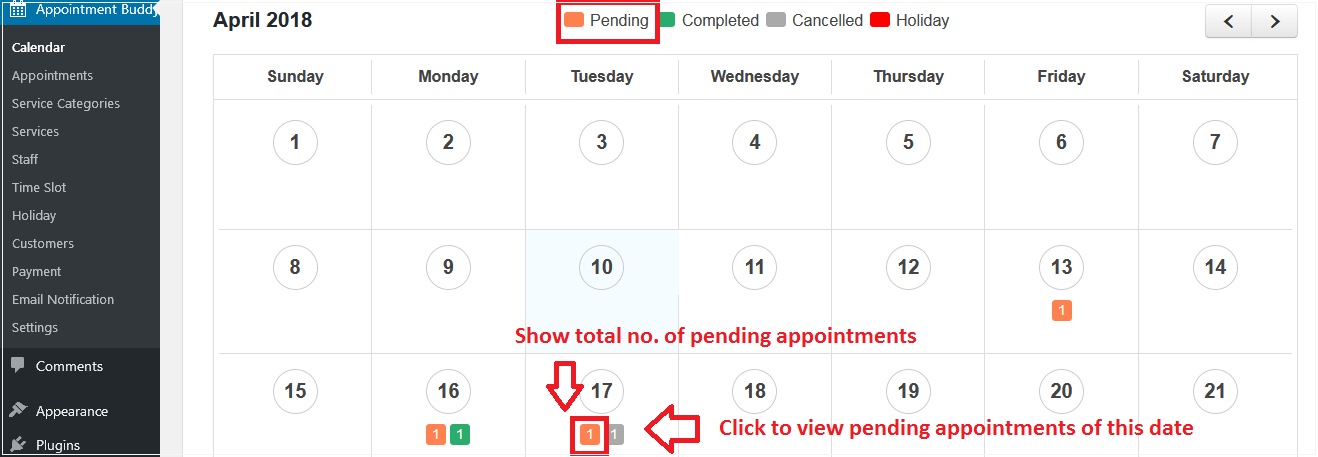
Pending appointment will be visible in orange box with the count of appointments.
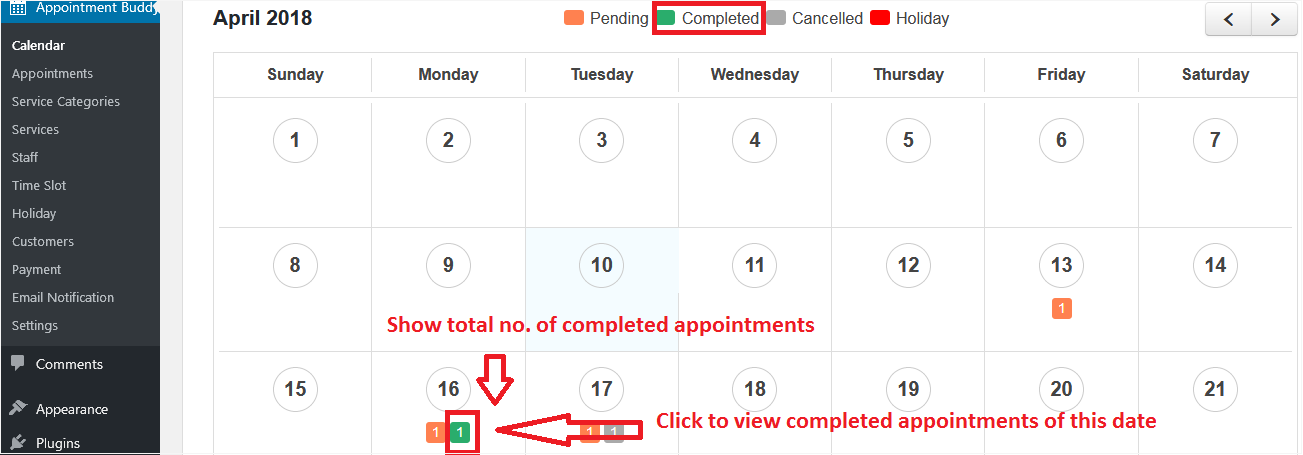
Similarly, Visited/Completed appointments will be visible in green box with the count of appointments.
Similarly, Cancelled appointments will be visible in gray box with the count of appointments.
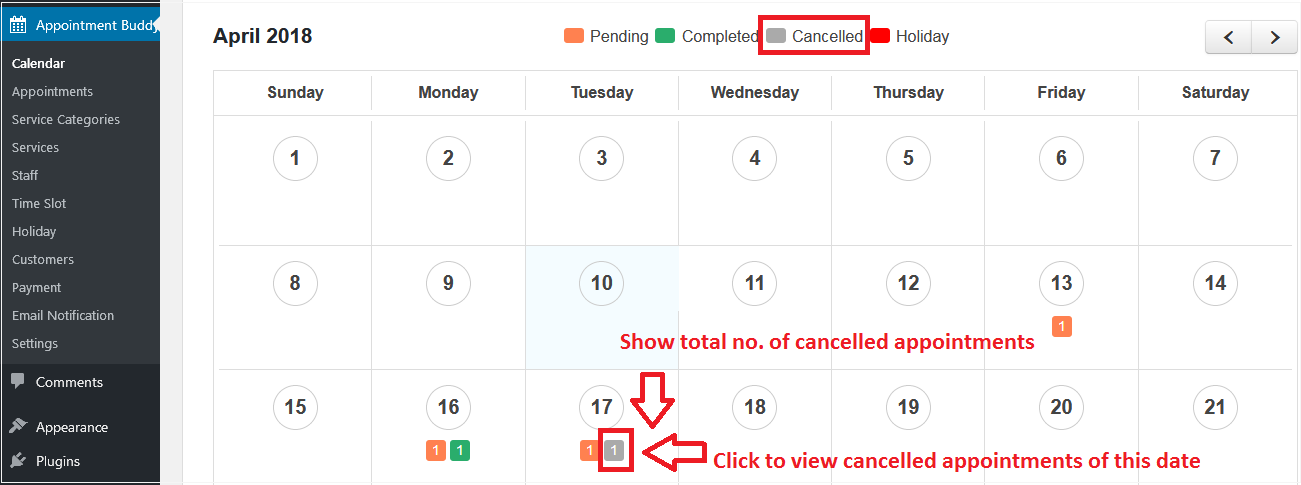
As you click on particular colored box, you will be redirected to the page of its appointment list. For example, as you click on orange box, it will redirect you to the appointment list of pending appointments of particular date.
A staff drop-down is given to administrator if he/she wants to view particular staff appointments in calendar.
Appointment
In Appointment Menu, you will see a list of appointment which includes, pending/awaiting appointments, visited appointments, cancelled appointments and appointments whose payment is still in process.
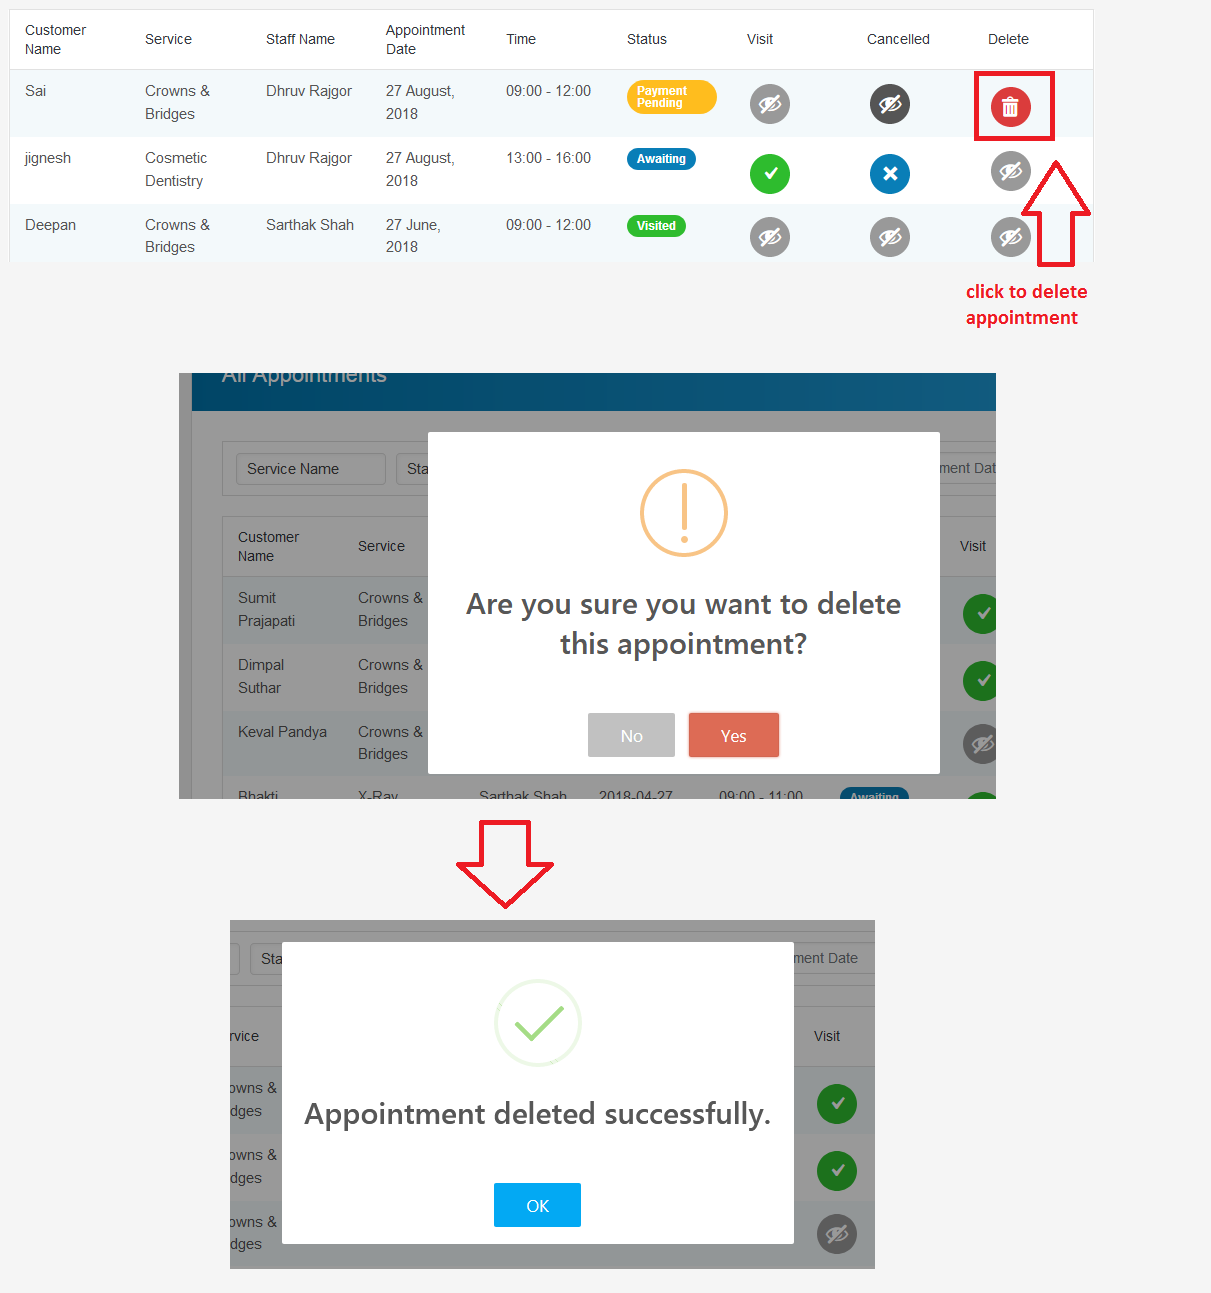
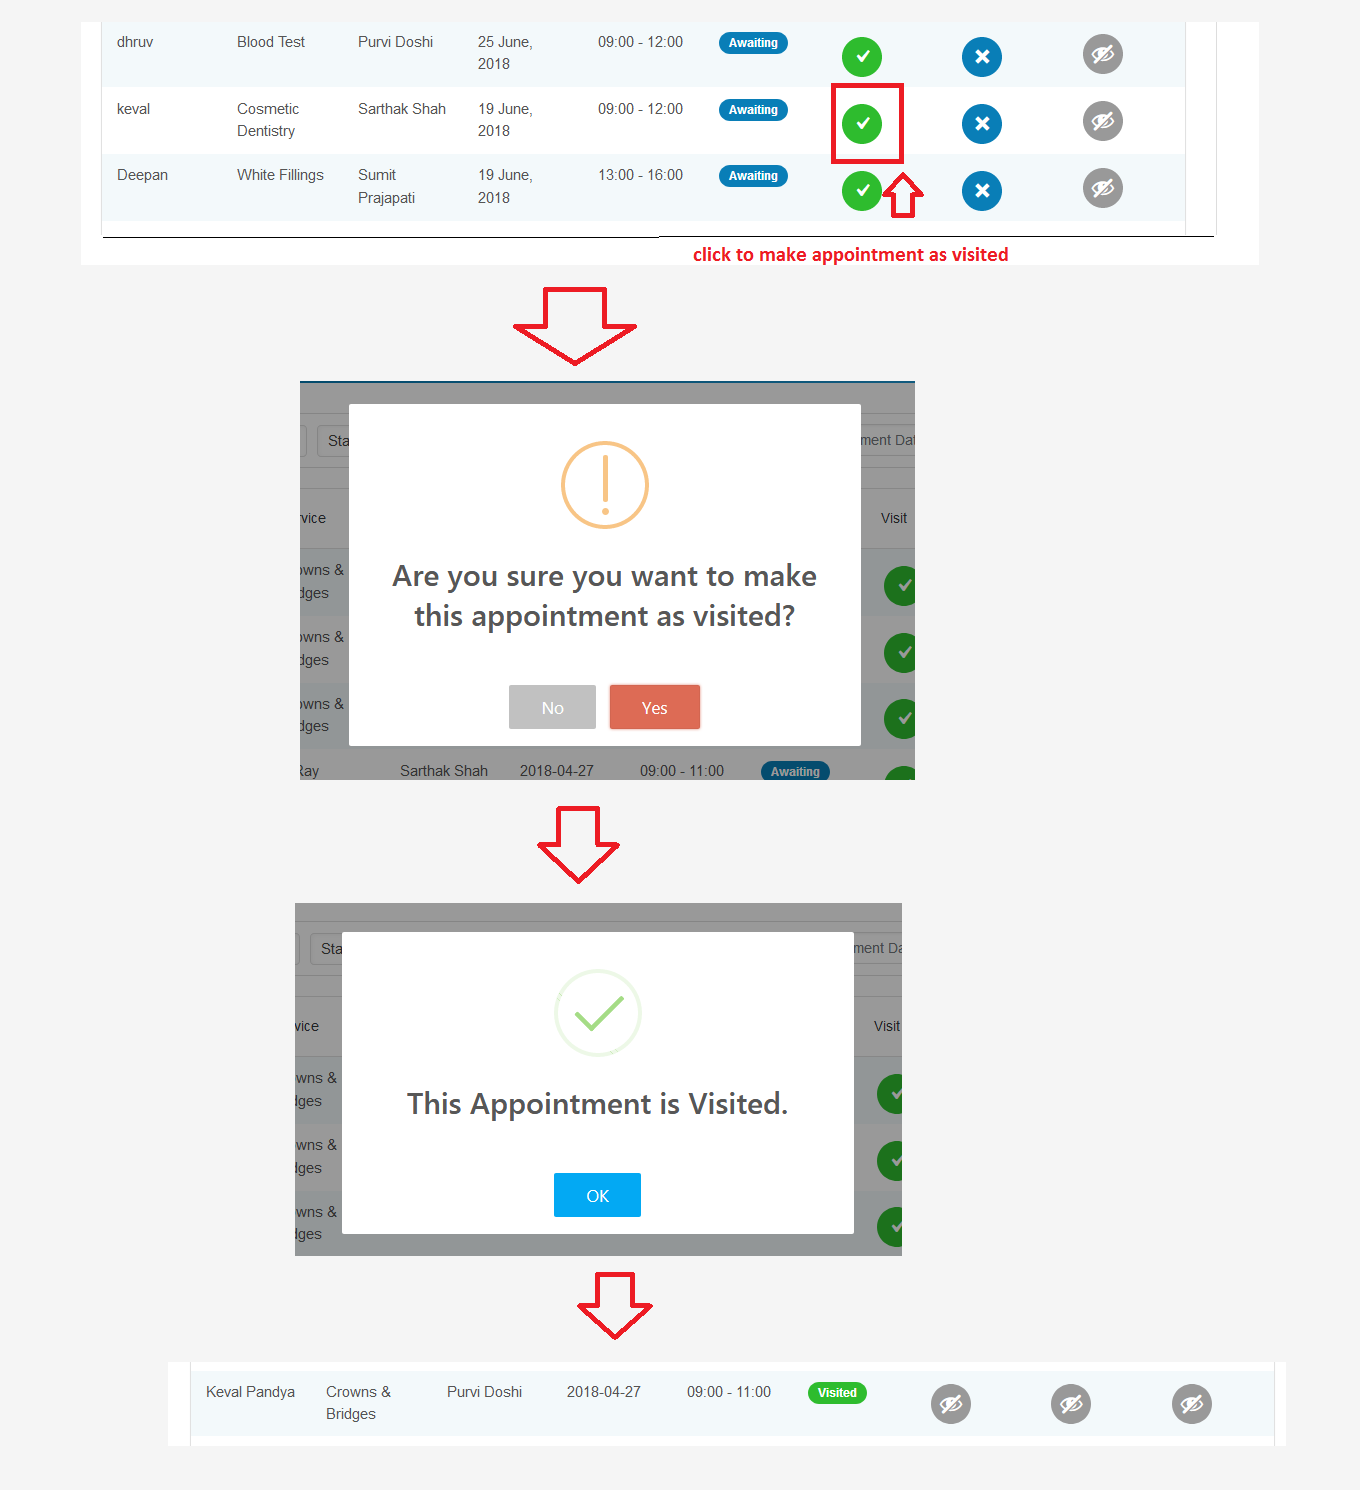
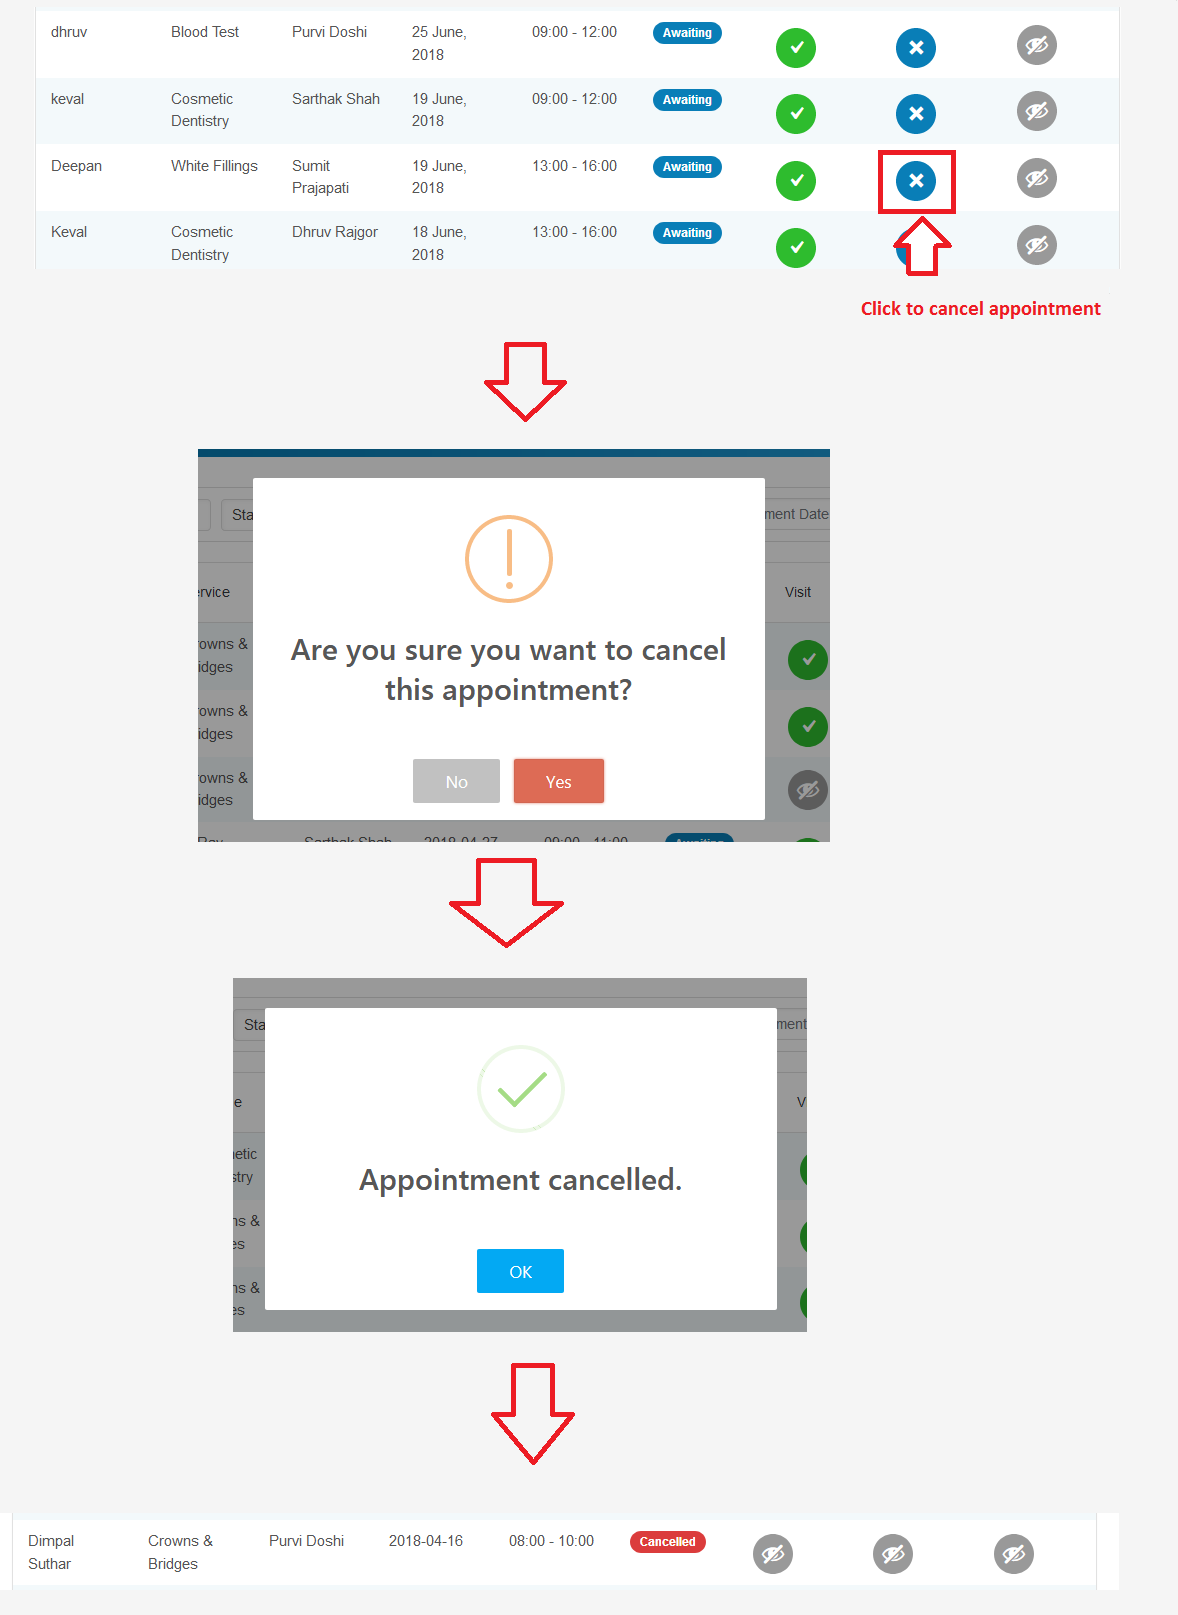
In the list itself, you can mark an appointment as visited / cancelled. You can also delete appointments whose payment is still not done.
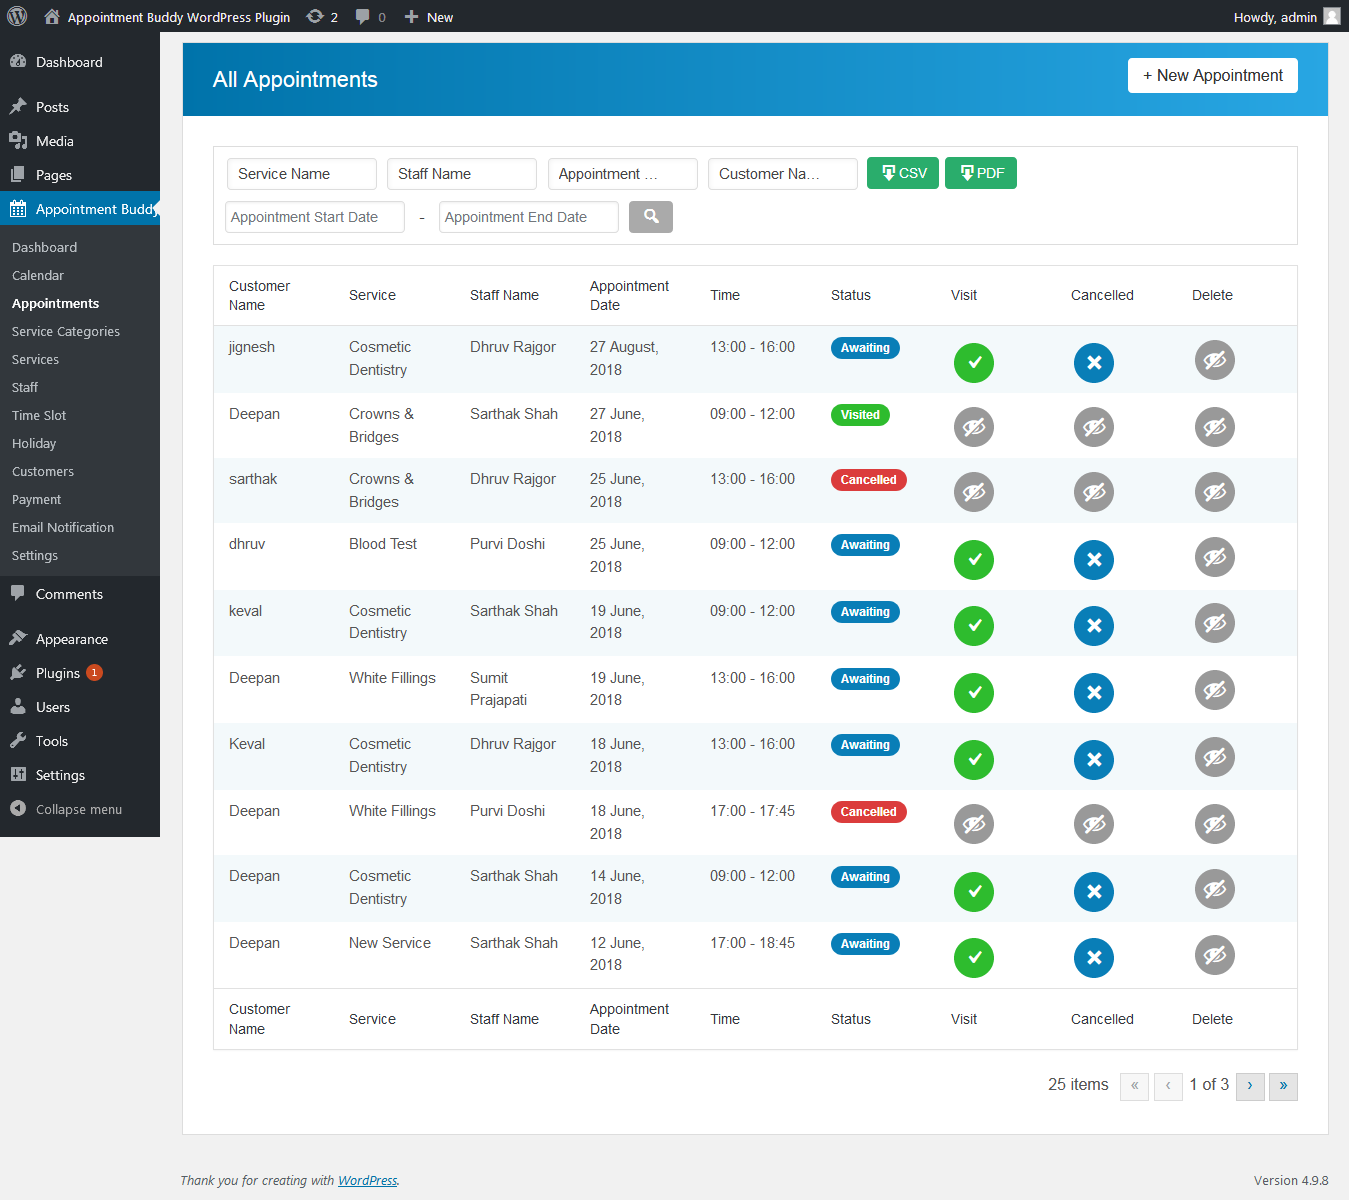
You can also download appointment list in CSV or PDF format.

Book An Appopintment Locally
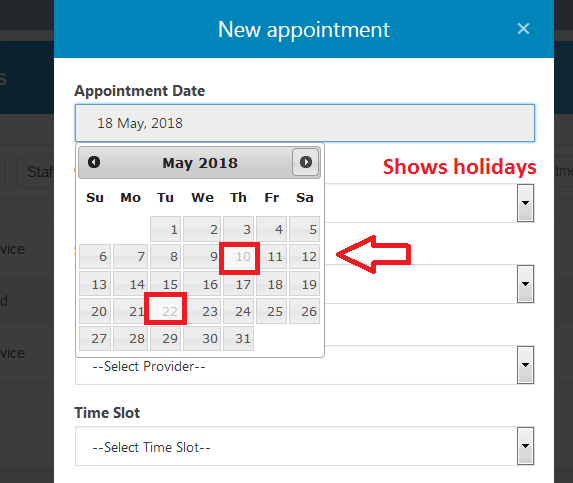
On important point in this process is that, if you have added holidays, they will be visible on your appointment calendar. You will not be able to book appointment on this particular date. You can see as per below image.
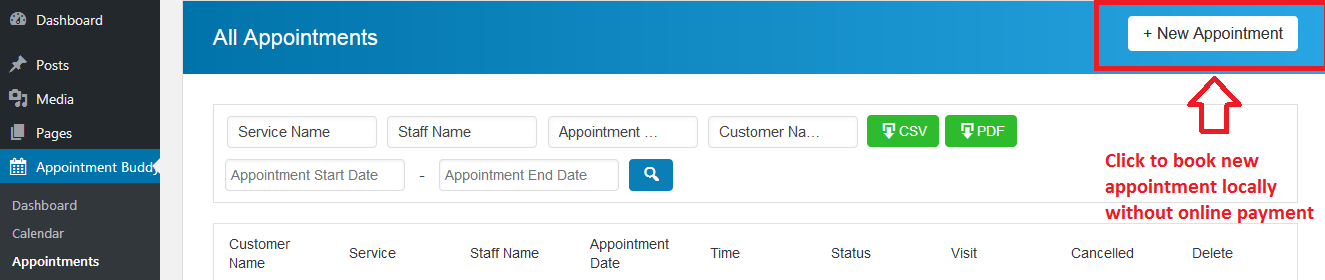
- Appointment Buddy plugin provides functionality to book an appointment offline for walk in customers/telephonic booking through authenticated users with “New Appointment”.
- Customer will make payment at the time of visit.
- Appointment form will open as per below image.
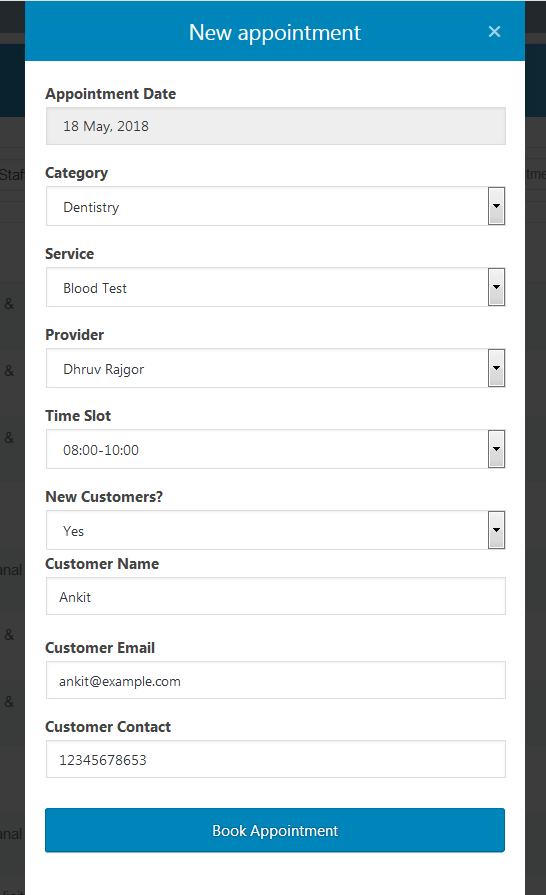
- It is easy to book an appointment for existing customers as you just need to select the customer from list. We strictly avoid entering same data again and again.

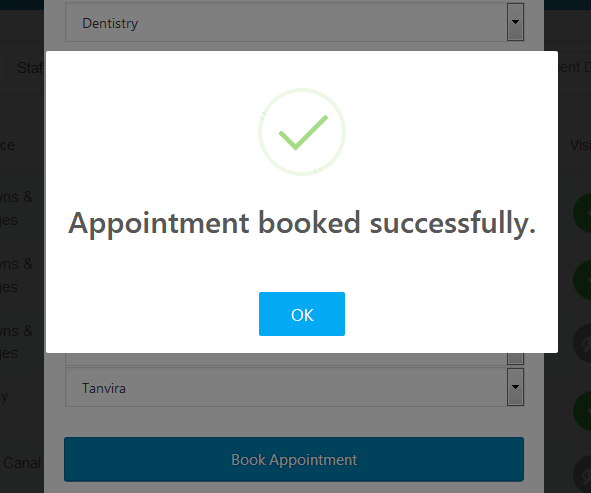
- As you click on "Book Appointment", your appointment will get booked and your will receive a confirmation message.
Let's understand about different status of an appointment.
- Payment Pending Appointments
- If payment process of appointment is unsuccessful then appointment will book with status as “Payment Pending”. These are the only appointments which you will be able to delete.
- Awaiting Appointments
- These appointments are booked successfully with payment but customer is has not visited your place. You can mark this appointment as "Visited" or "Cancelled" or "No Show".
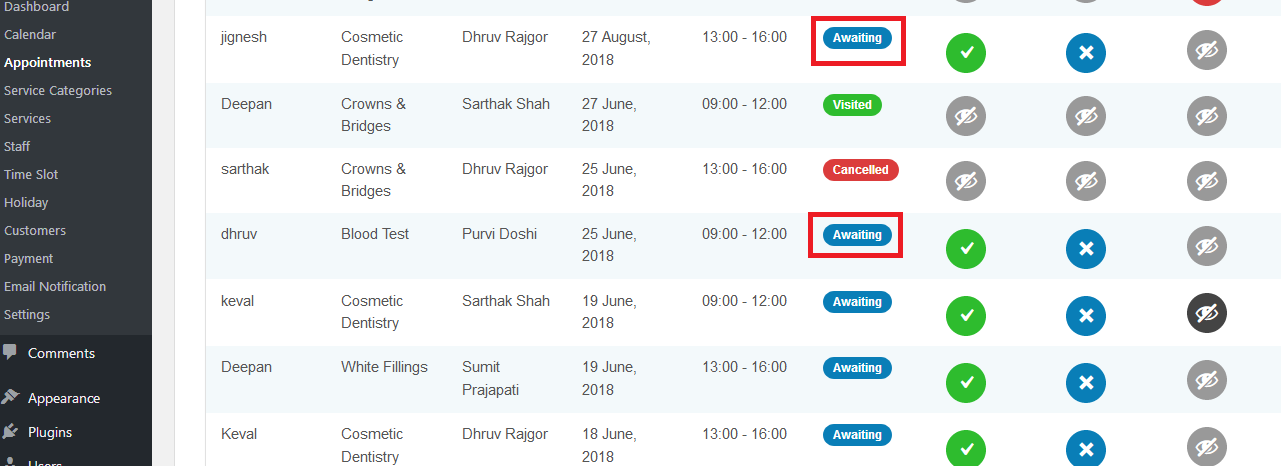
- Visited Appointments
- These are the successful appointments which are marked as "Visited"
- Cancelled Appointments
- These are the appointment which cannot complete successfully for some reason like customer cannot come to place for visit but payment process is successfull.
- Note: Money will not be refunded to customer's account.
Service Category
In “Service Category” menu, you can manage new category for services. Here you can manage unlimited service categories.
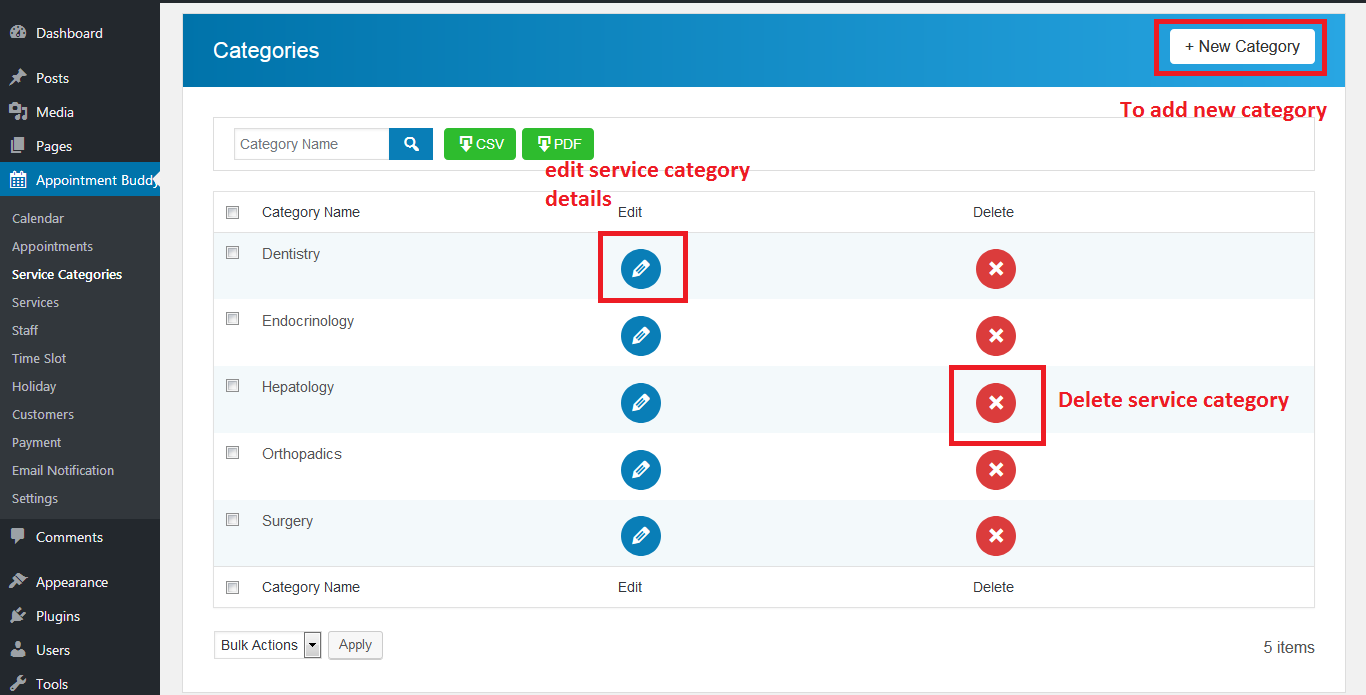
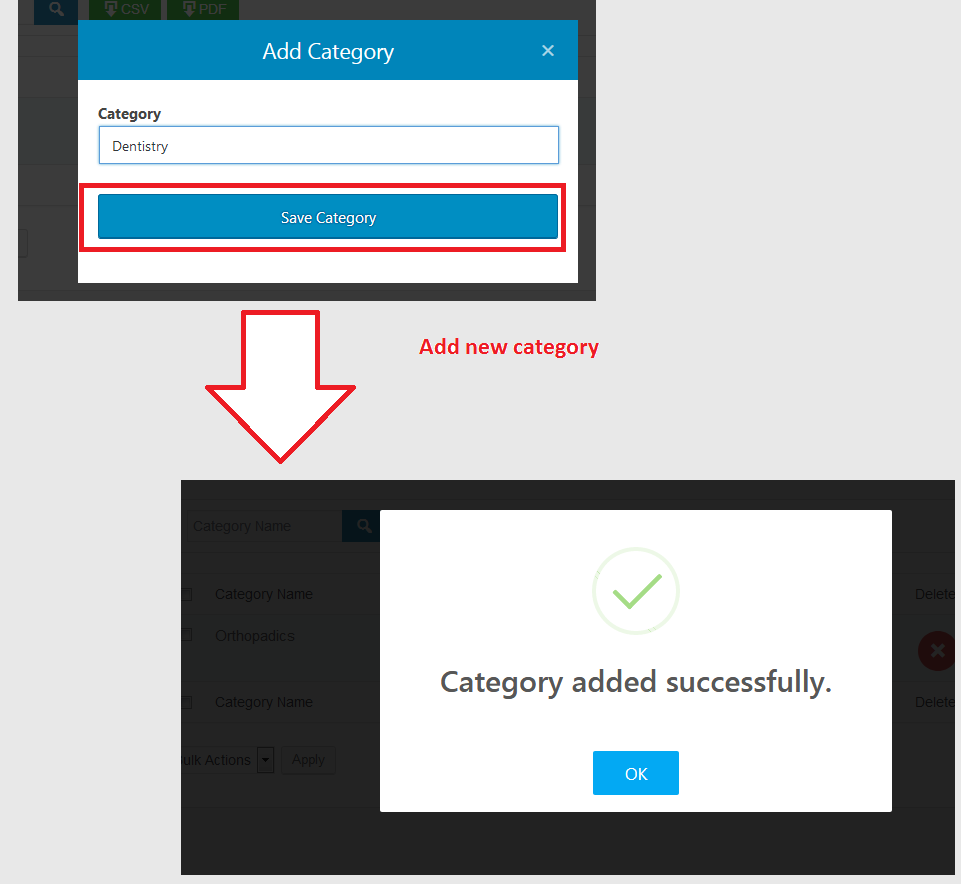
Add New Category
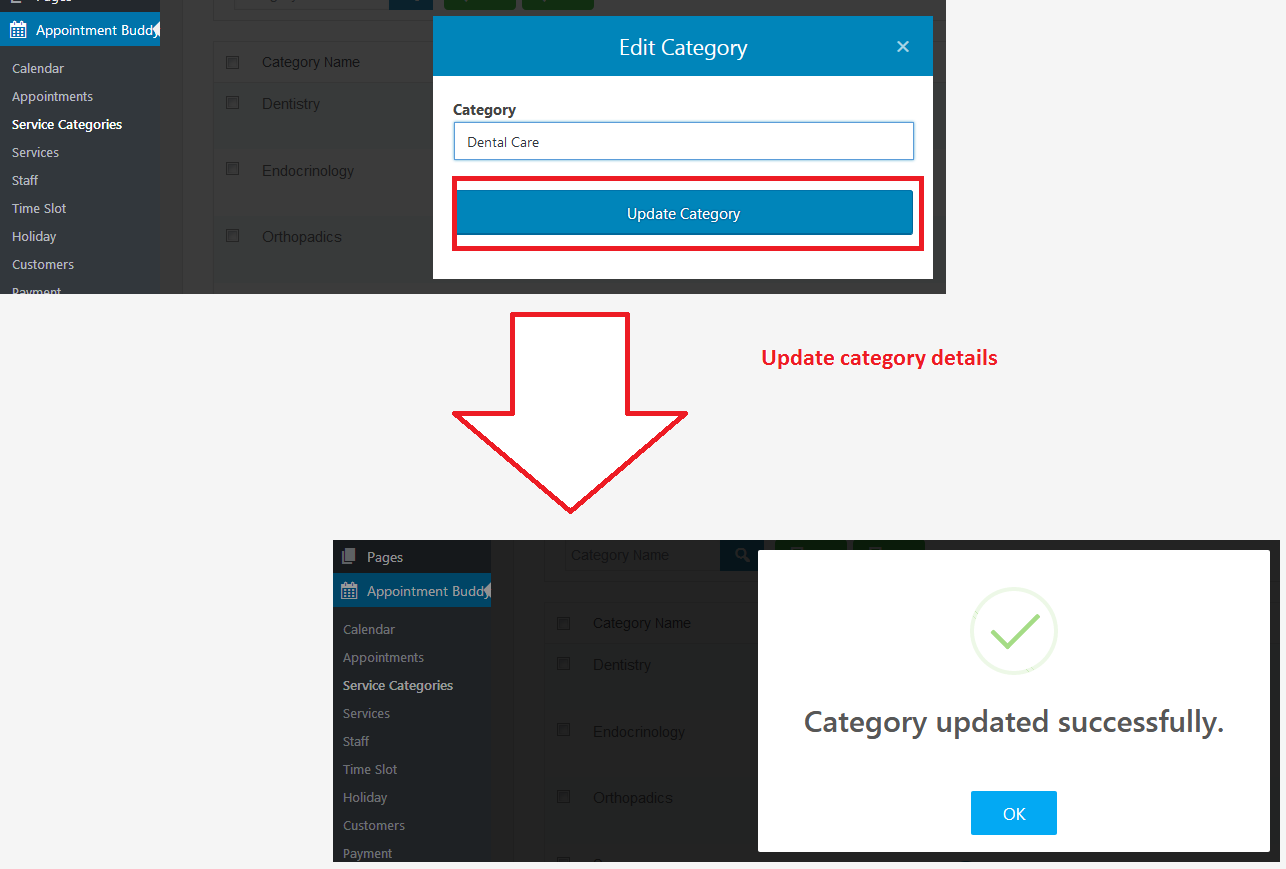
Edit Category
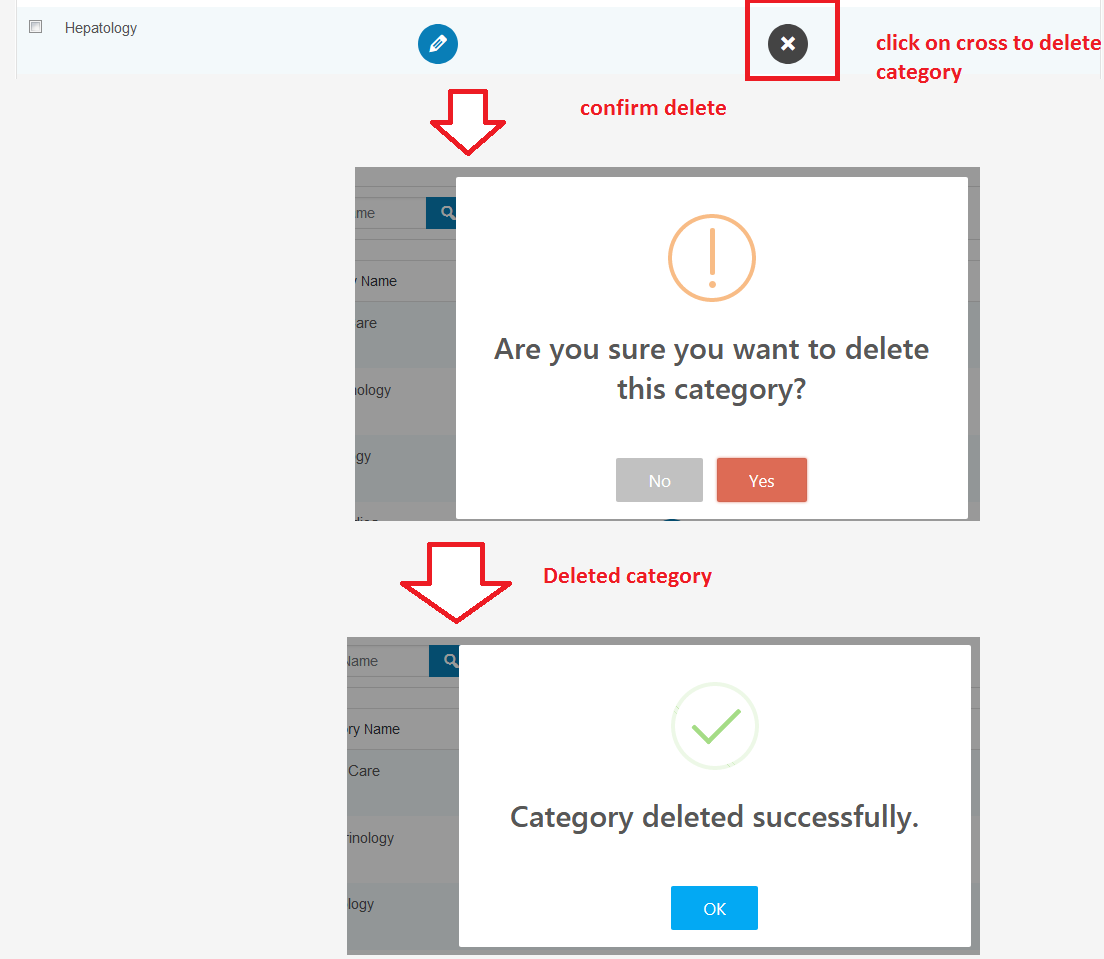
Delete Category
Service
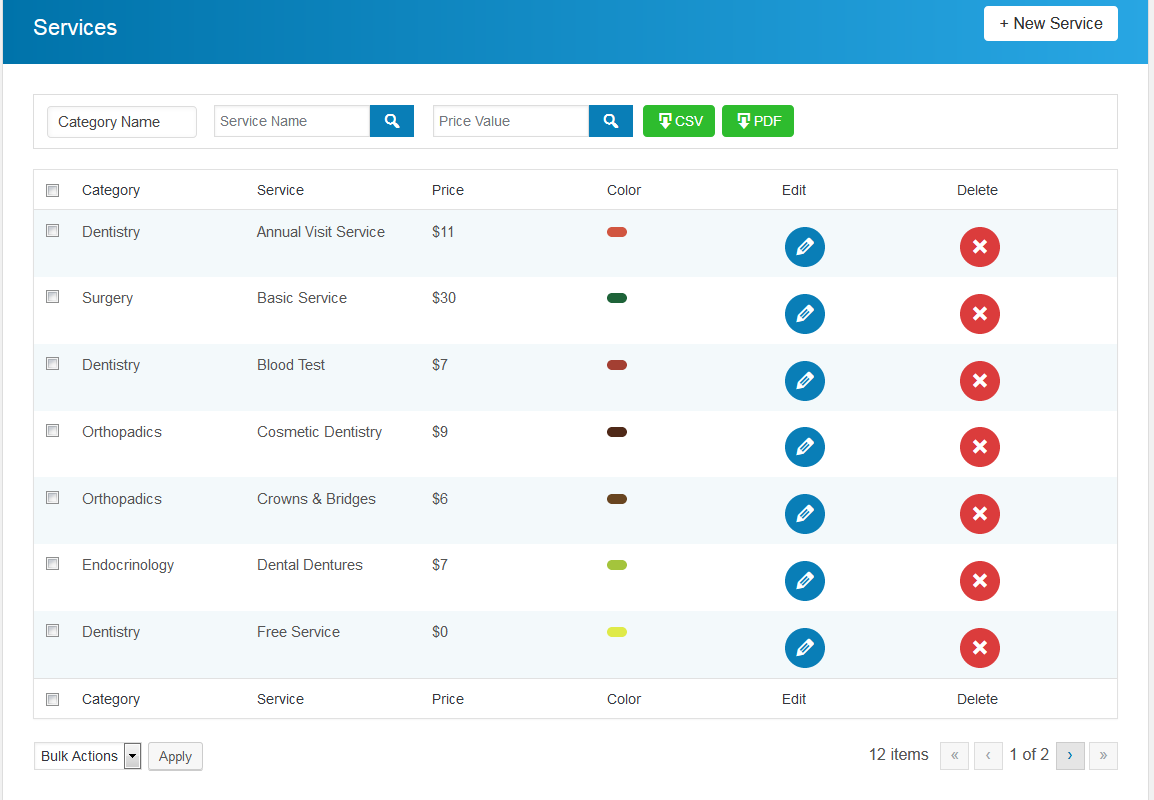
In “Service” menu, you will be able to manage unlimited services provided by your organization to customer. These services will be visible in the appointment form on front end side of your website.
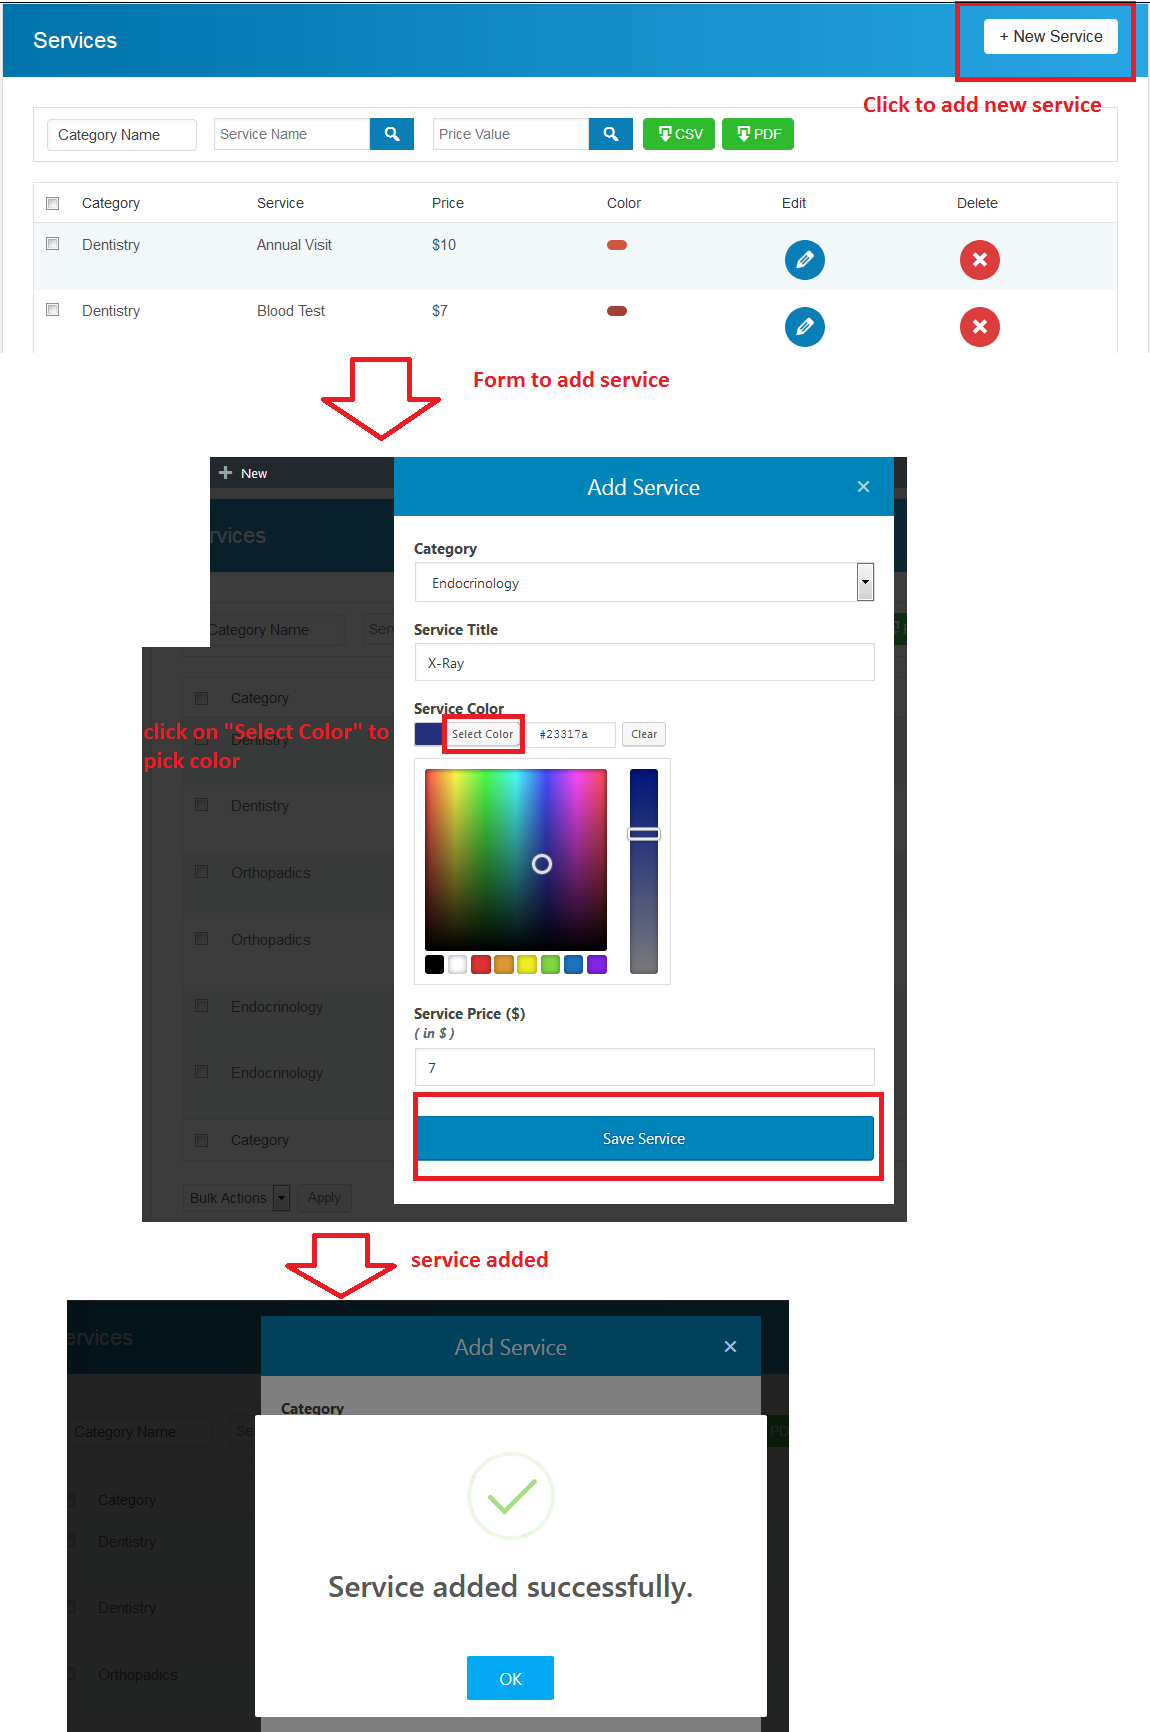
Add New Service
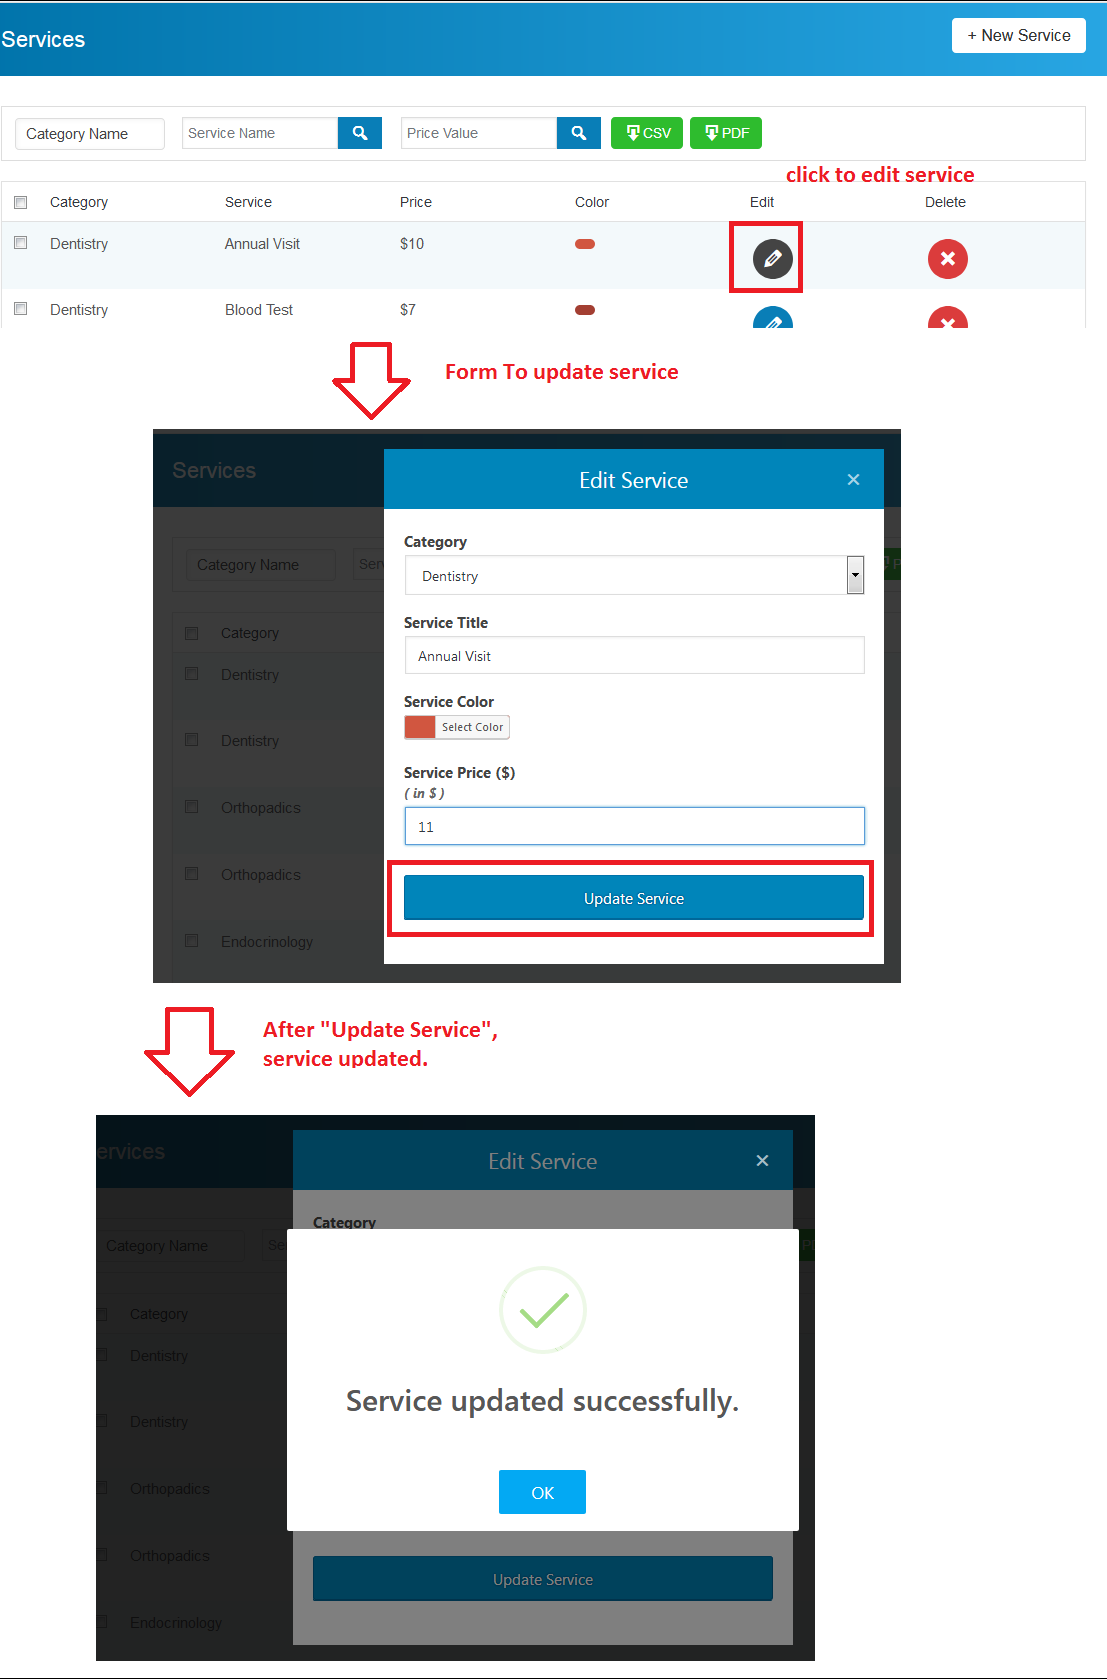
Edit Service
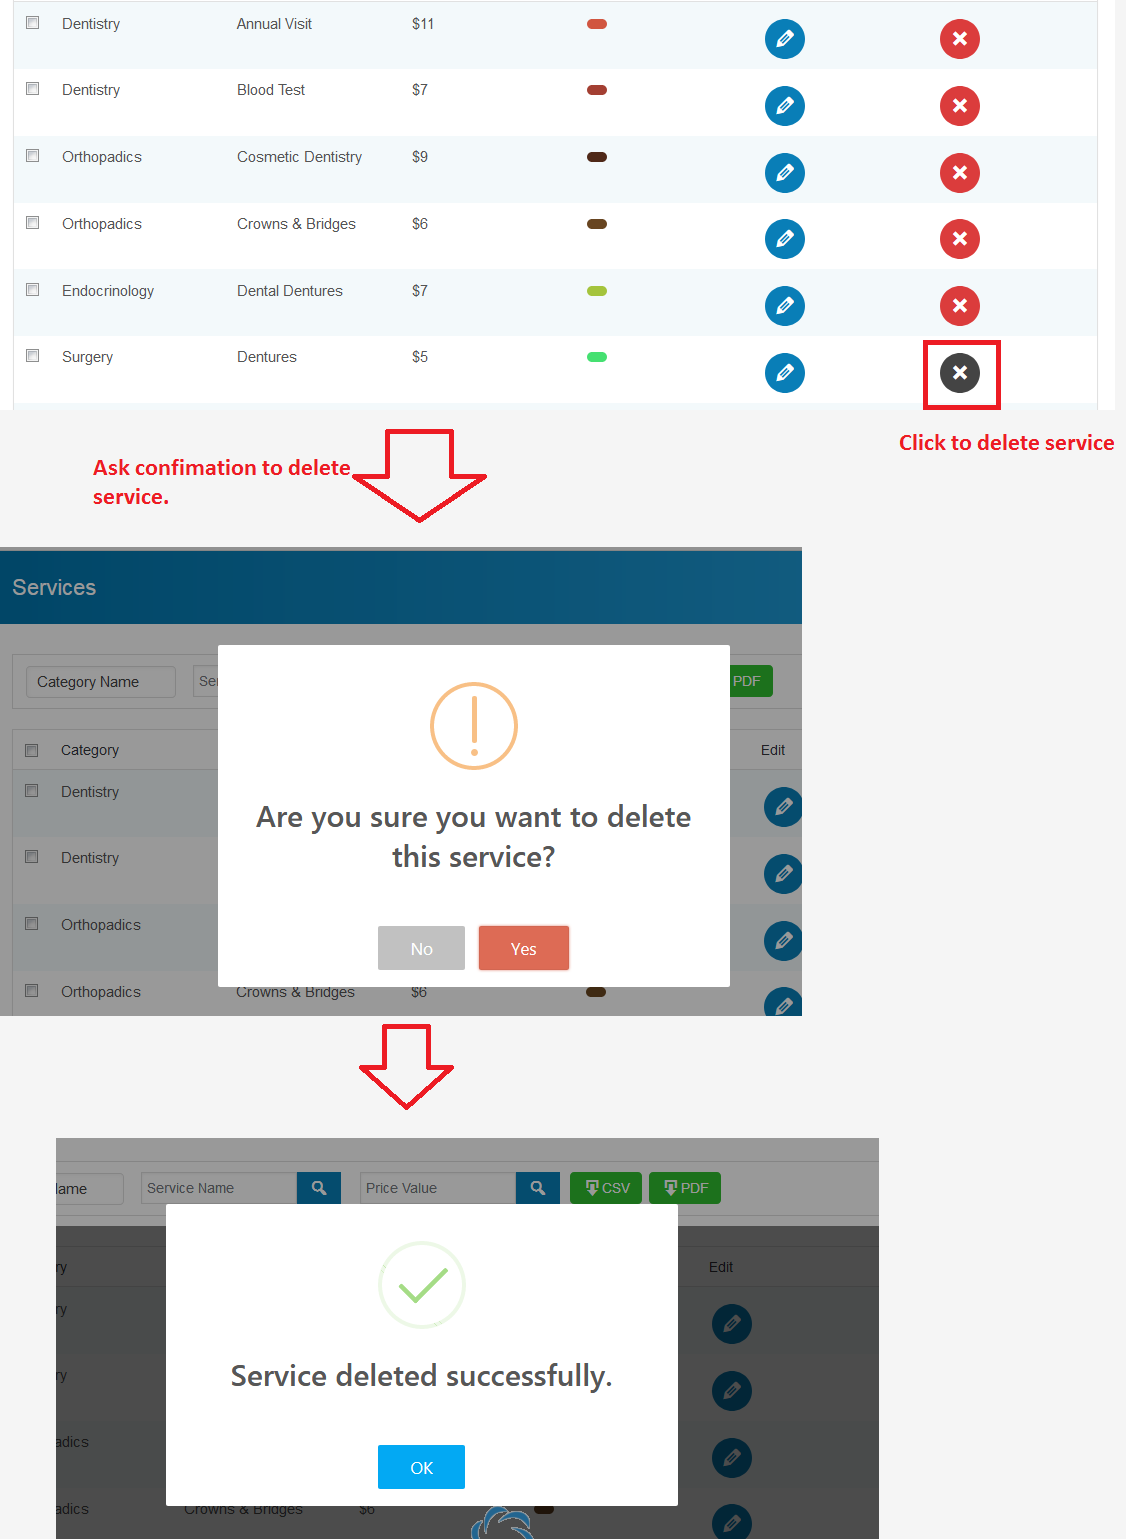
Delete Service
Time Slot
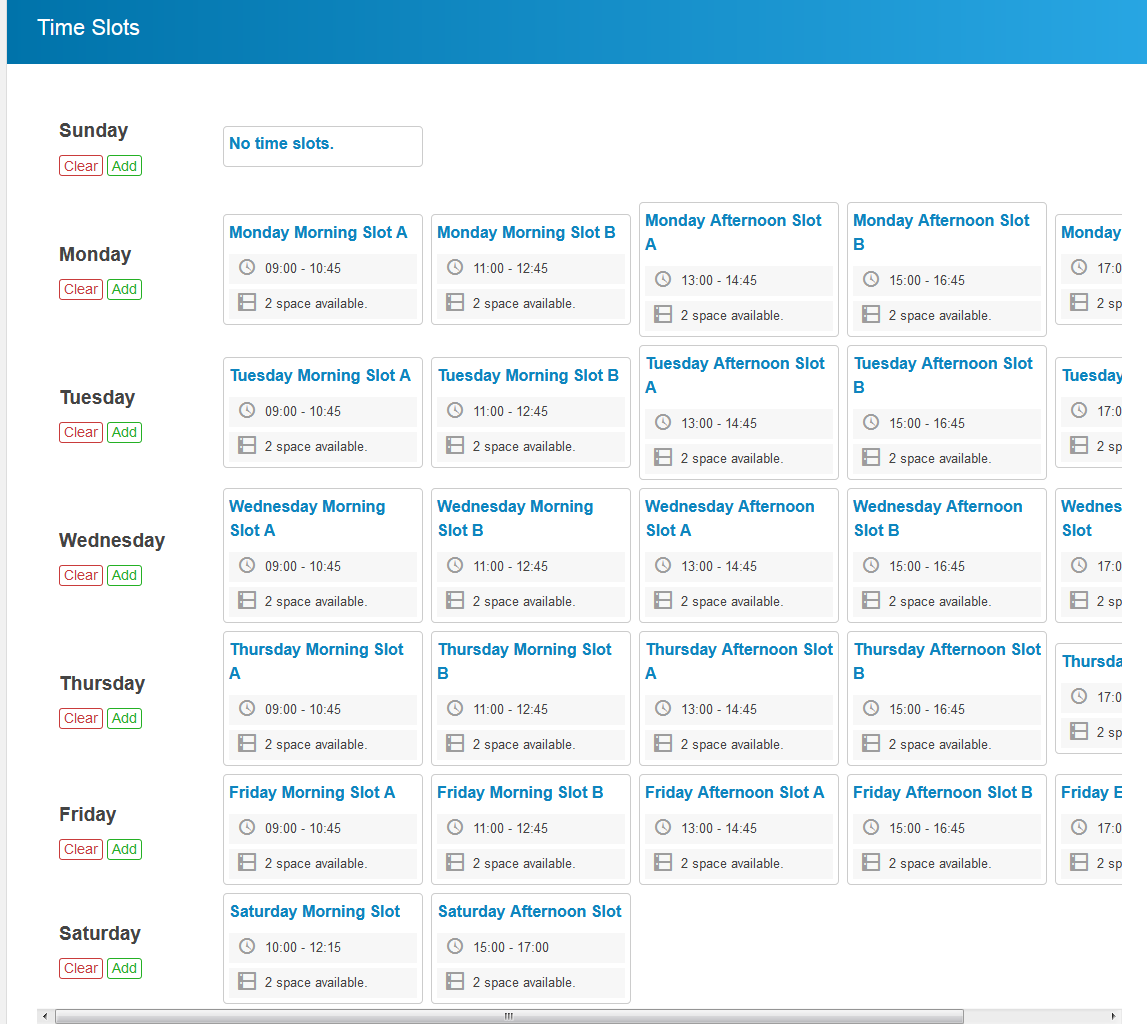
Appointment Buddy plugin provides functionality to create unlimited time slots per weekday (like Sunday, Monday, etc.) as per your choice. These slots will be visible on appointment form according to date selected in form. It allows you to add maximum no. of appointment can be booked in one slot. As soon as the slot reaches its max limit to book appointment in particular slot, it won’t be visible in the slot list. You need to add start time and end time of slot with maximum no. of appointments to be booked in particular slot. You can manage unlimited time slots.
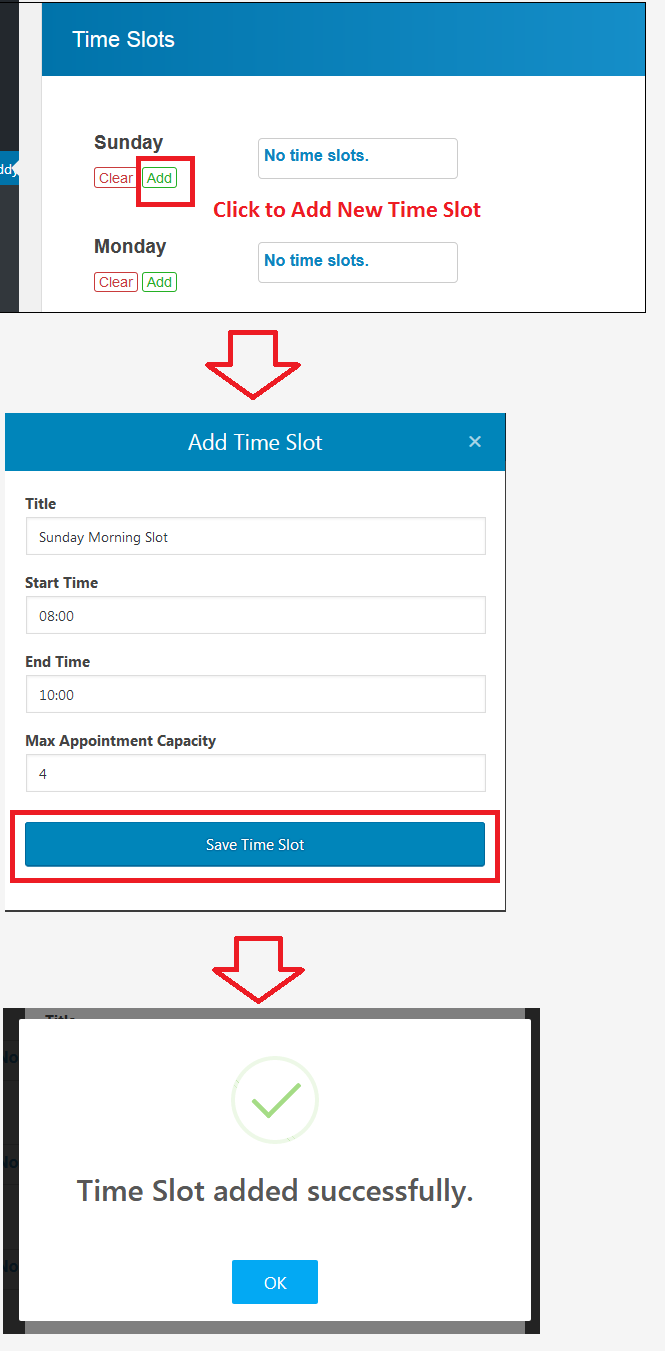
Add a slot on particular weekday
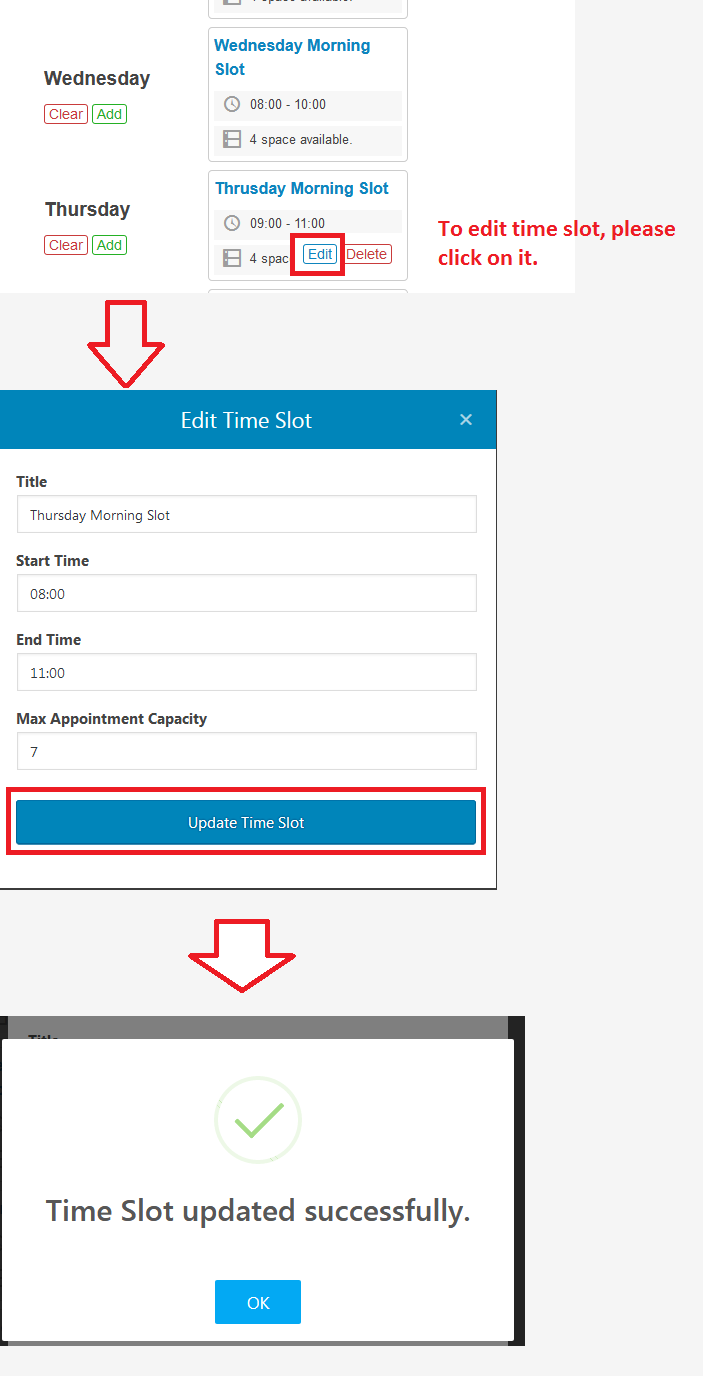
Edit a slot on particular weekday
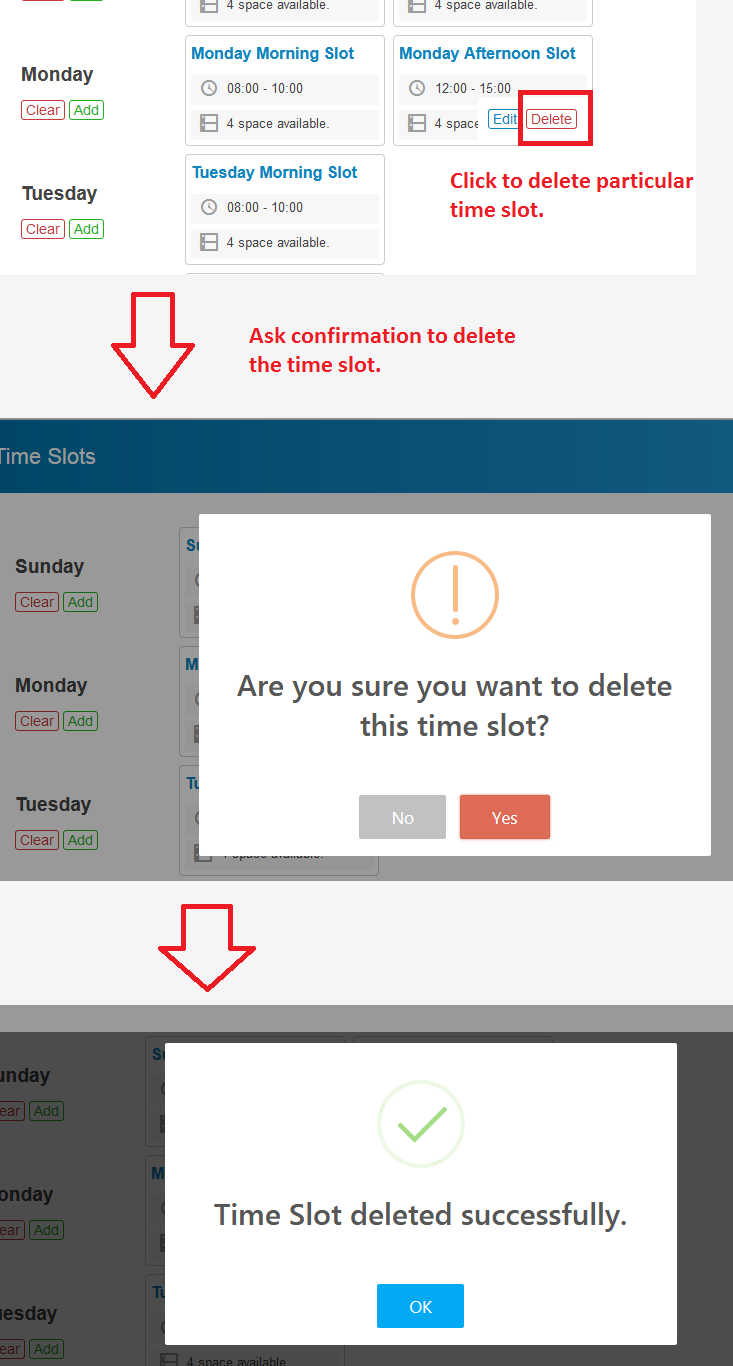
Delete a slot on particular weekday
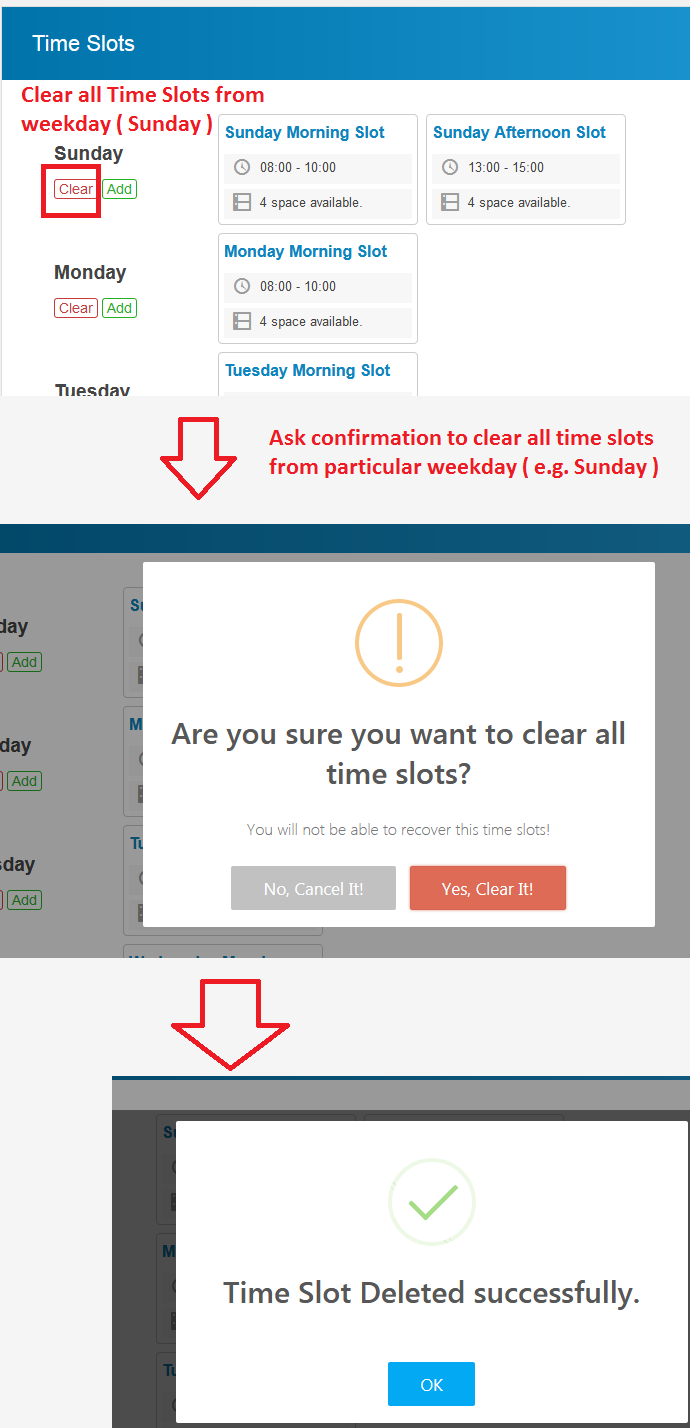
Clear all slots on particular weekday
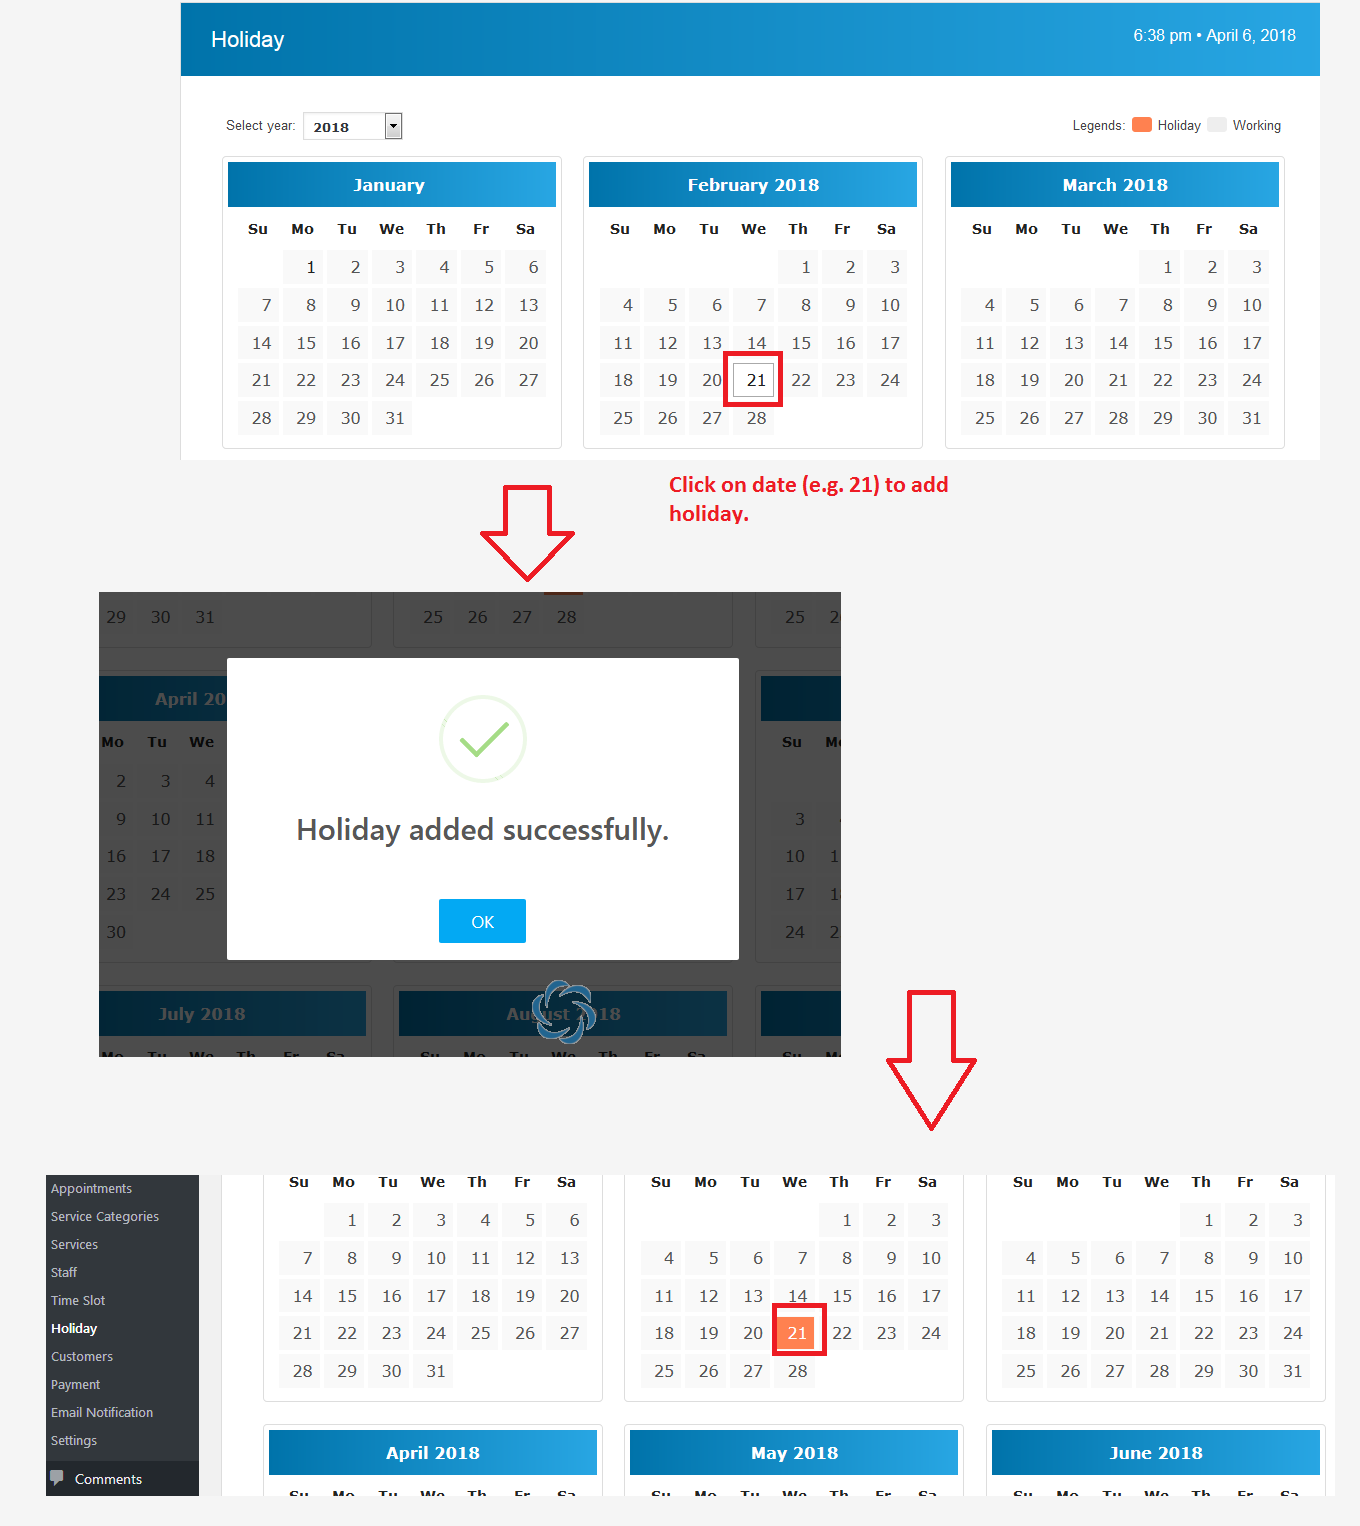
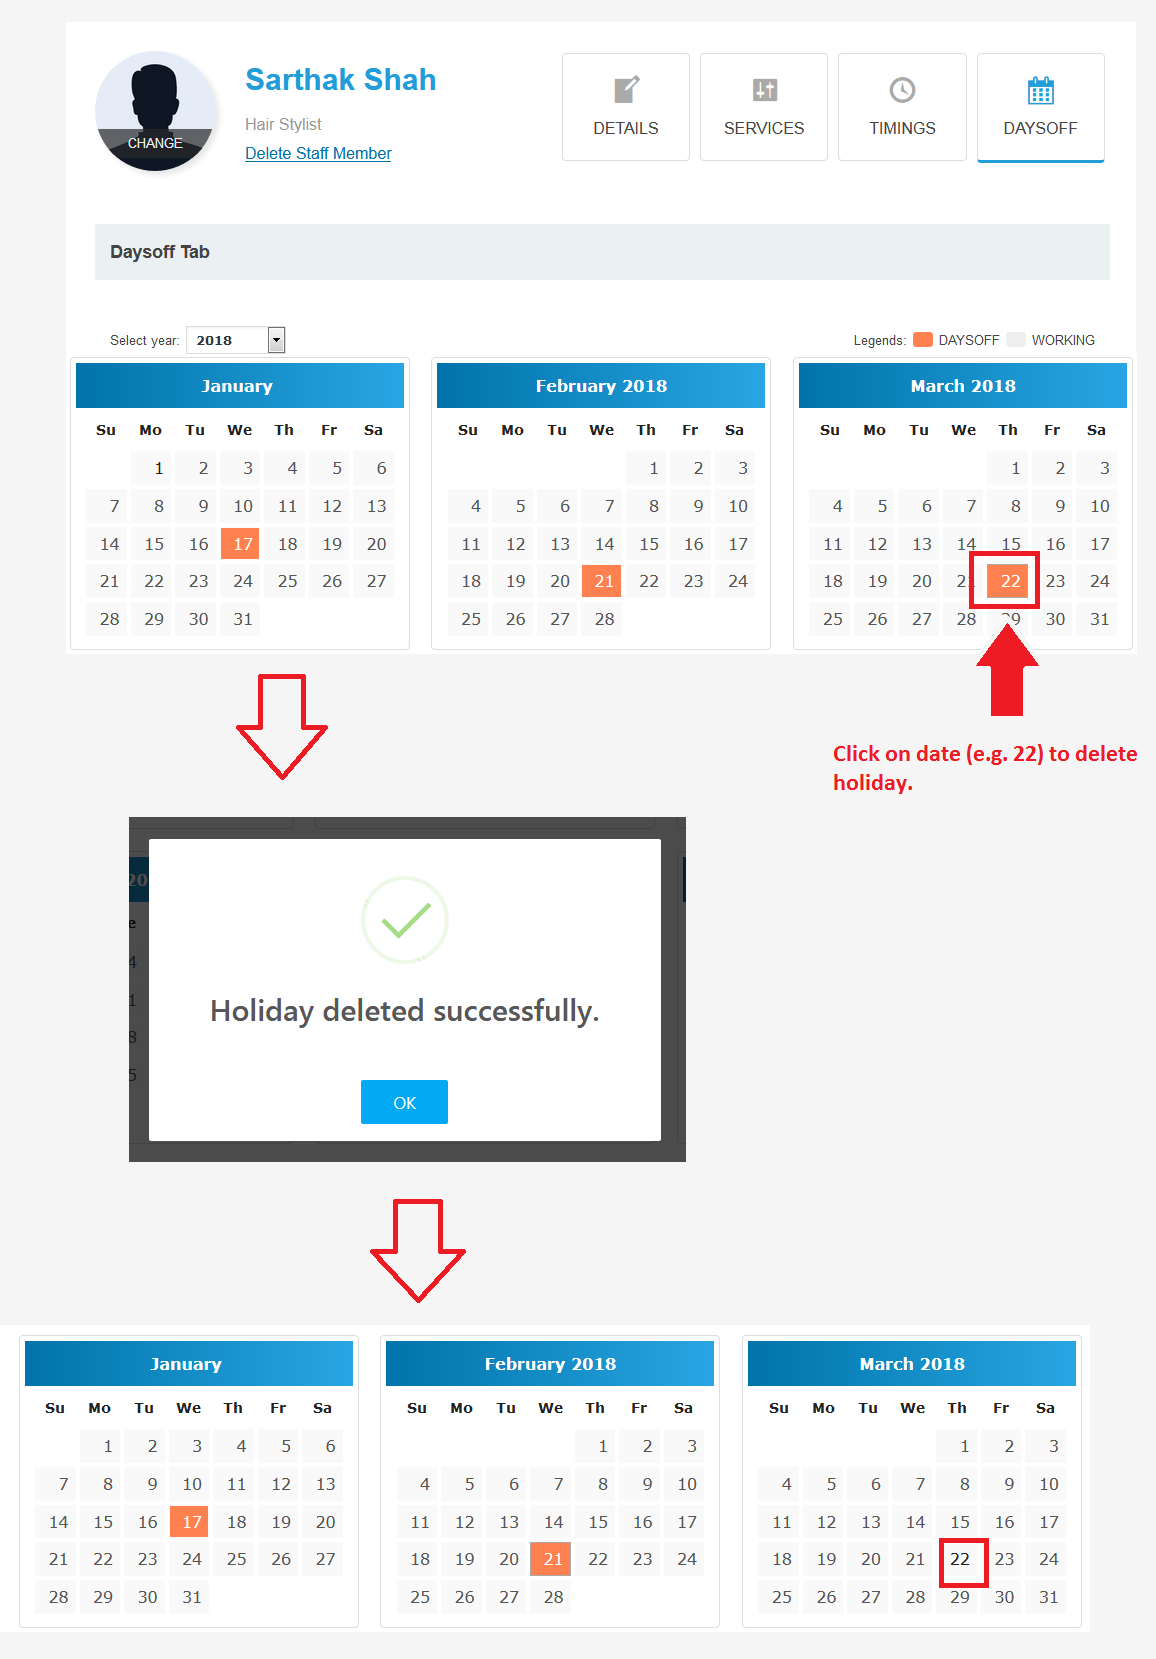
Holiday
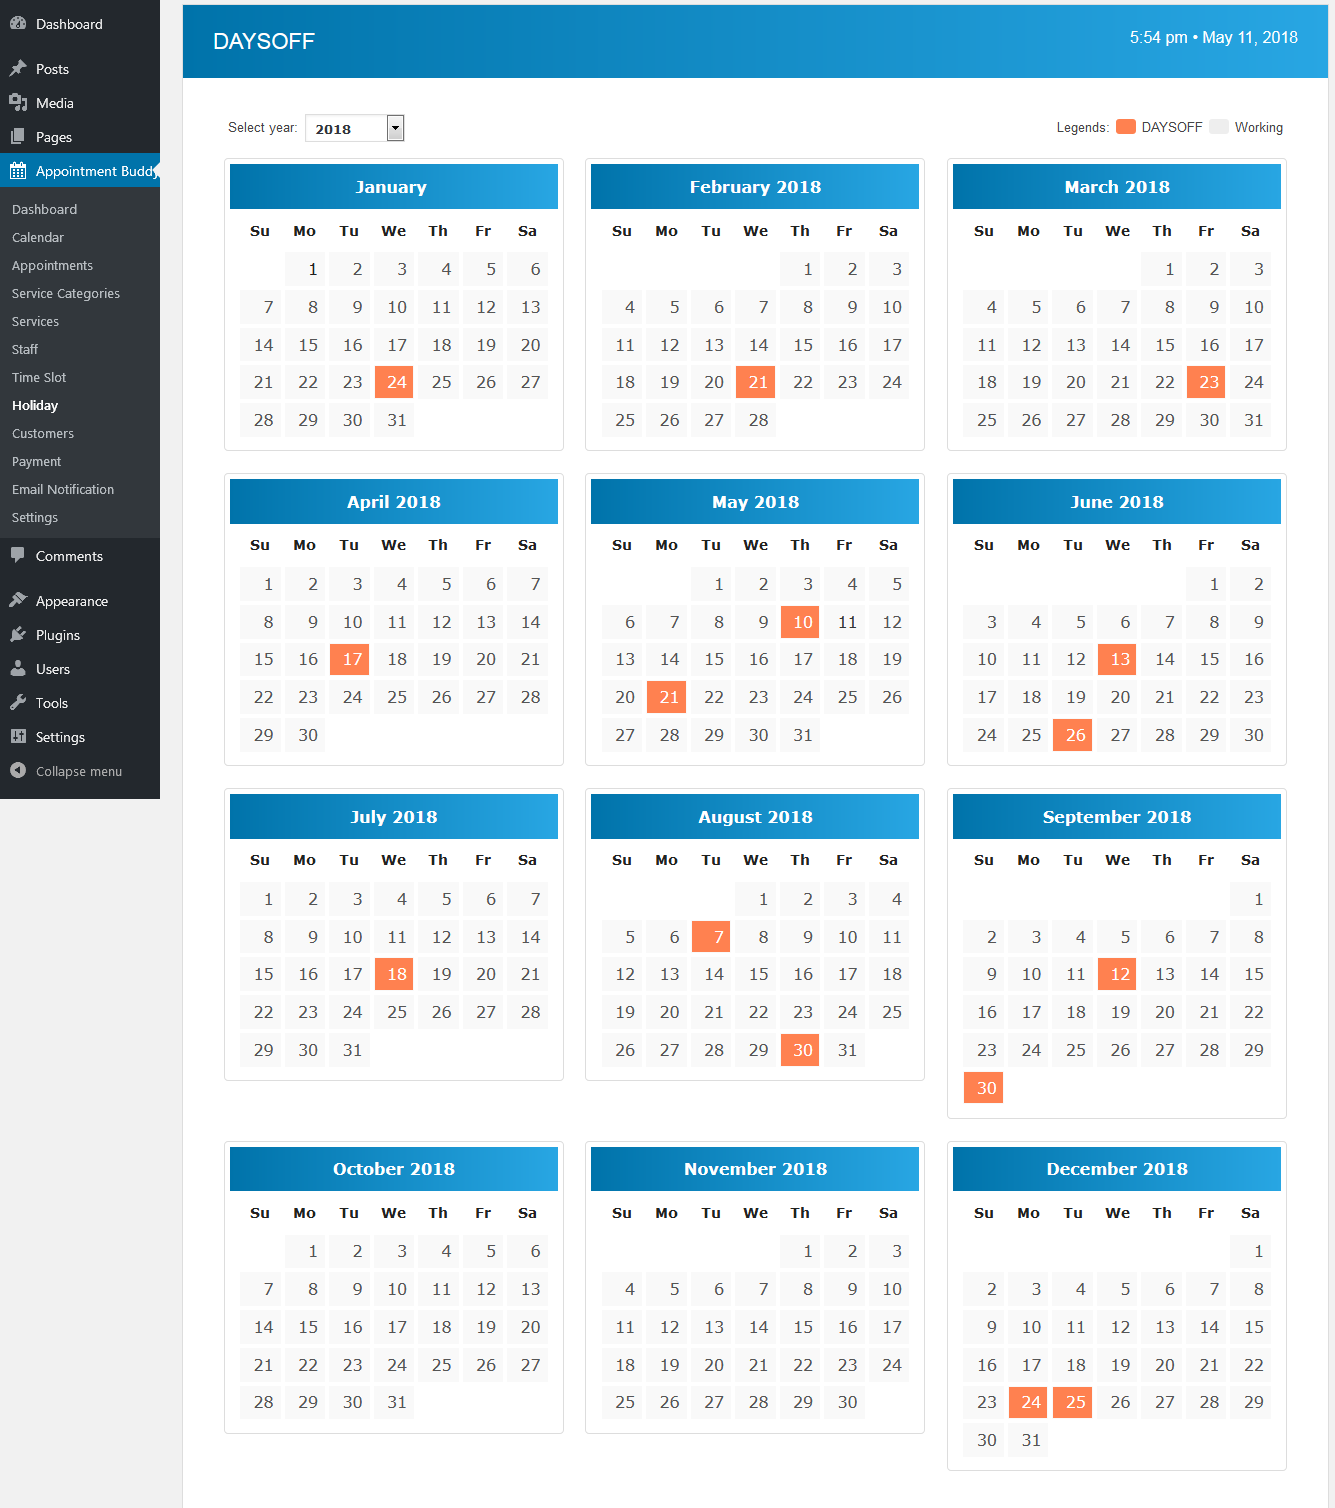
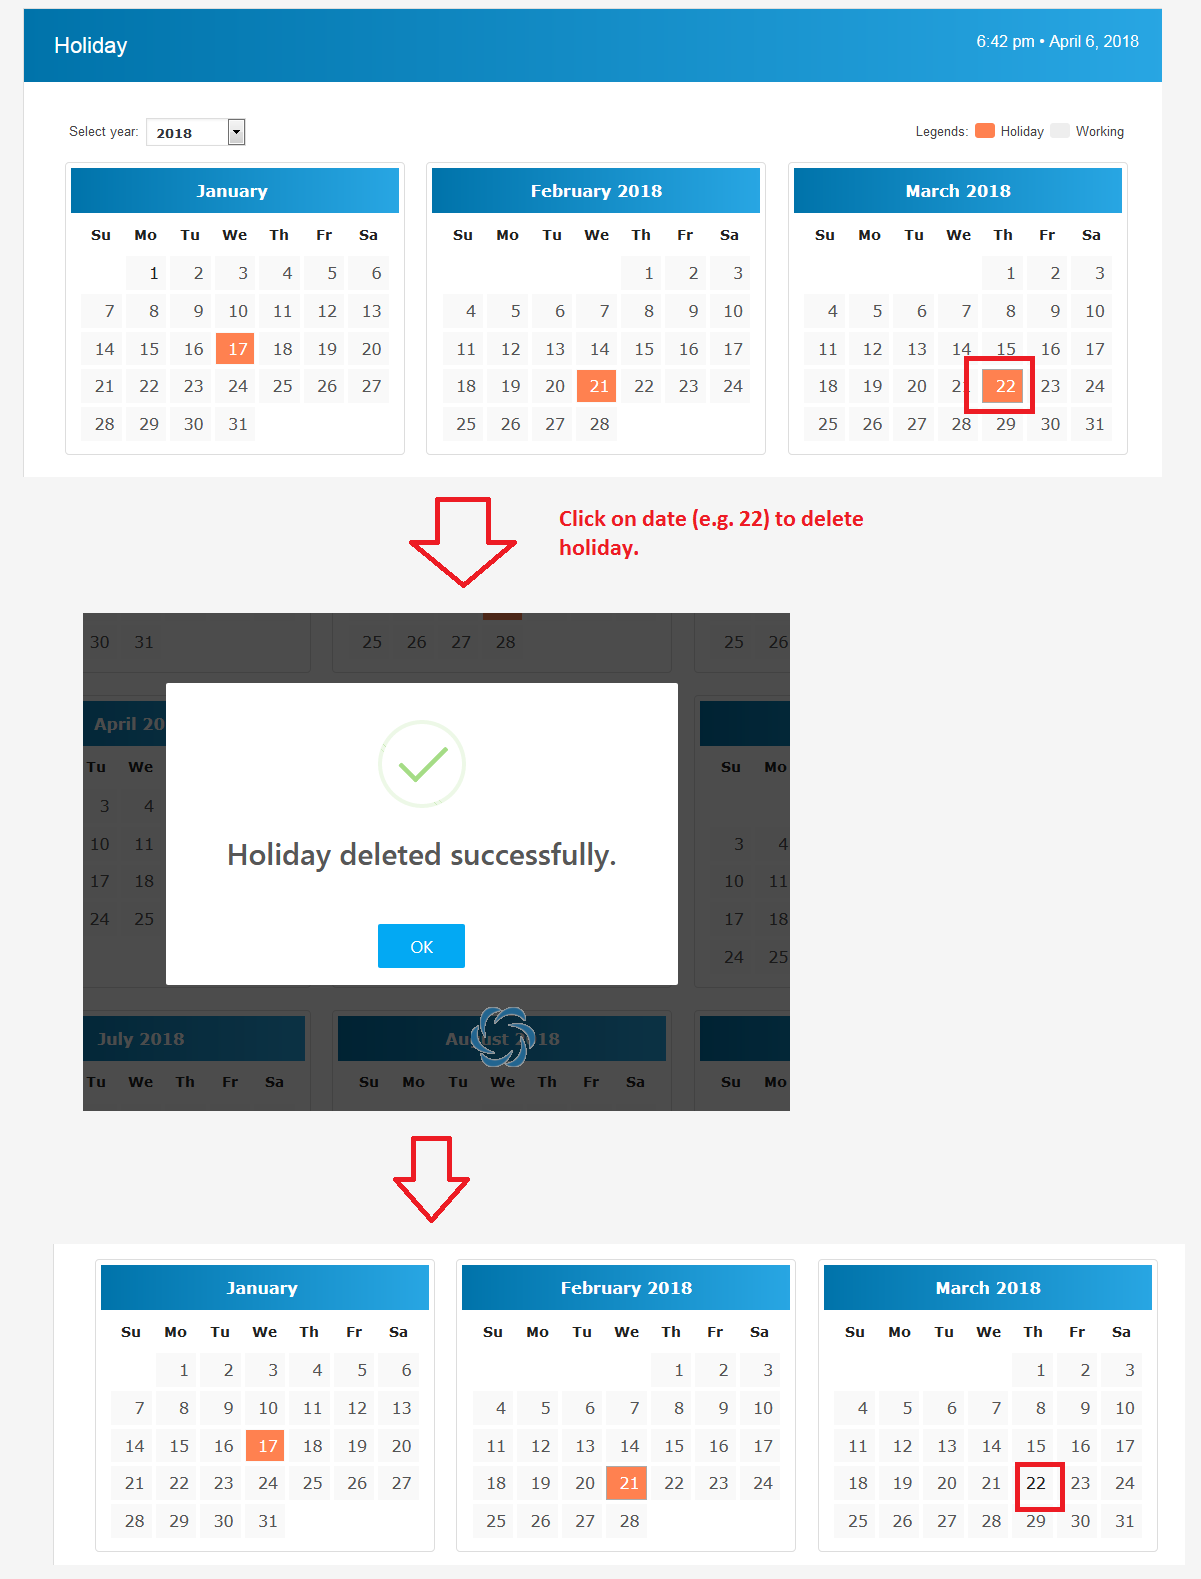
In Holiday menu, you will see full year calendar. Appointment Buddy plugin provides functionality to add/delete holiday on particular date by just a single click on the date. The holidays added in site will seen in orange color on calendar. You can also add future holidays.
These holidays will be seen on calendar at calendar menu.
Add a holiday on a particular date
Delete a holiday on a particular date
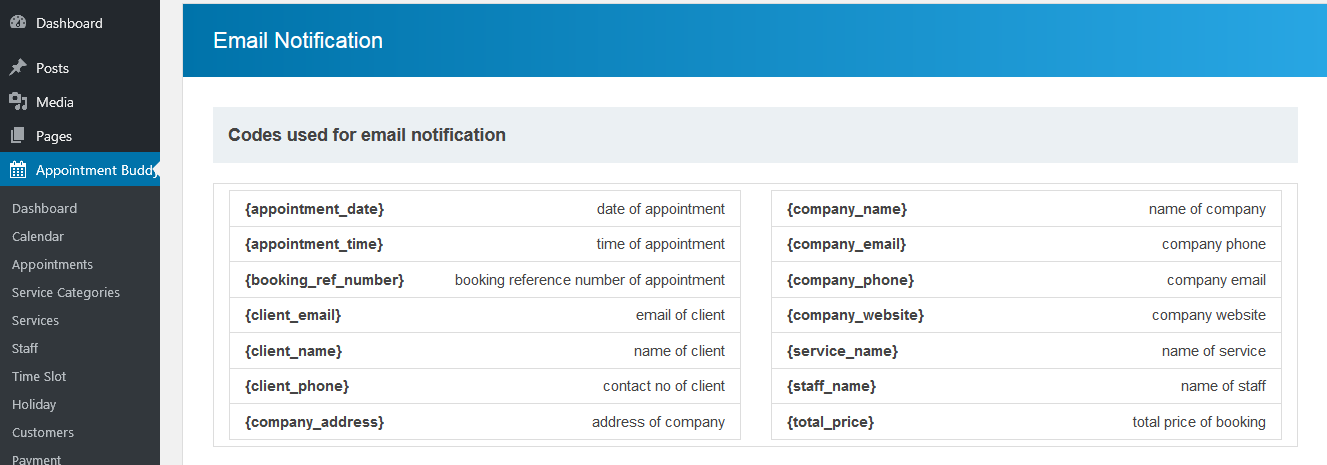
Email Notifications
Appointment Buddy provides default email templates for appointment related notifcations to admin, staff and customer. You can customize these default templates.
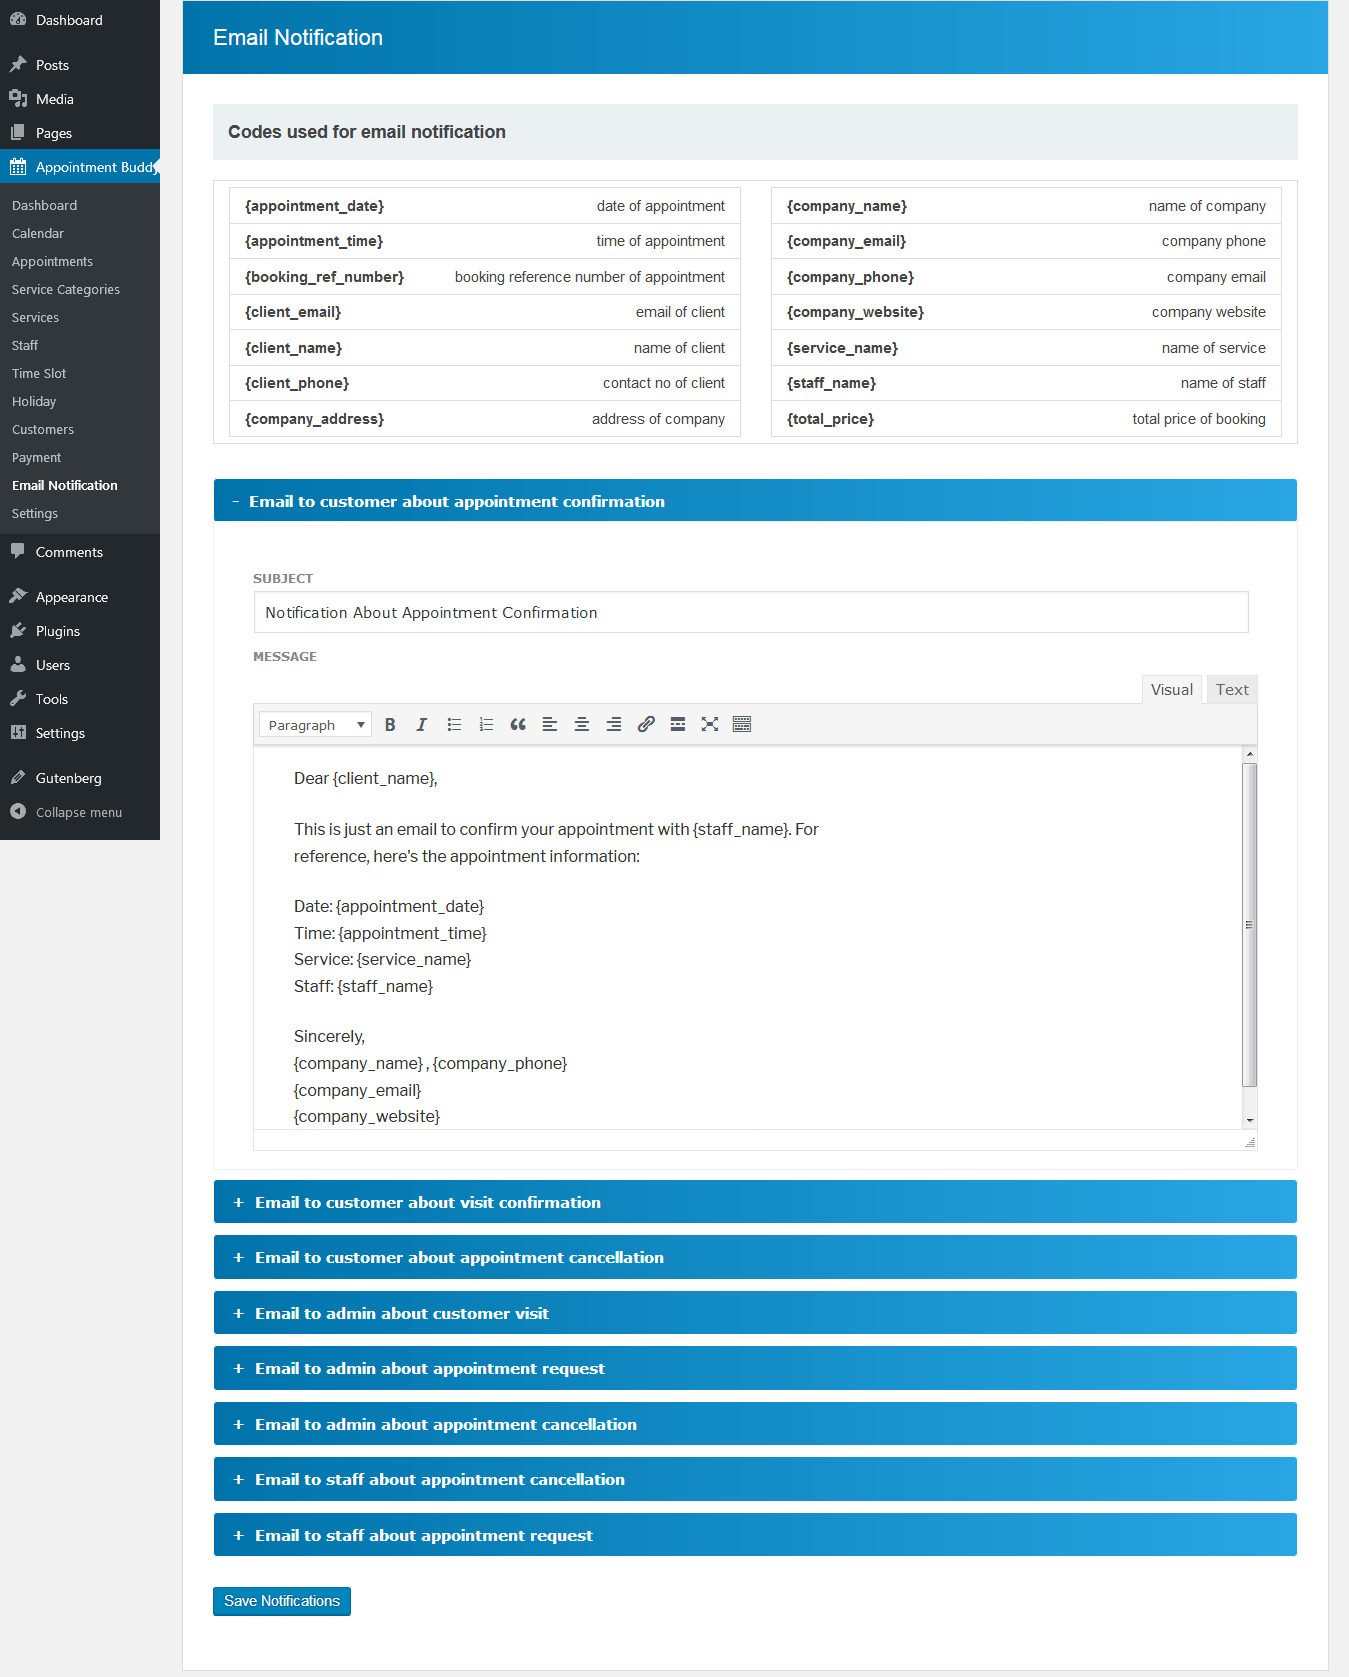
Here are the codes used to send specific detials.
Staff
Appointment Buddy allows you to create unlimited staff members. You can see how staff member is created as per below image:
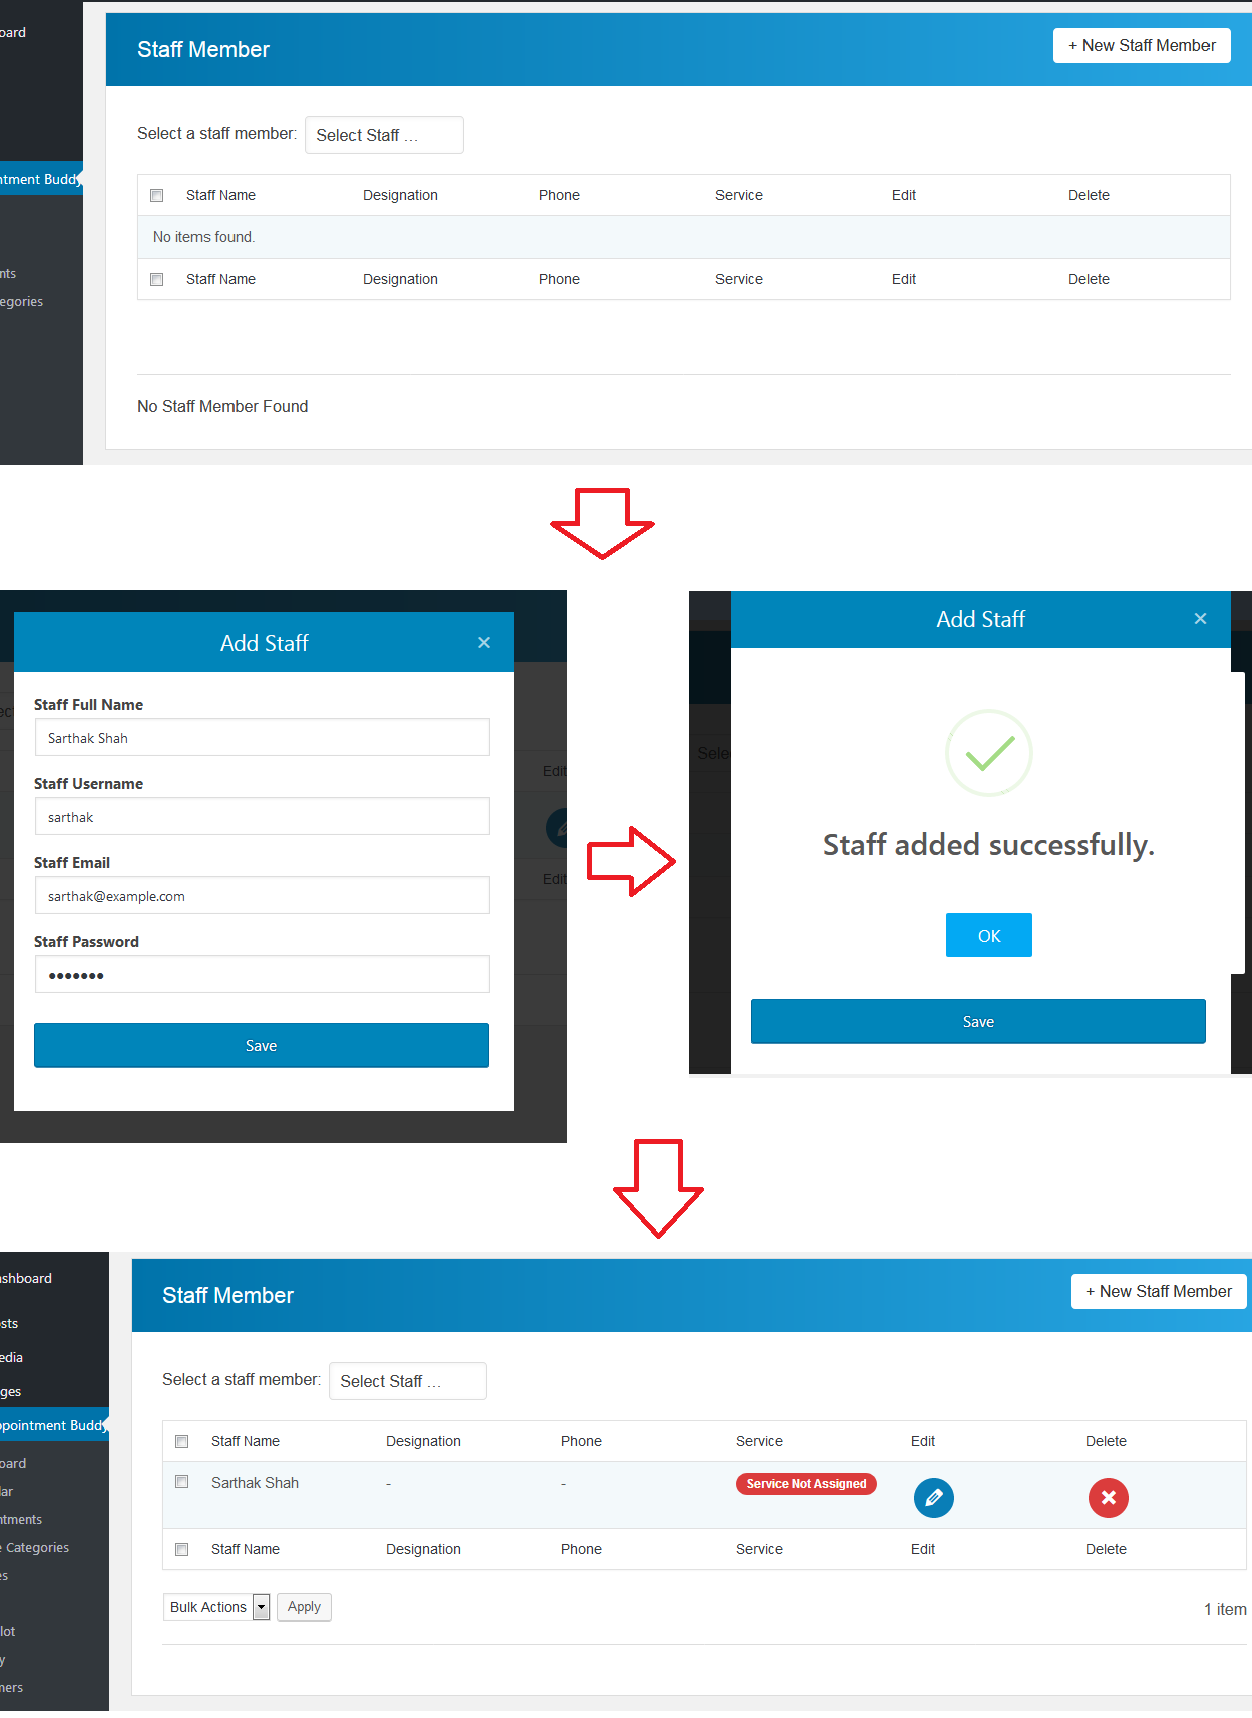
With staff, system will also create WP Users. So each staff member will receive its individual account to login. In member login, member will see:
- Only login member’s appointments in list and in calendar
- Edit profile
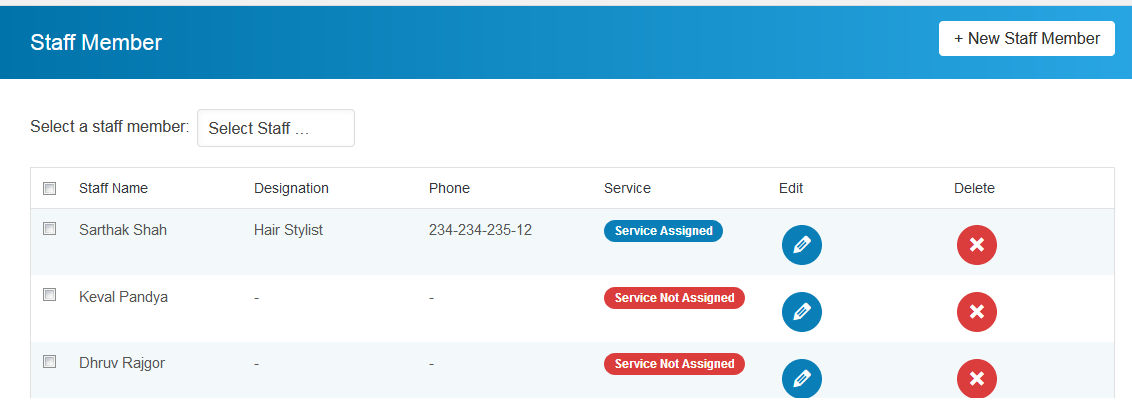
As you create staff, it will be visible in the list with tag as "Service Not Assigned". It means staff members has not assigned services. If services are already assigned to staff member then it will be listed with tag "Service Assigned".
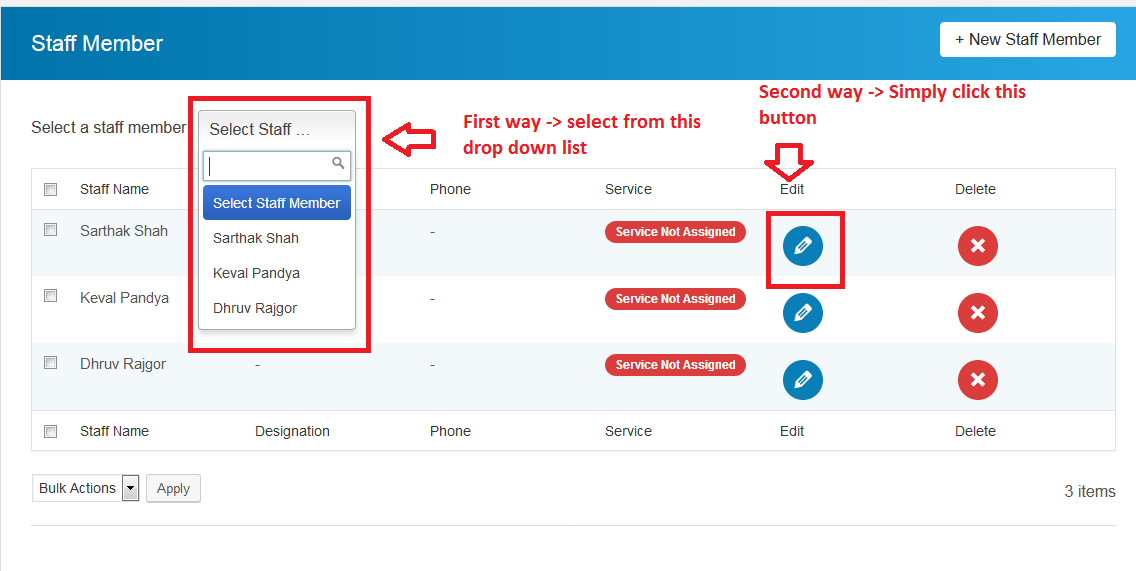
You can edit particular staff details in two ways as shown in image:
Staff member profile update:
- STAFF GENERAL DETAILS

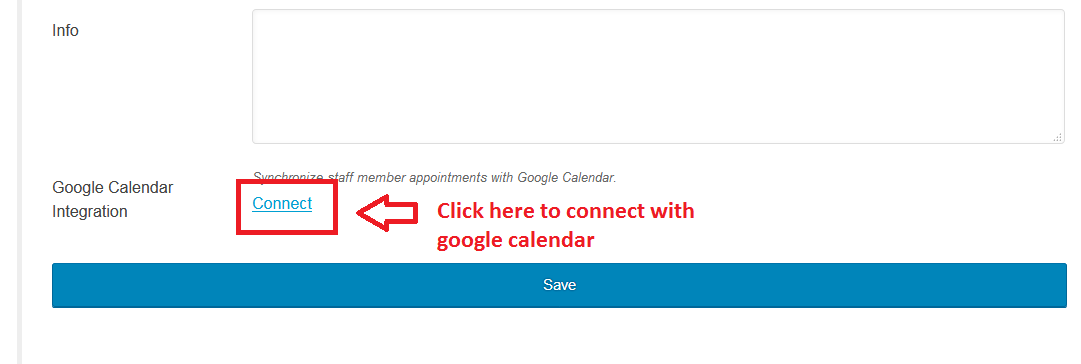
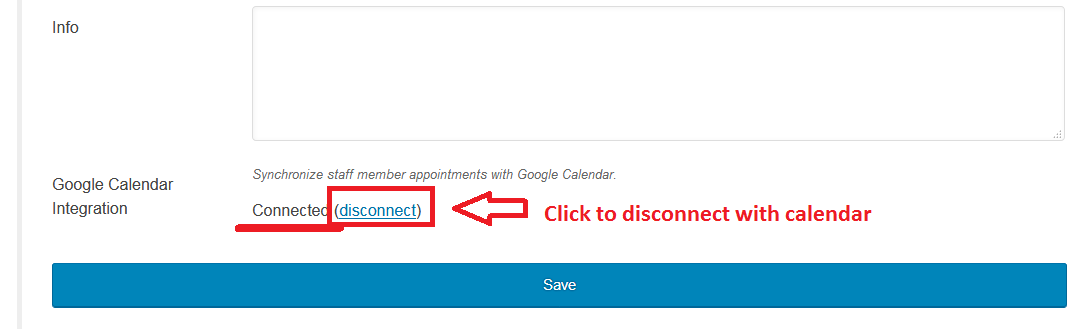
- Appointment Buddy provides Google Calendar Syncronization of appointment in staff member 's gmail calendar. It will sync automatically to member's google calendar if member has allowed permission to sync.
- In Staff member details tab, you will see "Google Calendar Integration" label. Member just need to click on link "Connect" to syncronize his/her google account with website.
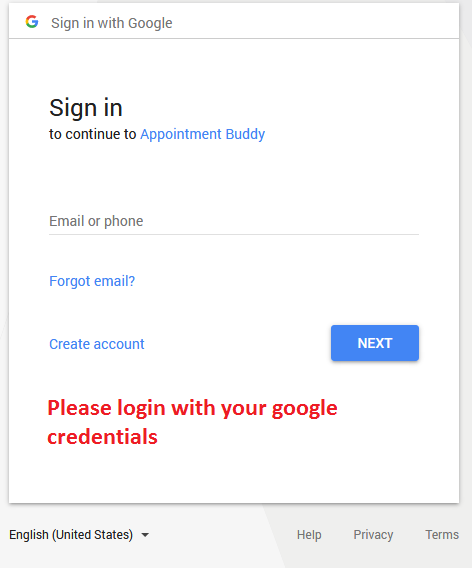
- As soon as he/she click on link "Connect" , he/she will be redirected to google account page where they has to login in their google account.
- After login they will be asked permission to access their google calendar.
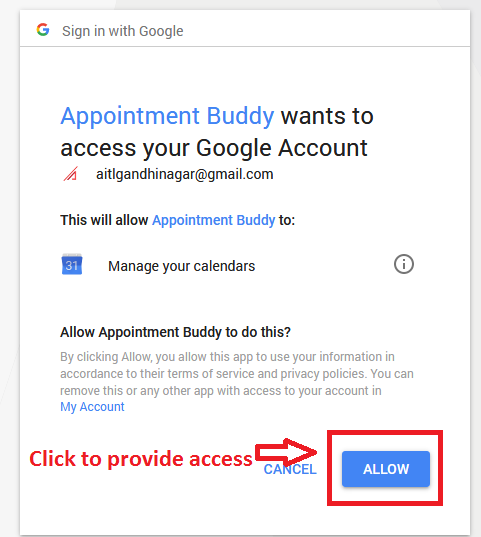
- As soon as he/she allows, they will be redirected to their profile page.
- STAFF SERVICES
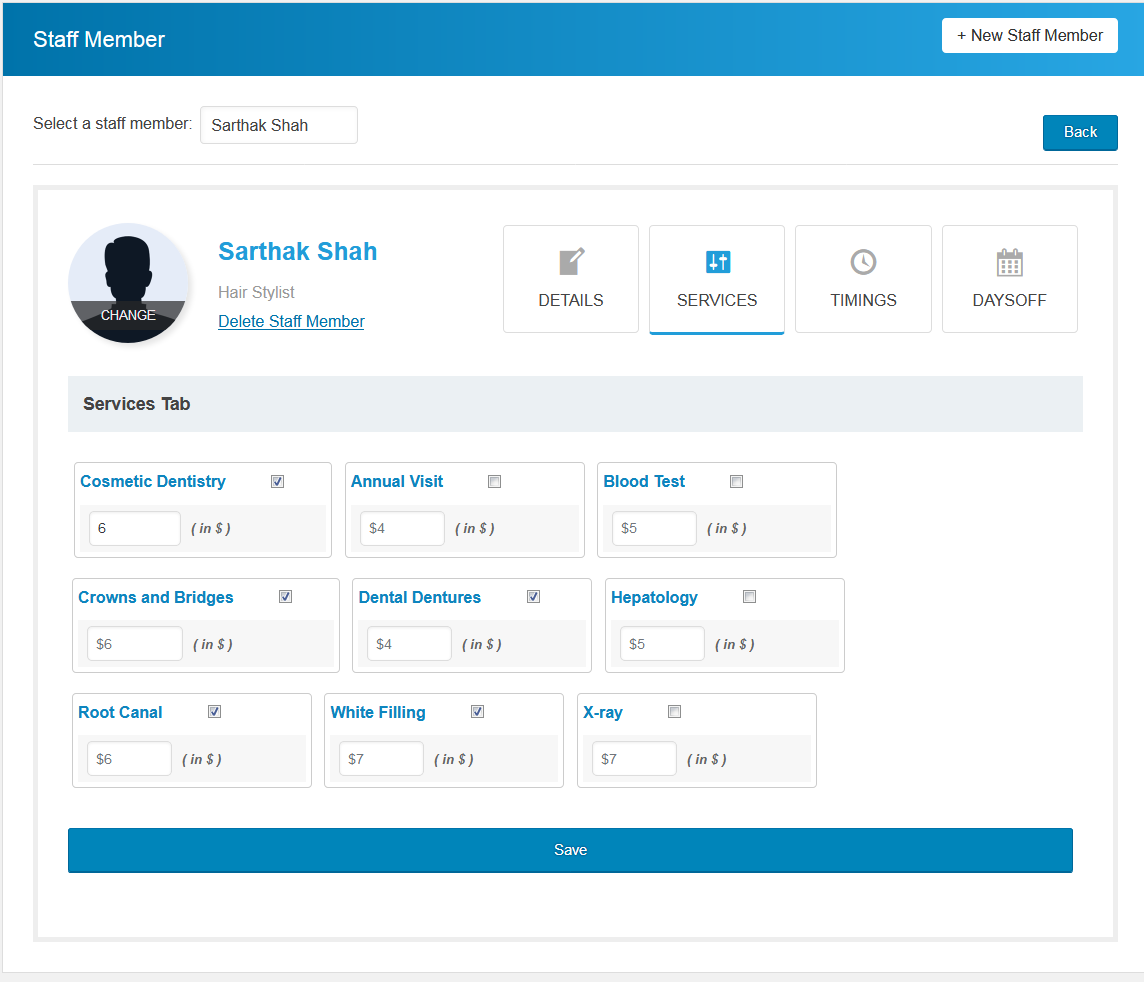
Here, their will be list of services included by the administrator. Member need to just check on the box of service he/she is going to provide and "Save" it.
- STAFF TIME SLOTS
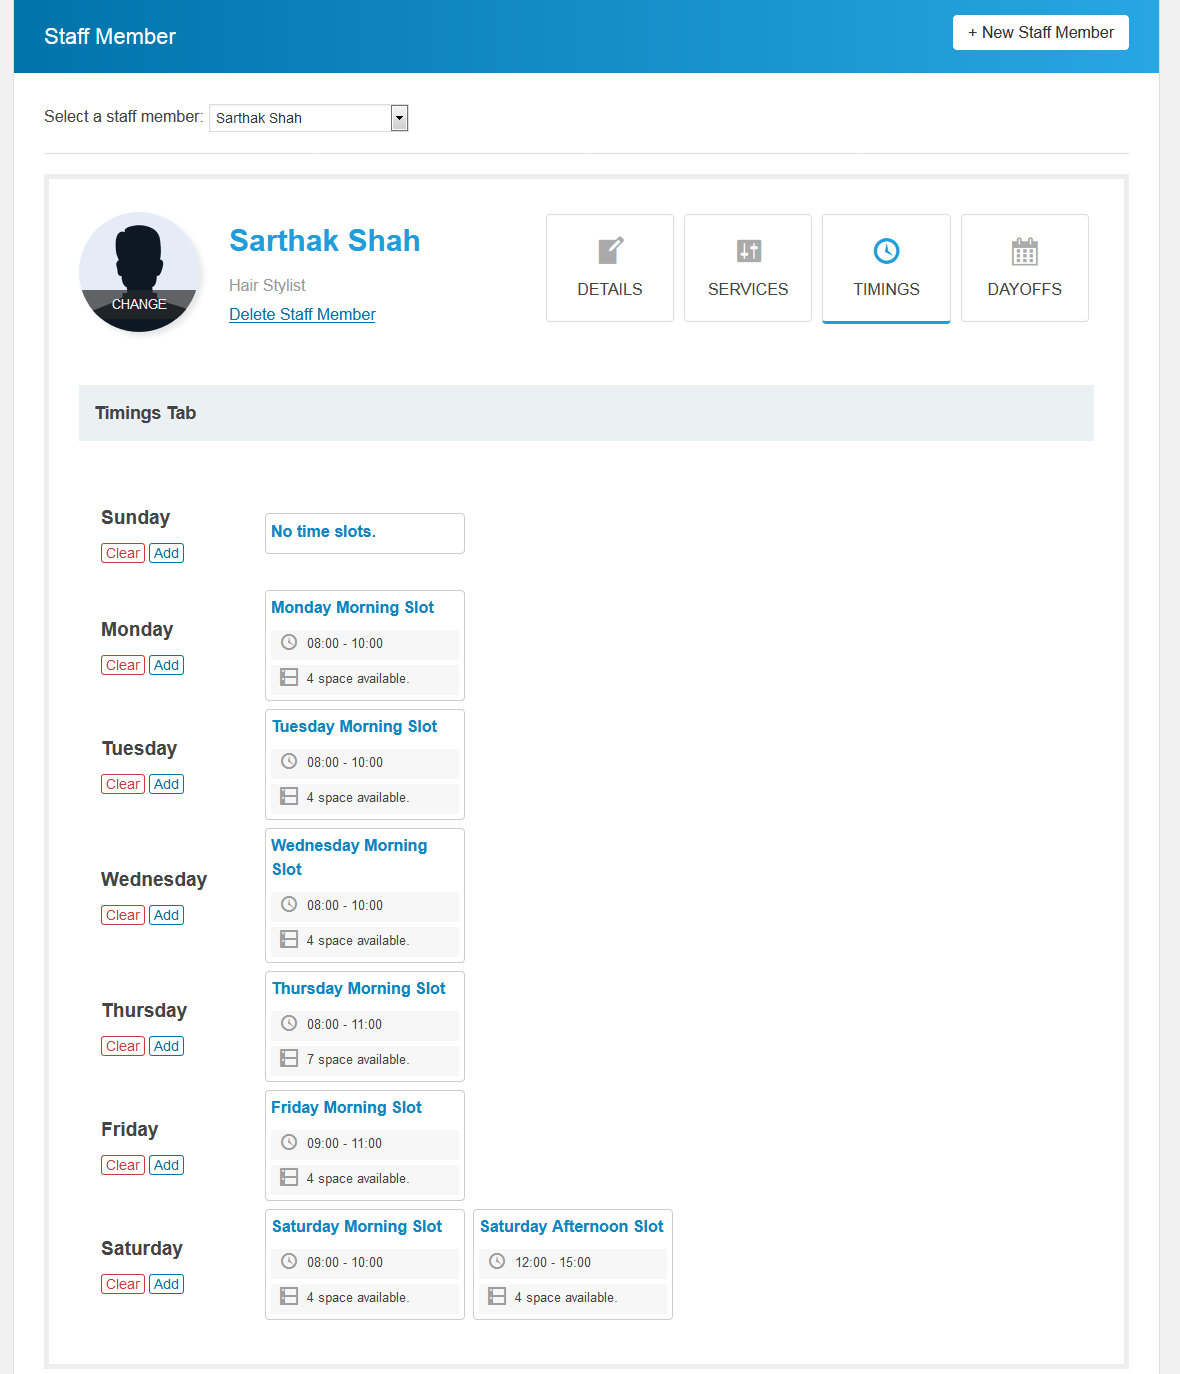
Here, their will be list of general time slot included by the administrator. Members can also create their own time slots and manage other slot.
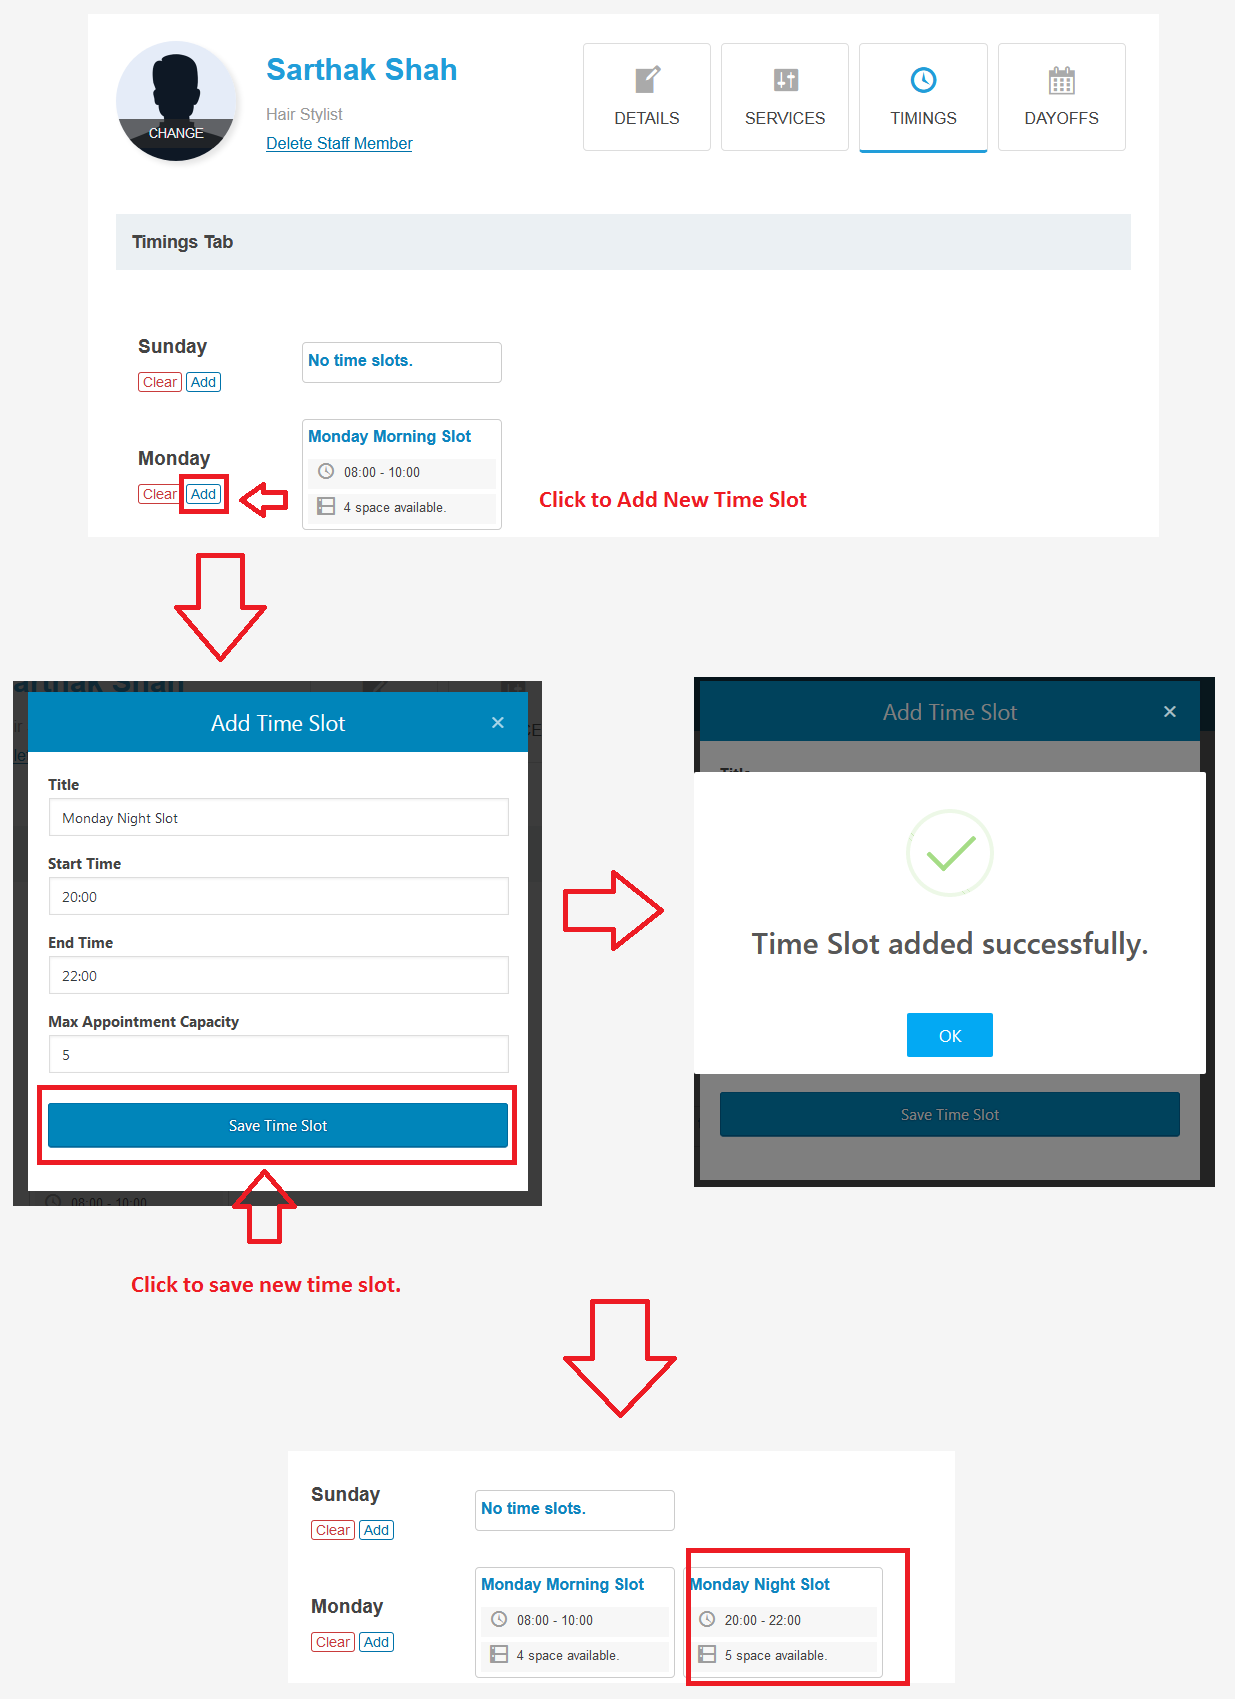
- Add new time slot
- Edit time slot
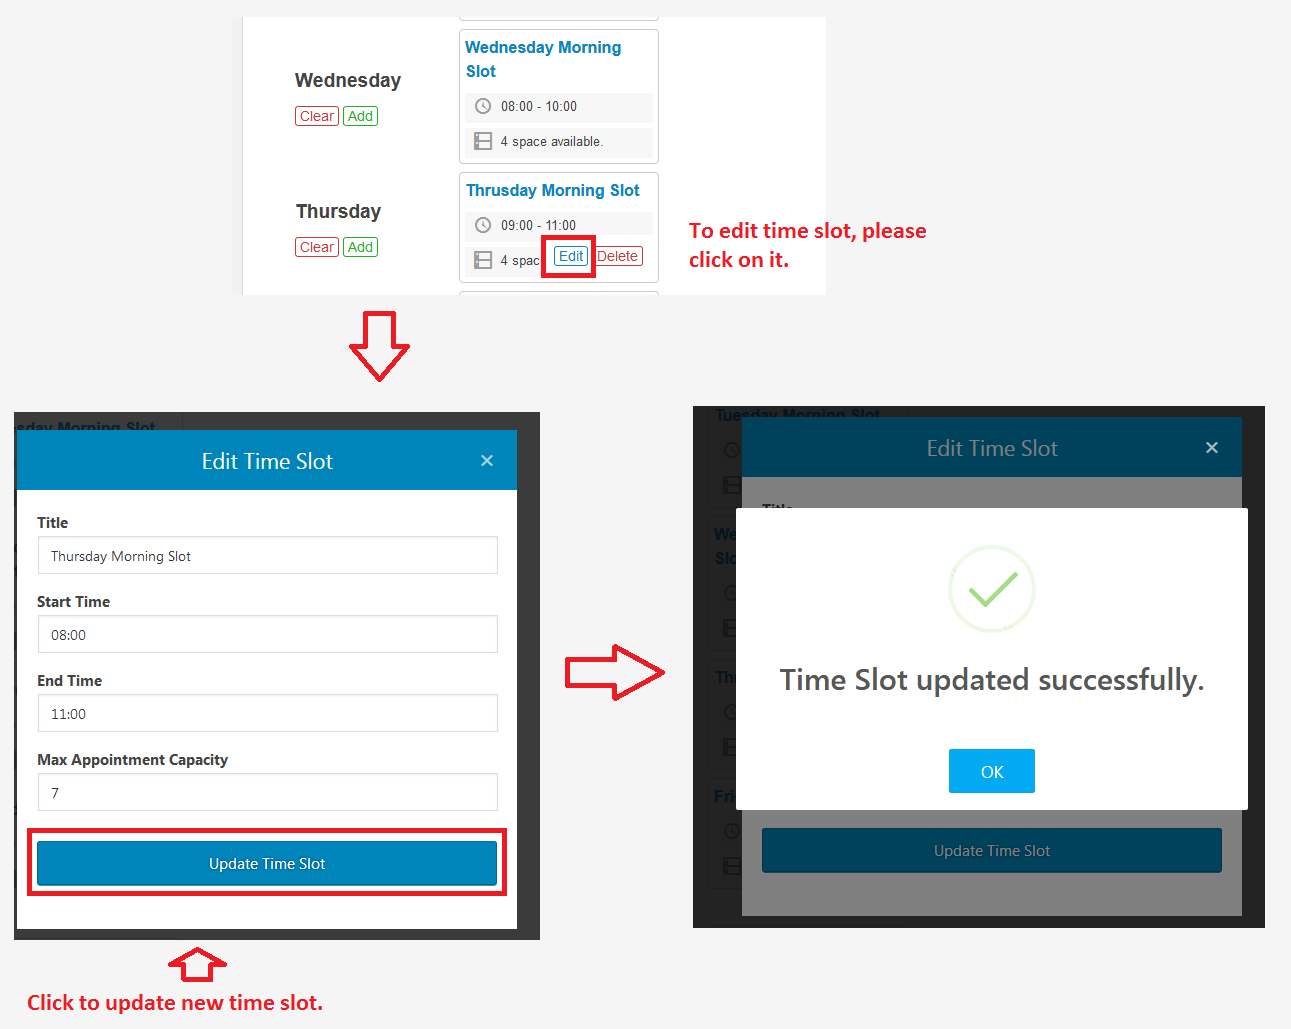
- Note: members can only edit time slot created by them and not the default time slot.
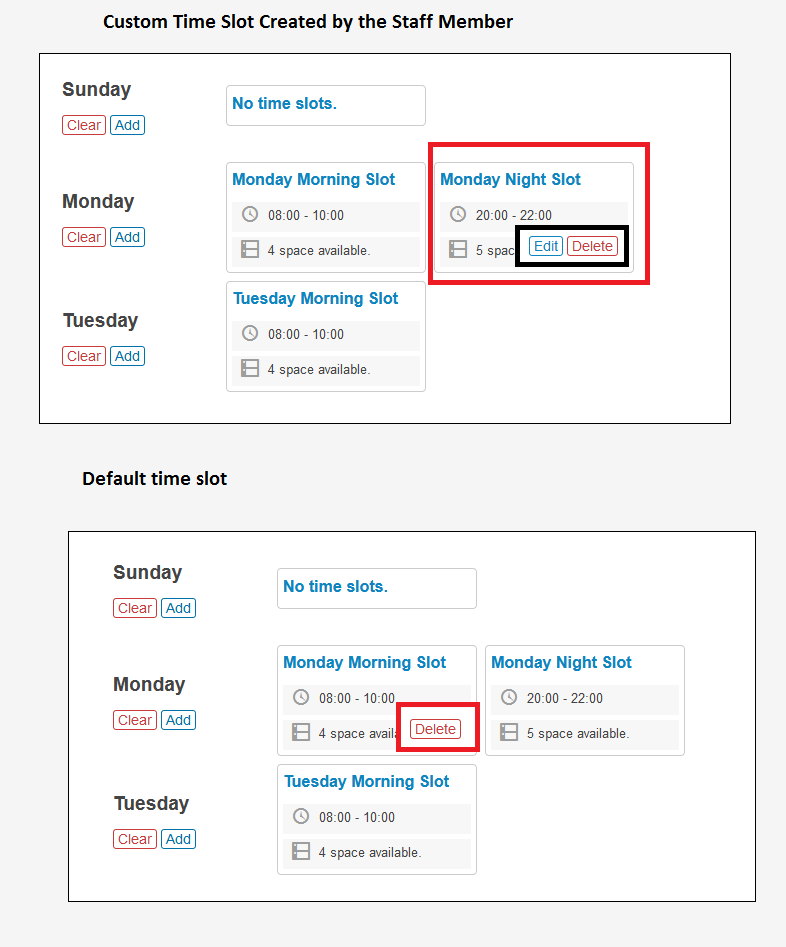
- Delete time slot
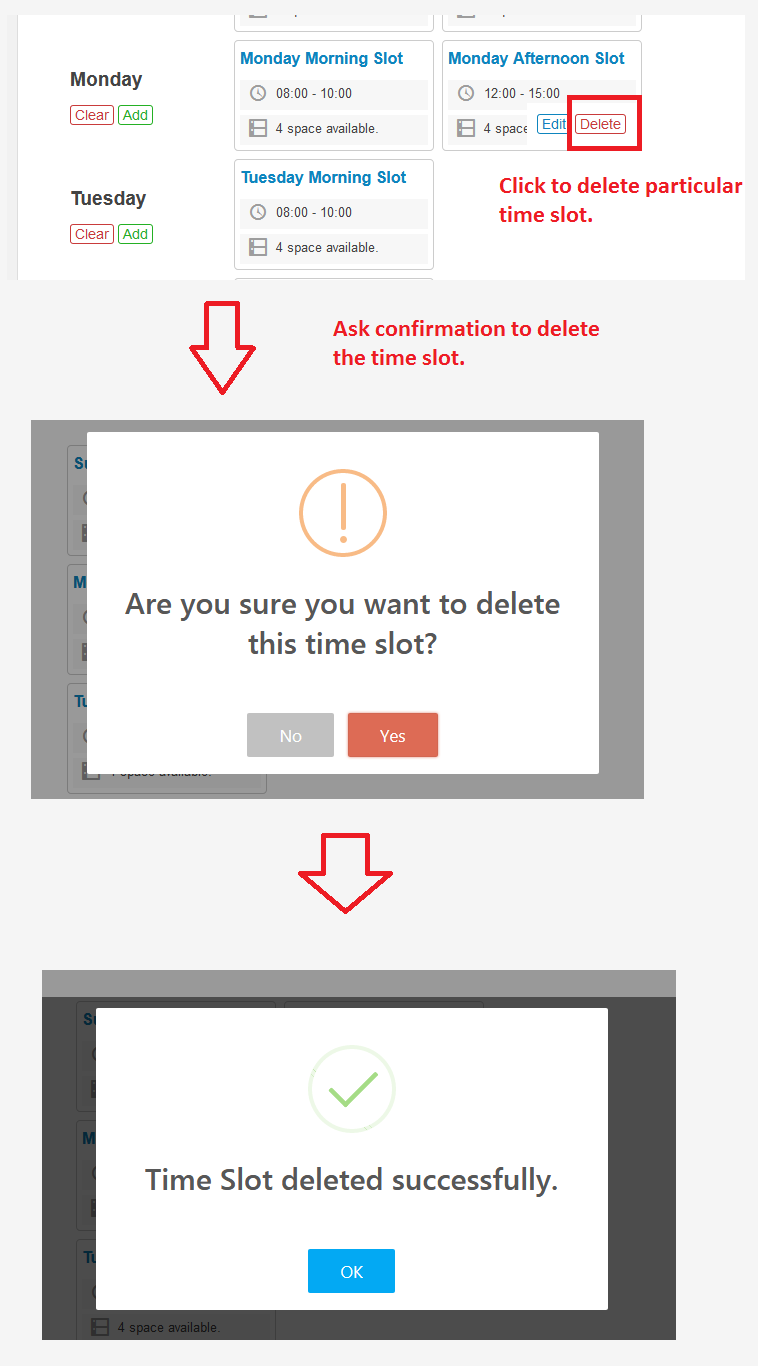
- Note: Staff member can delete default and custom time slot as it will deleted from particular staff member time slot list.
- Clear/ delete all time slots
- Add new time slot
- STAFF DAYSOFF
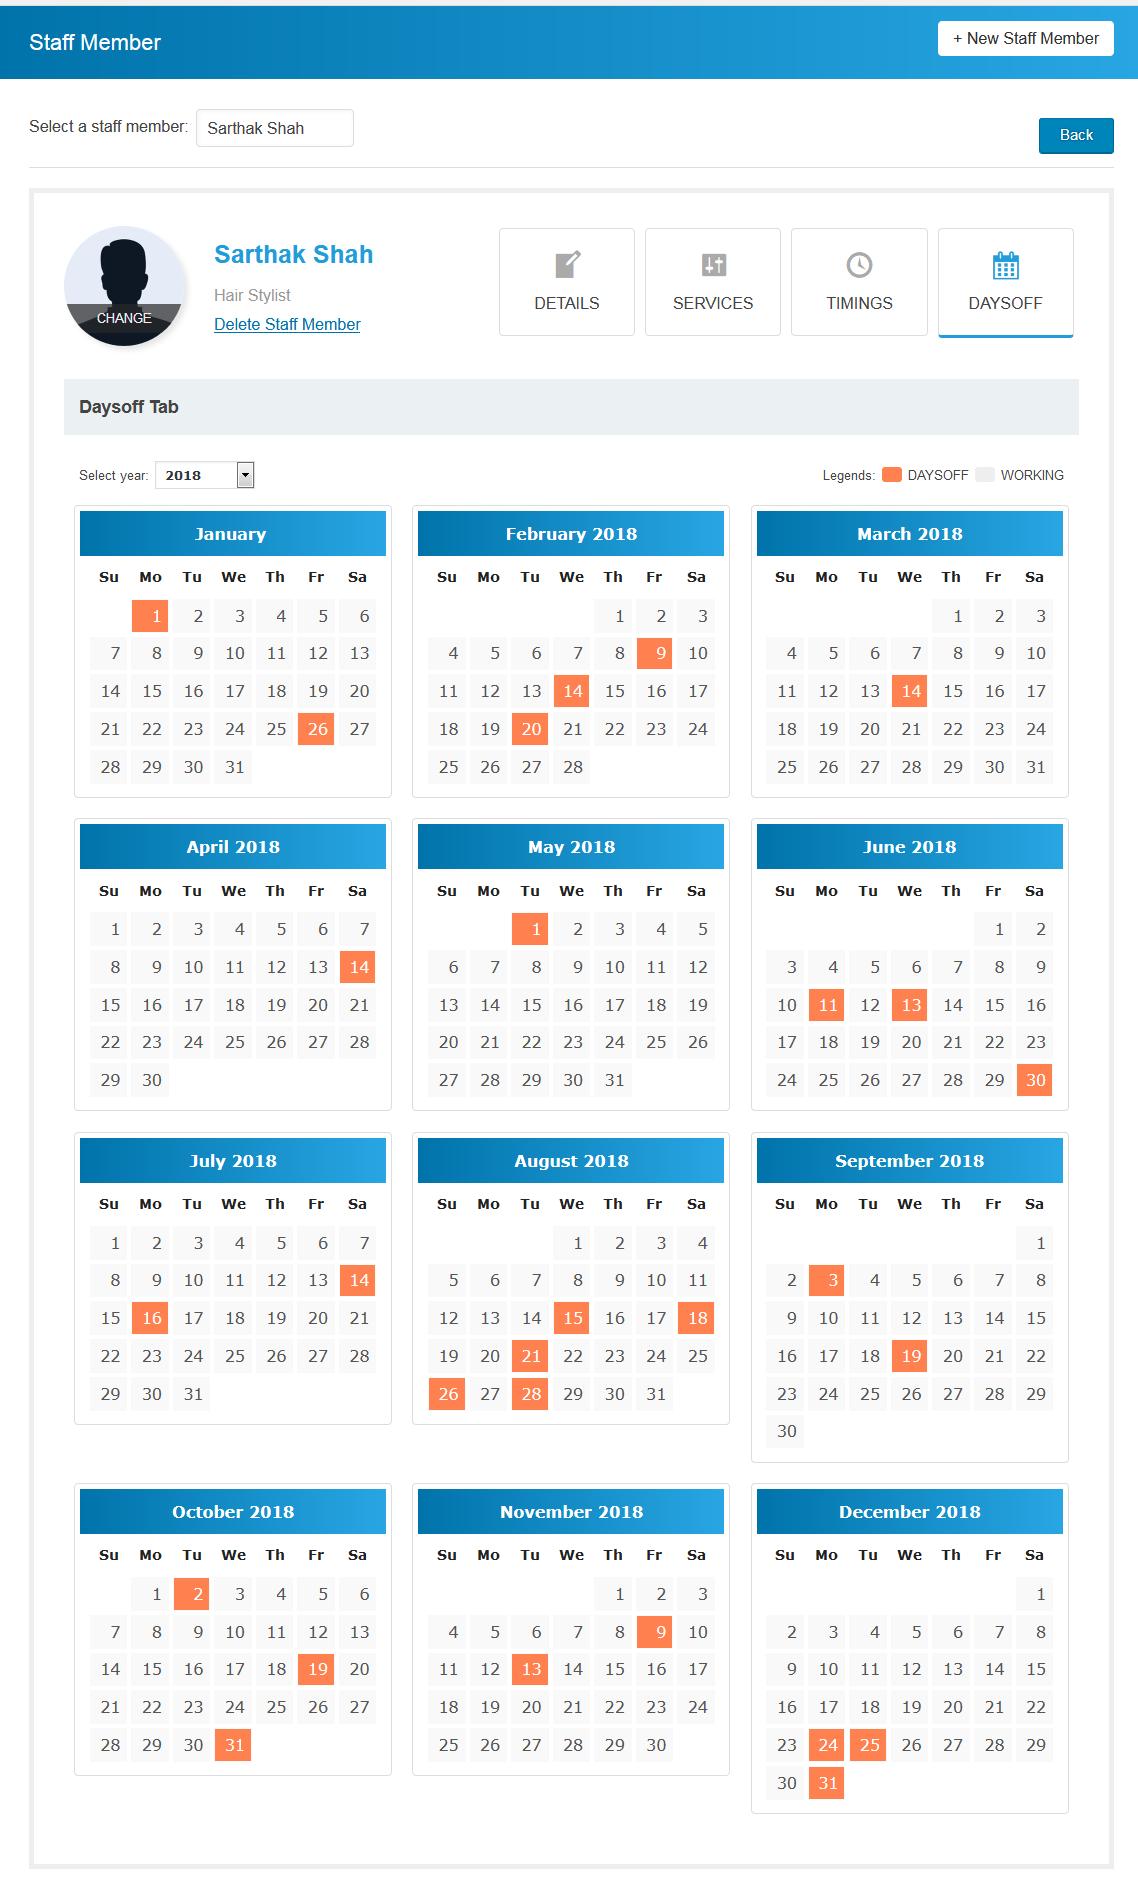
Here, general holidays/daysoff included by the administrator will be seen in calendar. Members can add their holidays/daysoff in calendar.
- Add a new dayoff
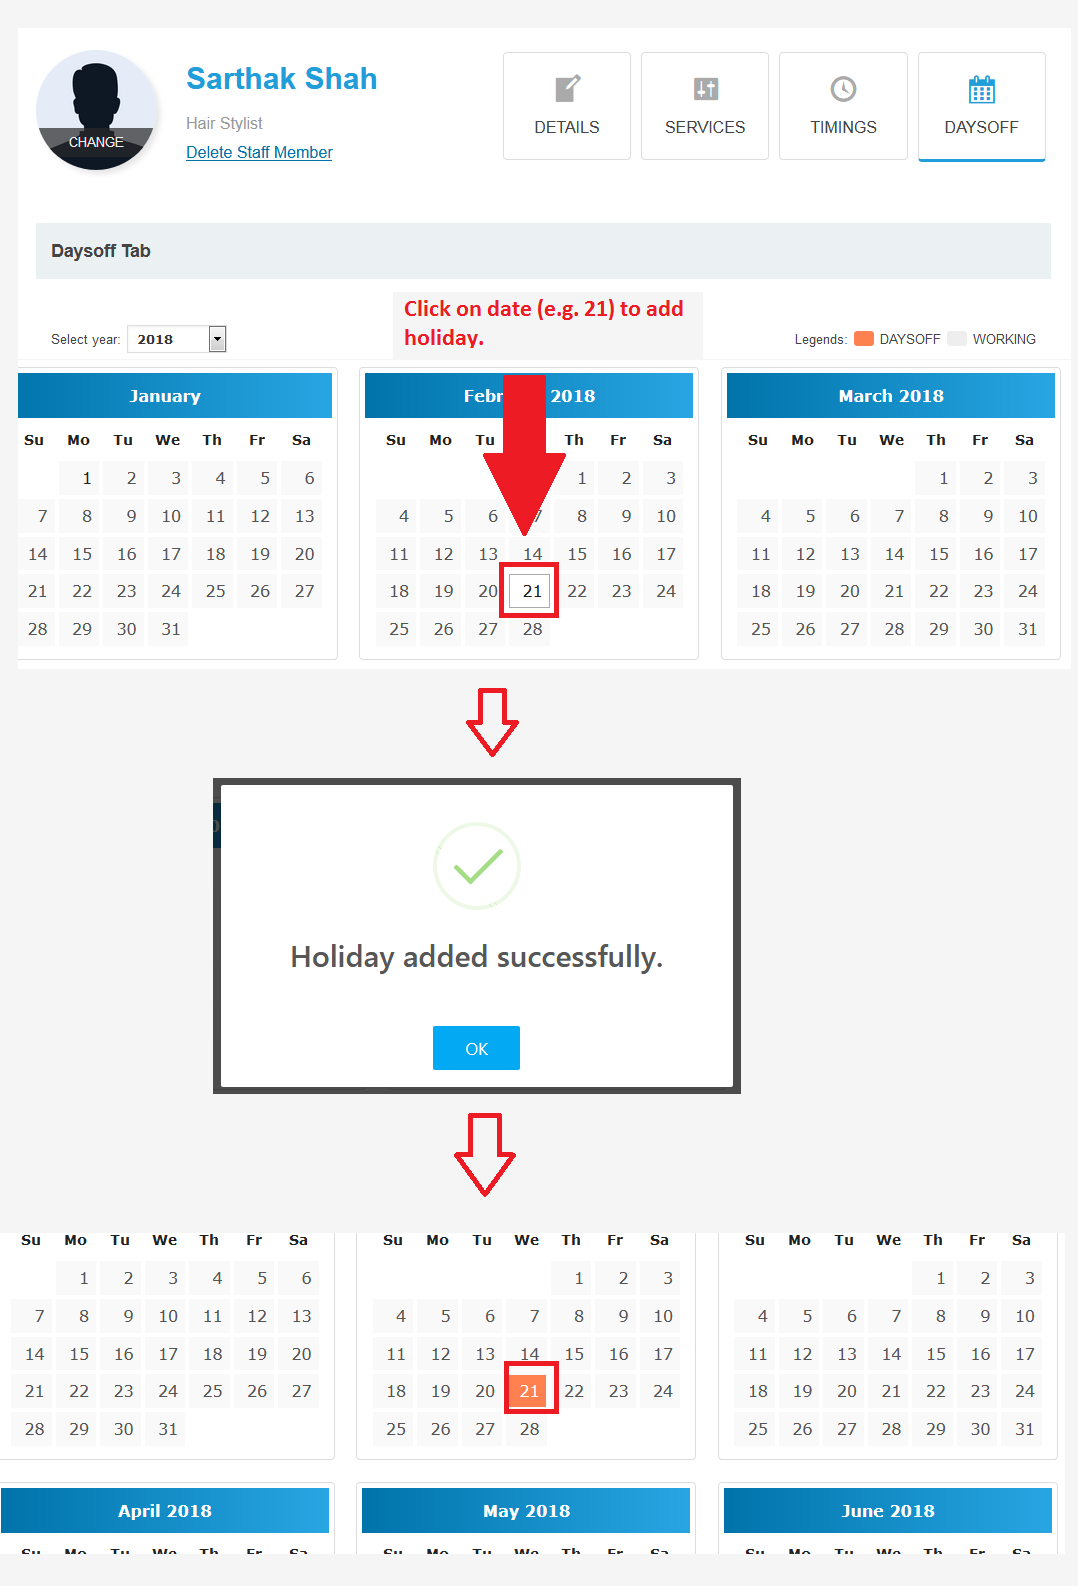
- Delete a dayoff
- Add a new dayoff
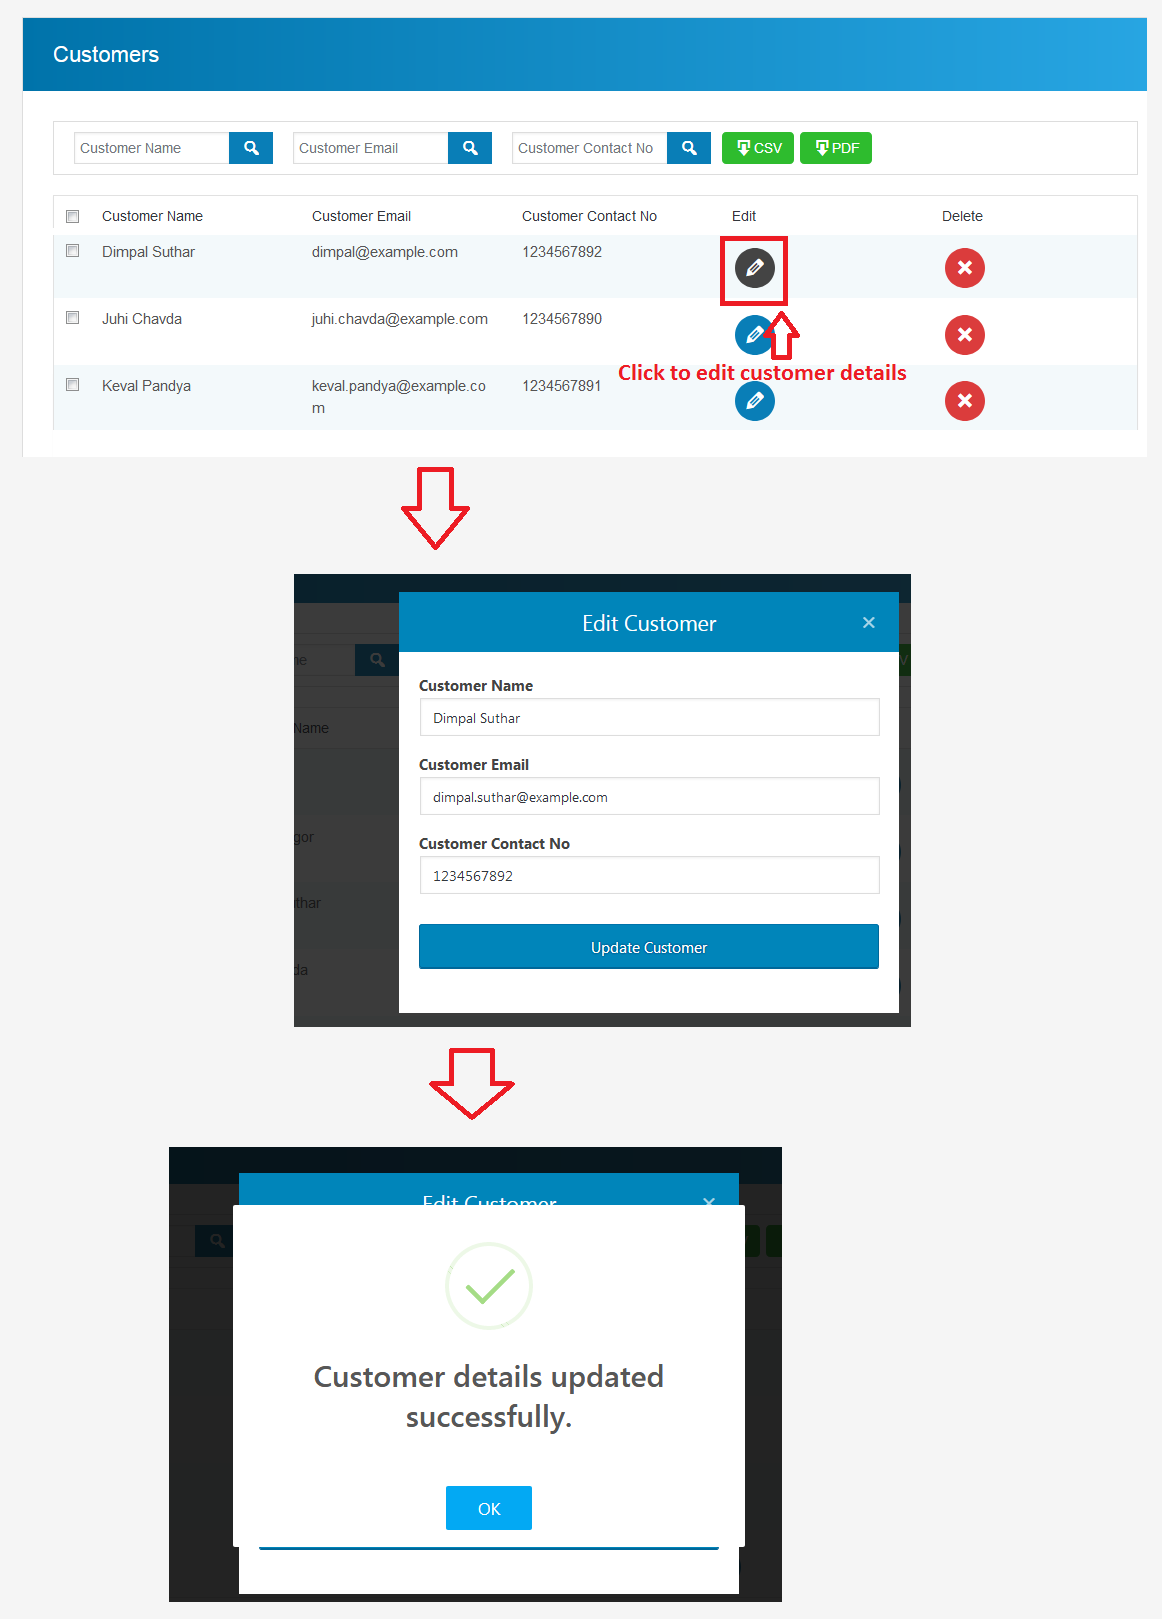
Customer
You can view your customers list here. You can manage customers from here.
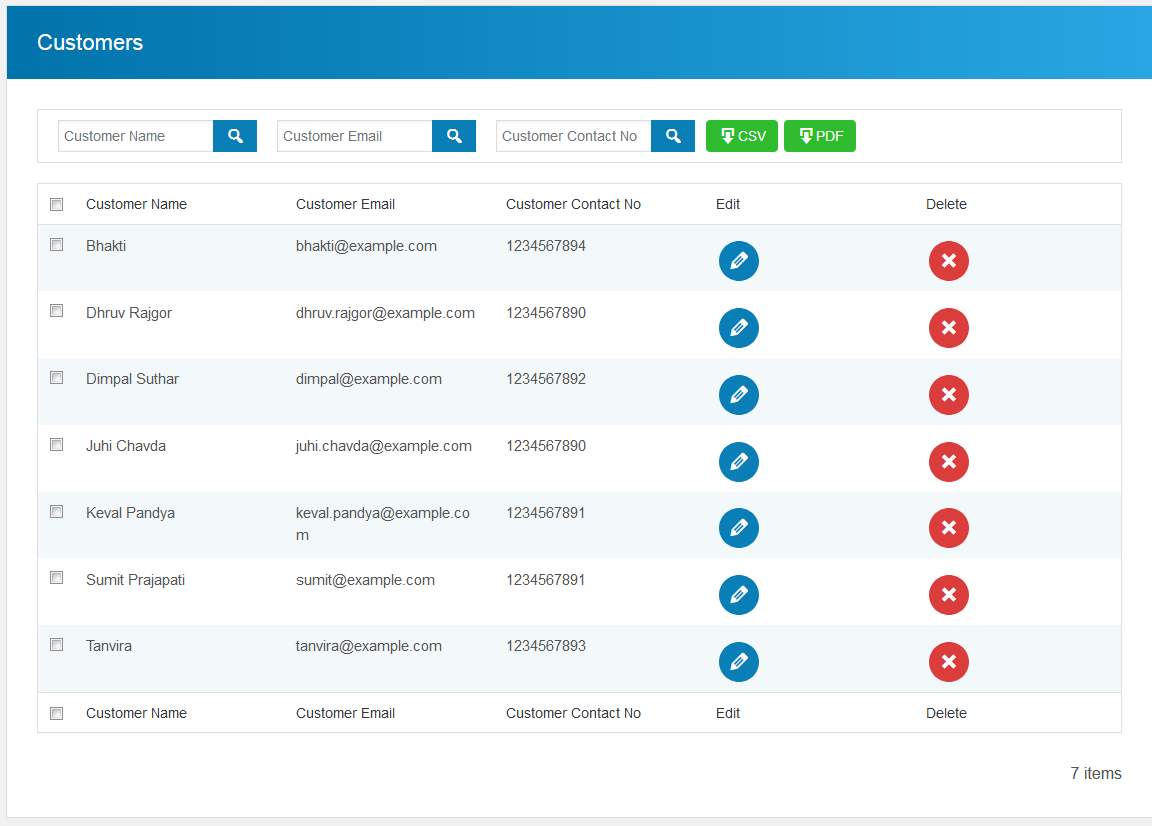
Edit Customer
Payment
You can view received payments list from customers wheather it is doen online or locally.

Settings
Appointment Buddy Settings, where you get all options to customize whole plugin as per your choice. There are 7 different settings for different settings
Company Settings
As per below image, here you will add your company details such as
- Company Name
- Company Address
- Company Contact Number
- Company Email Address
- Company Website
These details will be mentioned in the email sent by you to your client.

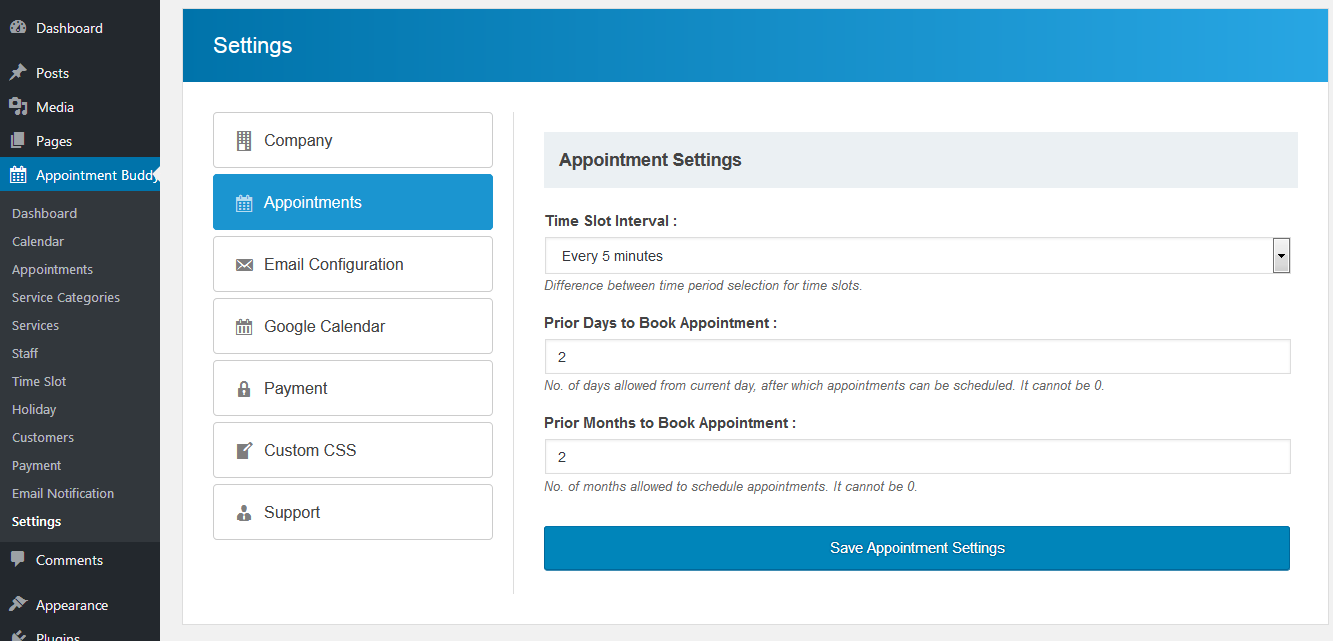
Appointment Settings
- Set priority days allowed from current day, after which appointments can be scheduled.
- Set priority months allowed to schedule appointments.
- Set time period between for start time and end time.
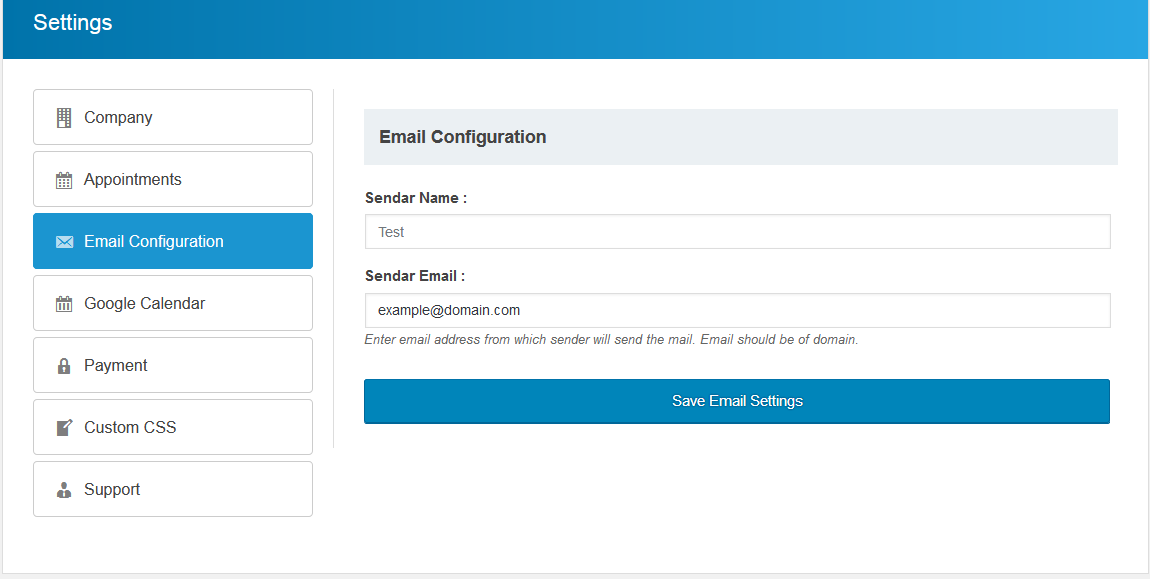
Email Configuration Settings
- Add sender name.
- Add sender email address which will be used to send notification to user/customers
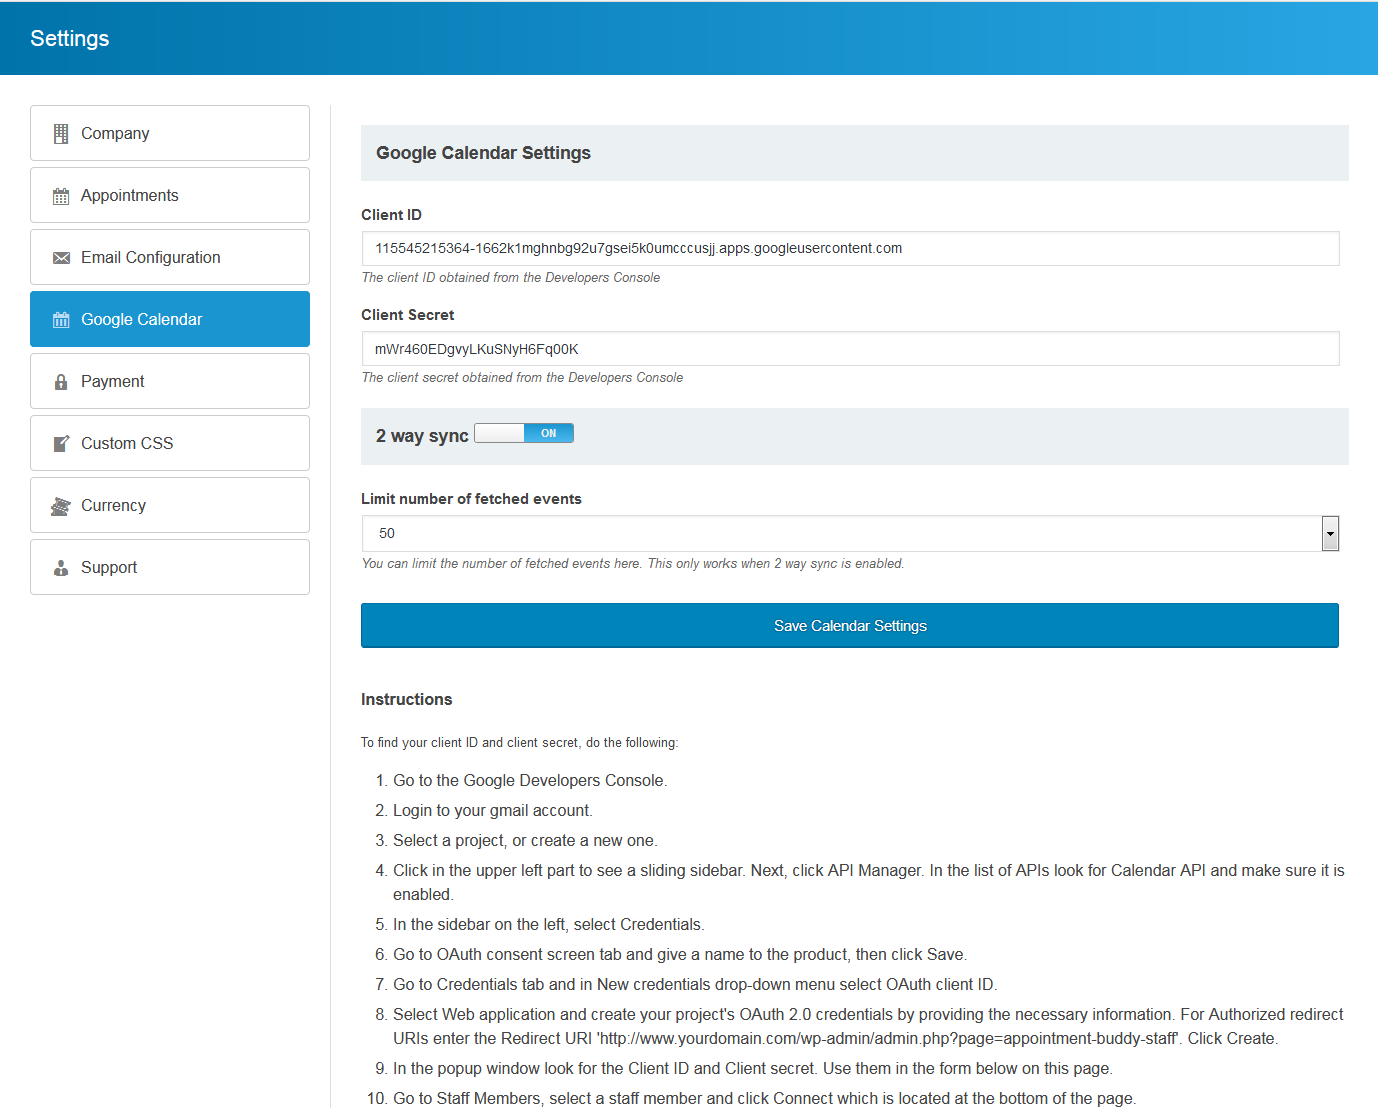
Google Calendar Settings
- Instructions to get client id and client secret key are given.
- Add you client id and client secret key to integrate appointment with your google calendar.
Two-way sync
If you enable this type of sync, you’ll get a full two-way synchronization which allows keeping all your Appointment Buddy calendar data and any further schedule updates in sync with Google Calendar. All new bookings created or updated in Appointment Buddy Calendar will be automatically reflected in the Google Calendar, and vice versa.
Important: it is necessary to configure settings in Google Calendar first, before selecting this type of sync and clicking Save. Your website must use HTTPS.
Please read the following instructions carefully, and visit this page for more details about the implementation of calendar data "incremental synchronization".
Bidirectional sync consists of two stages:1. Initial full sync is performed once at the very beginning in order to fully synchronize the client’s state with the server’s state. The client will obtain a sync token that it needs to persist.
The first stage of the initial full sync will be performed at the time of the two-way sync activation. When you click Save, all appointments from Appointment Buddy will be copied to Google Calendar, and all appointments from Google Calendar will be copied to Appointment Buddy.
In the Sync appointments history field, you can specify how many days of past calendar data you wish to sync. For example, if you enter 1 in this field, both calendars will sync appointments history starting from yesterday.
Note: Initial sync may take a long time depending on the number of events to be synchronized.
2. Incremental sync is performed repeatedly and updates the client with all the changes that happened ever since the previous sync. Each time, the client provides the previous sync token it obtained from the server and stores the new sync token from the response.
Incremental sync starts functioning after initial full sync has been performed. Appointment Buddy triggers incremental sync when Google Calendar informs your Appointment Buddy Calendar about changes by push notifications.
Registering your domainYou must register the domain for any URLs you plan to use to receive push notification messages. In addition, before you register a domain, you must first verify that you own it. This step is an abuse-prevention measure to stop anyone from using push to send messages to someone else’s domain.
Step 1: Verify that you own the domain
Before you can register your domain, you need to verify that you own it. Complete the site verification process using Search Console. For more details, see the site verification help documentation.
Step 2: Register your domain
To register a verified domain name as one of the allowed domains for your project, do the following:
1. Go to the Domain verification page in the API Console.
2. Click Add domain.
3. Fill in the form, then again click Add domain.
At this point, the Google API Console checks all domains in the list against the ones that you have verified in Search Console. Assuming that you properly verified all the domains, the page updates to show your new list of allowed domains. You now can use any of these domains to receive push notifications.
If you want to get more technical information, follow these links:
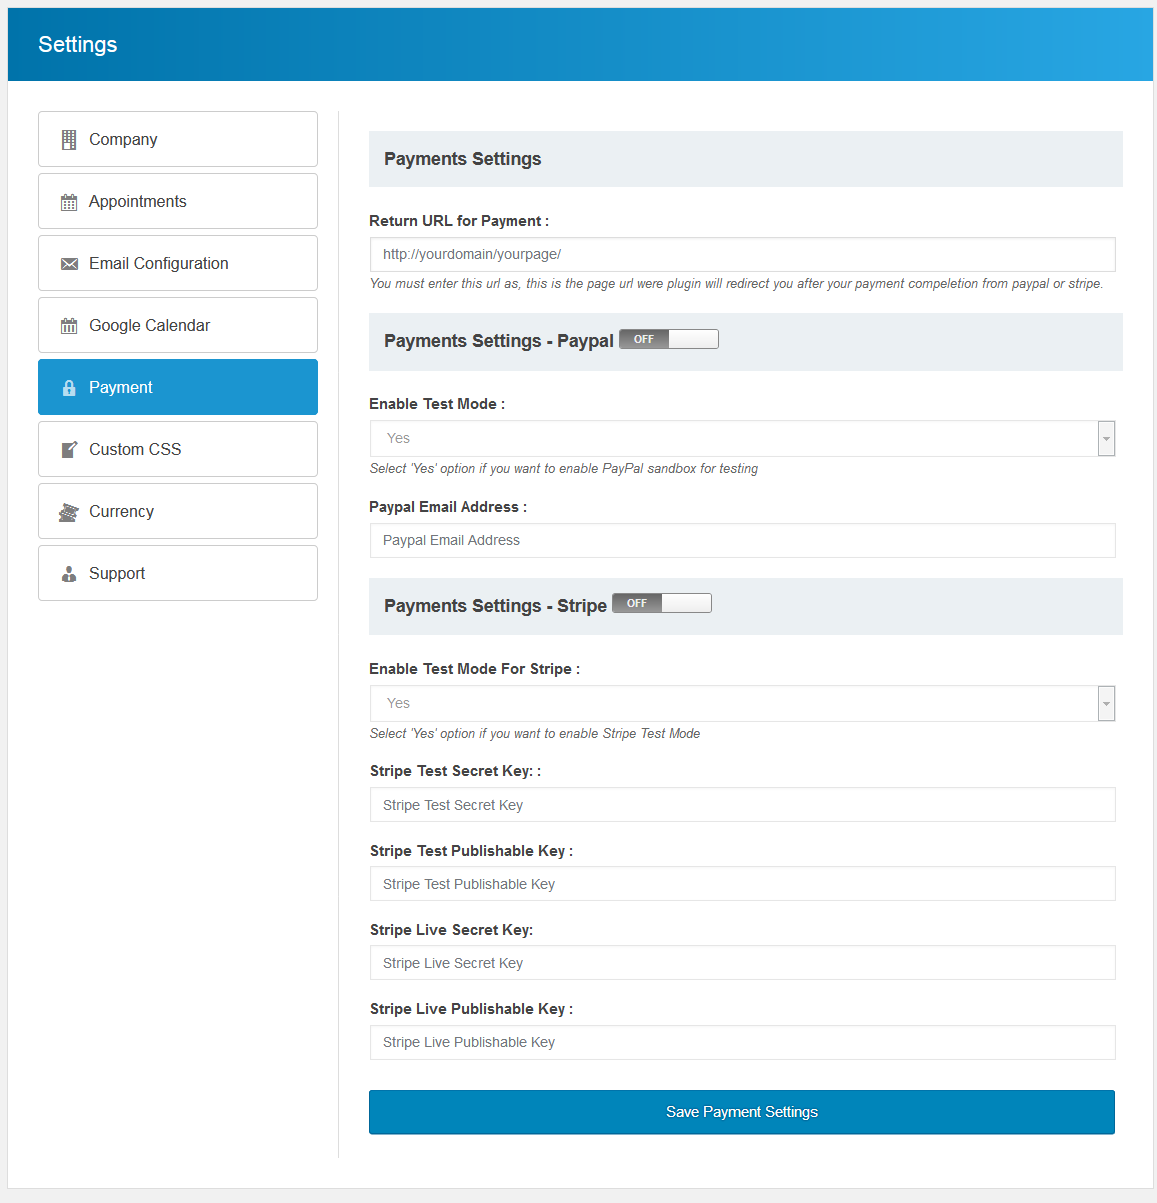
Payment Settings
We are providing payment in two ways for customer.
Reference to get test or live stripe secret and piblishable key - API Docs
You have to provide return url for payment, the page on your appointment form is added.
- Paypal
- Select wheather you are using paypal in test mode or live mode.
- Enter your merchant email address on which you will received payment from your customer.
- We have provided multi-currency code support.
-
Note: Currency in plugin settings and currency in merchant account of paypal should be same.
- Stripe
- Select wheather you are using stripe in test mode or live mode.
- Enter your secret key and publishable key for test or live enviroment.
- We have provided multi-currency code support.
Currency Settings
We are provided multi-currency support for this plugin. You need to select which currency you want for your payments.
Note: Currency in plugin settings and currency in merchant account of paypal should be same.

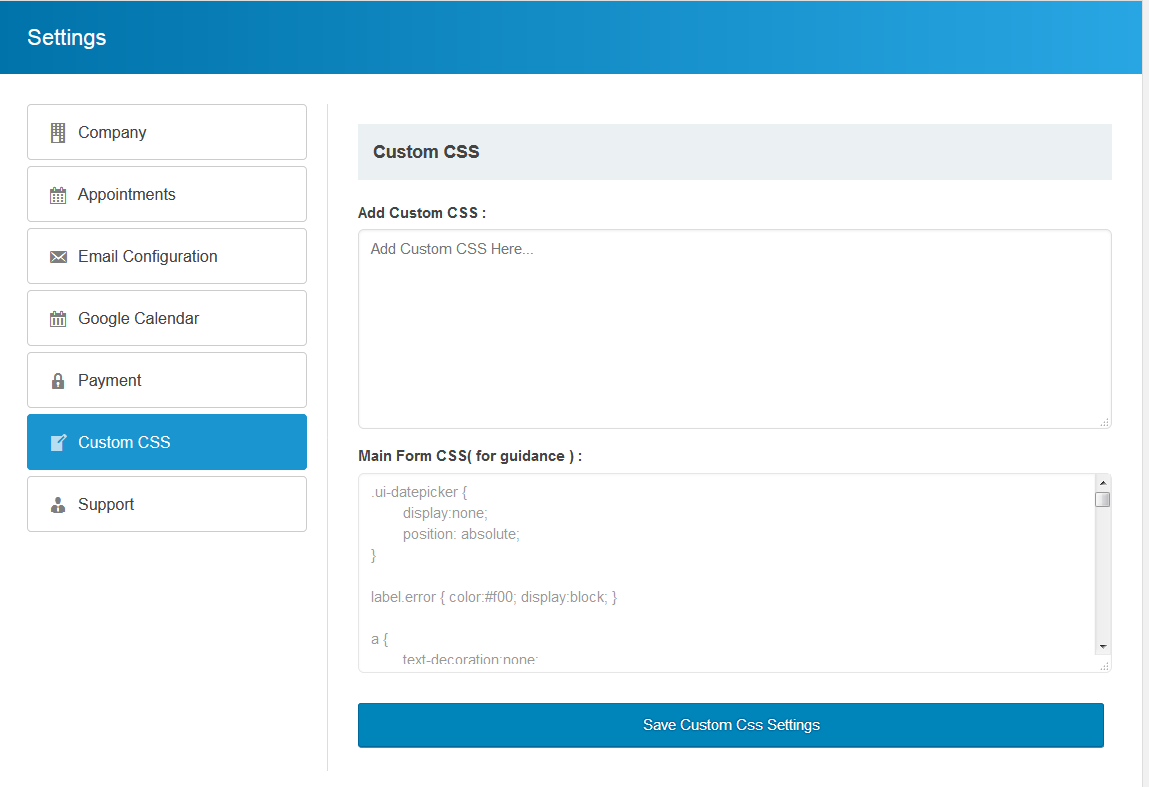
Custom CSS Settings
- Here, you can add your own style for the appointment form on user side.
- You can also see our main style for appointment form.
- It will be an advice not to change the main style, as it can break the design of form.
- If you want to change the design of form, you can use this "Custom CSS" settings.
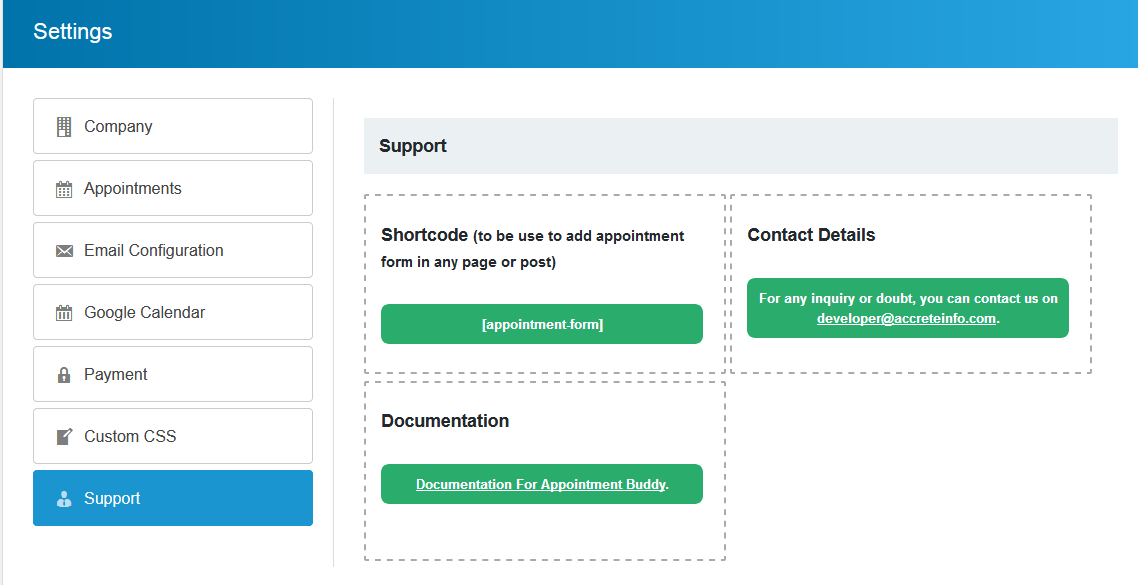
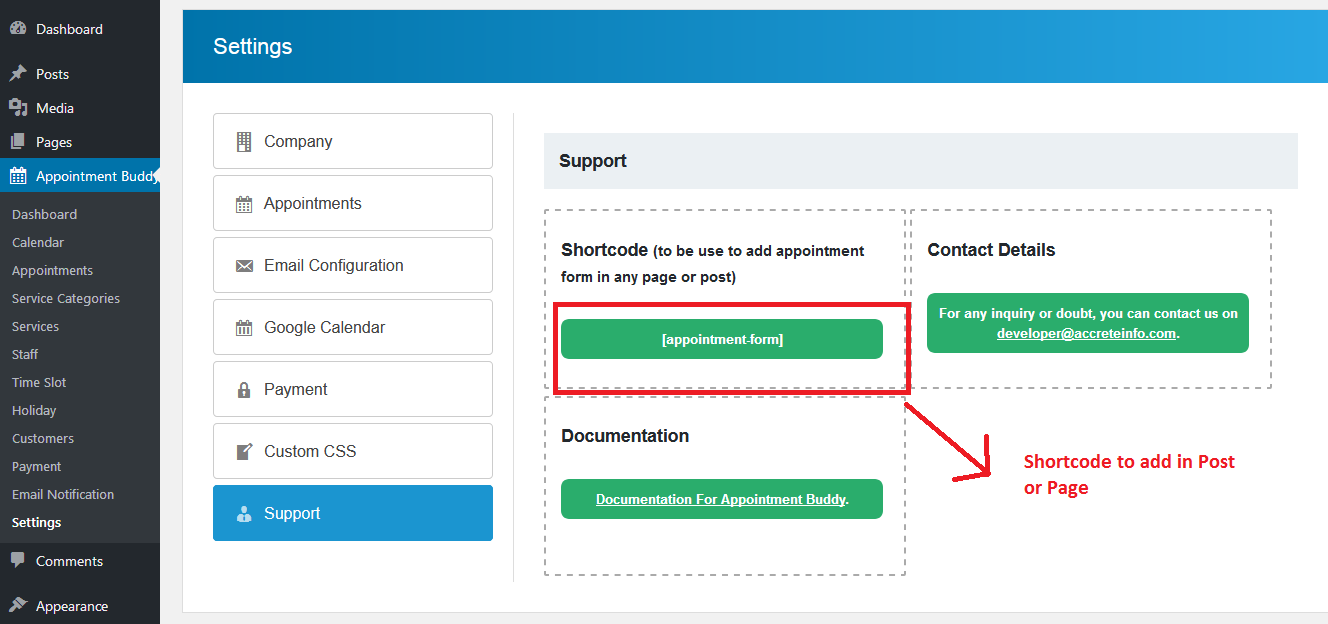
Support Settings
- Here is the shortcode "[appointment-form]" display for you which will display appointment form on website.
- You can add it in post or page.
Quick Start
To included the appointment form in your post or page of your site, you just need to add a small shortcode -> [appointment-form].
A reference is also given in support tab in settings menu.
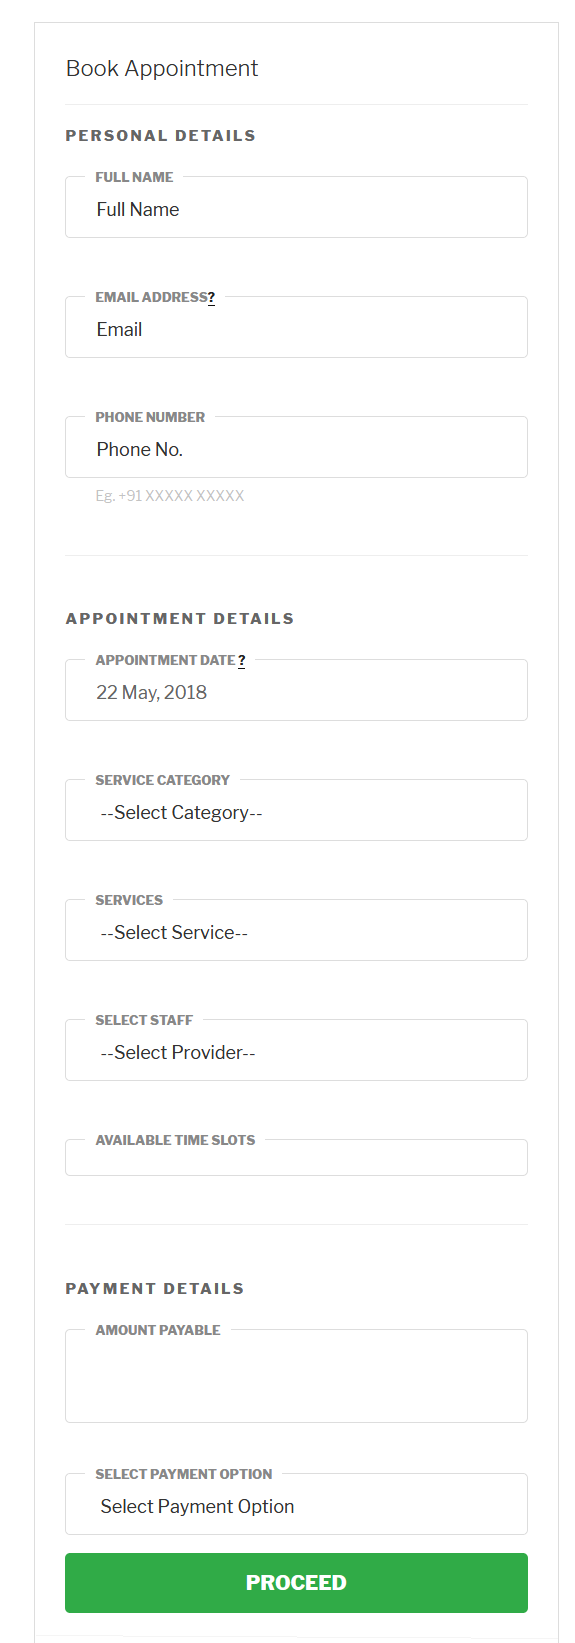
Appointment Form
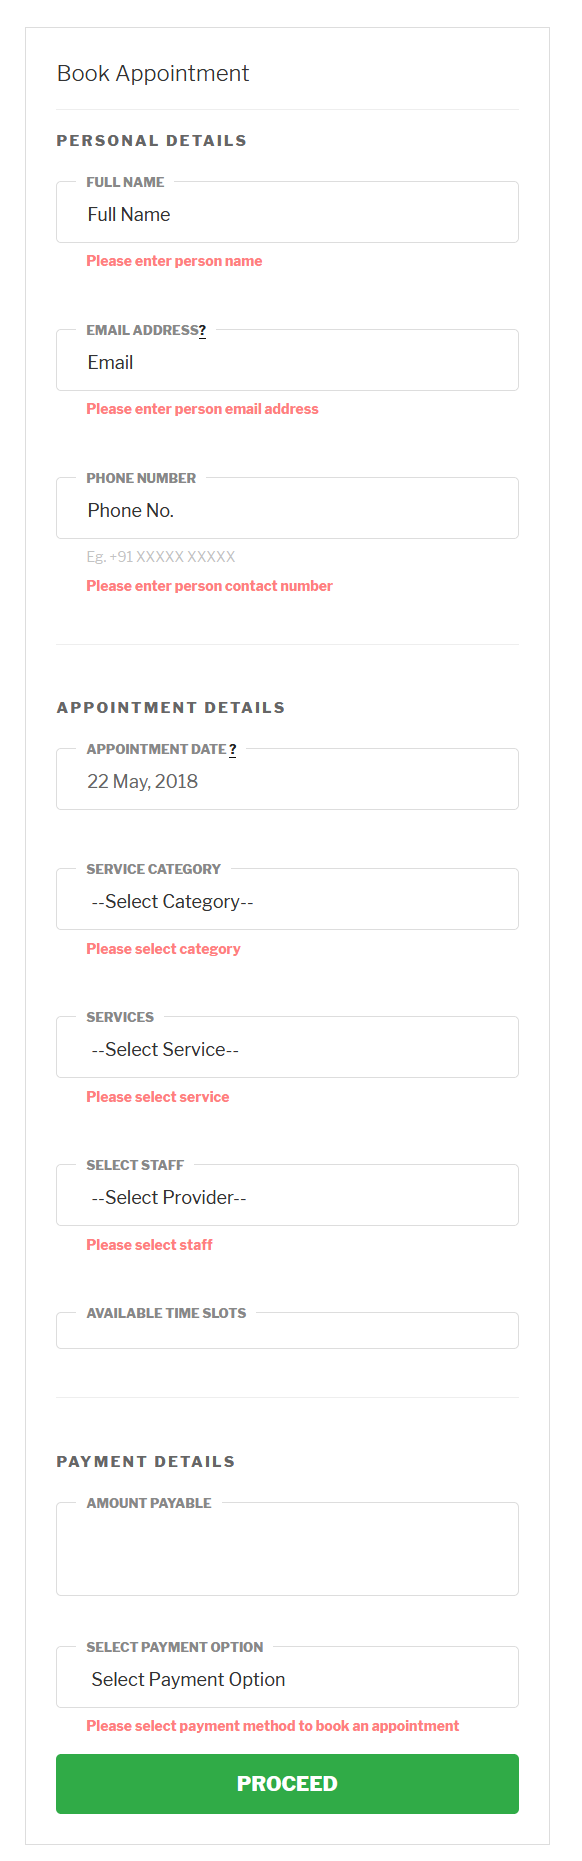
Appointment Form with Validations
Book Appoinments From Front End
Here is an example, how to book appointment from front-end (user side)?
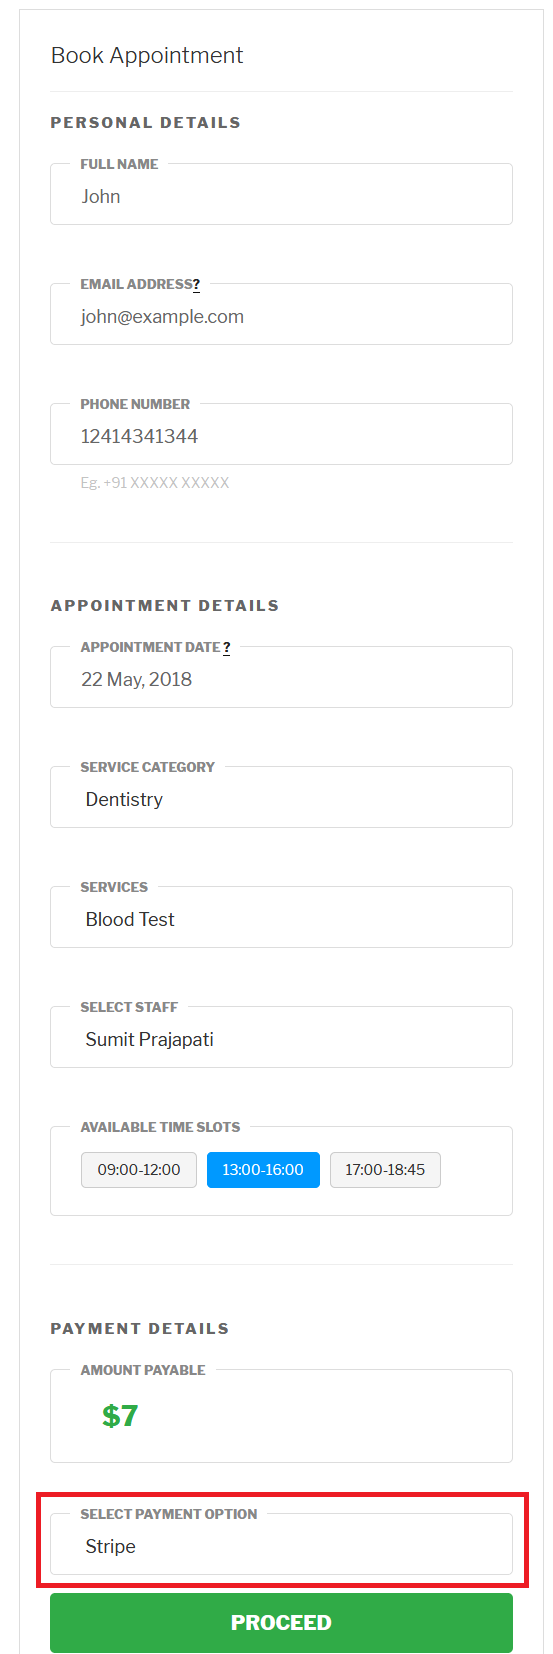
-
Fill the form with required fields.
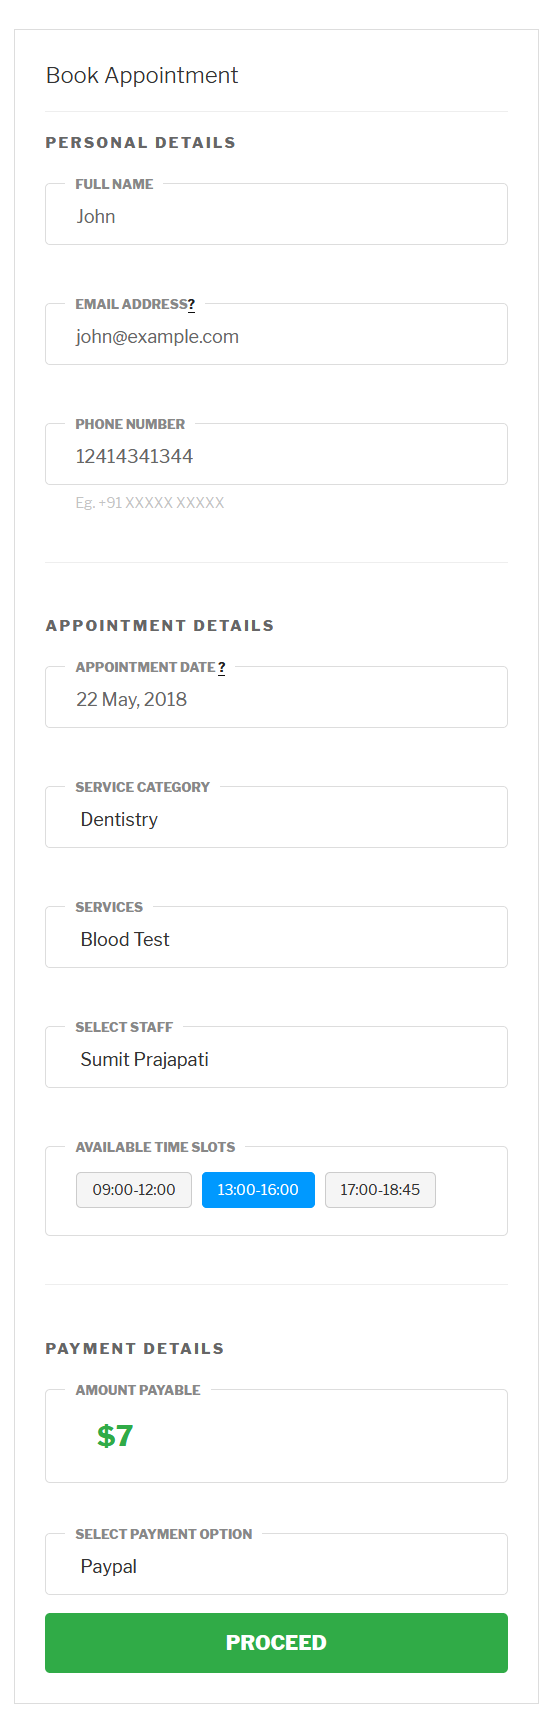
- For payment, you are provided with two options : PayPal & Stripe.
- Payment with PayPal.
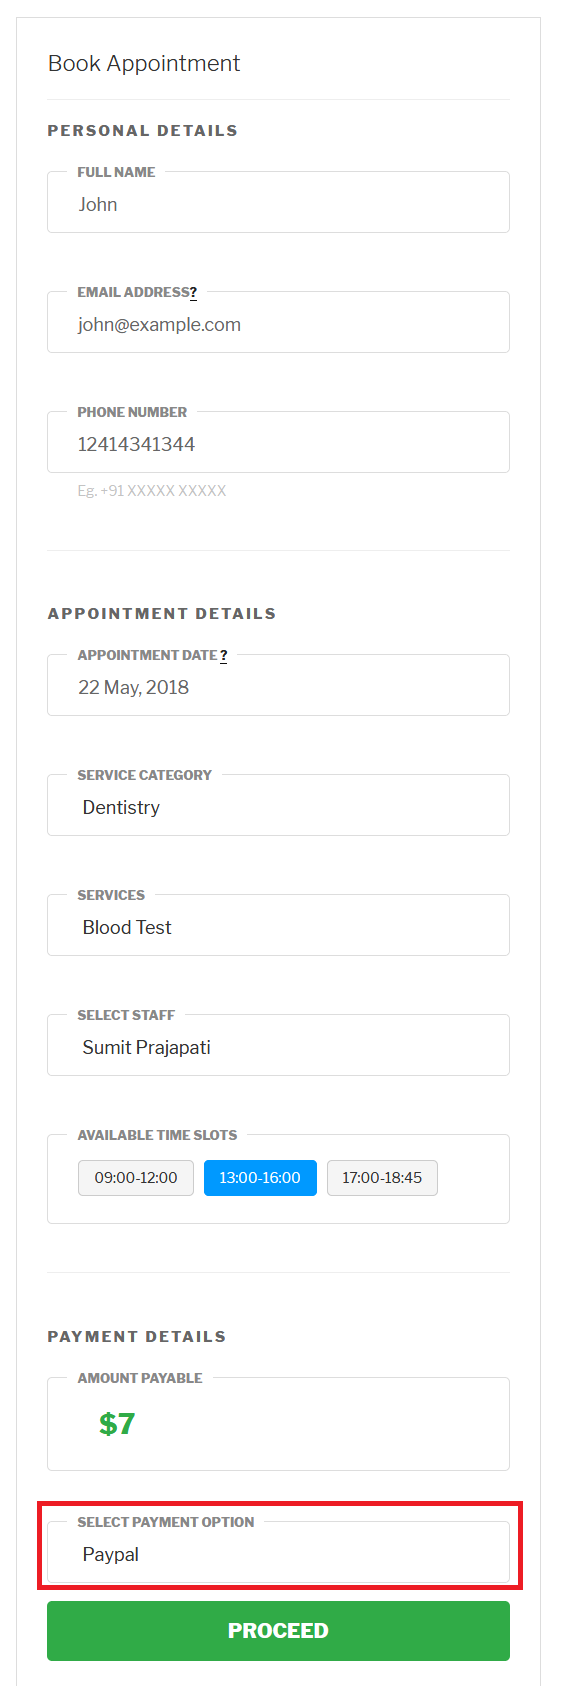
-
As you click on "Proceed", you will see a popup with customer details.
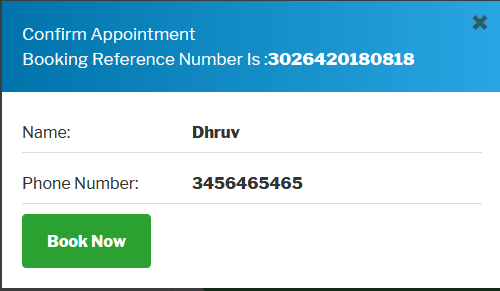
-
As you click on "Book Now", you will redirected to paypal login page where you can use your paypal login to pay amount.
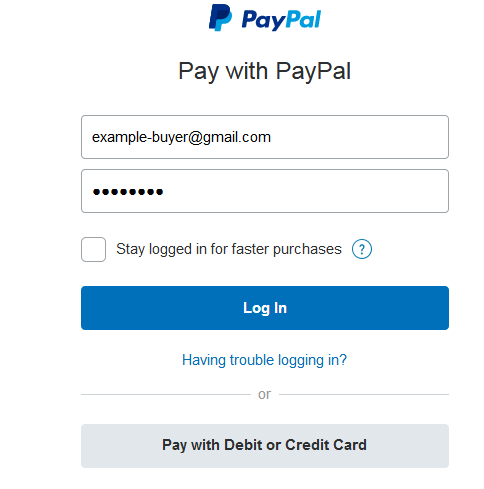
-
As you login, you will be redirected to payment page with other details.
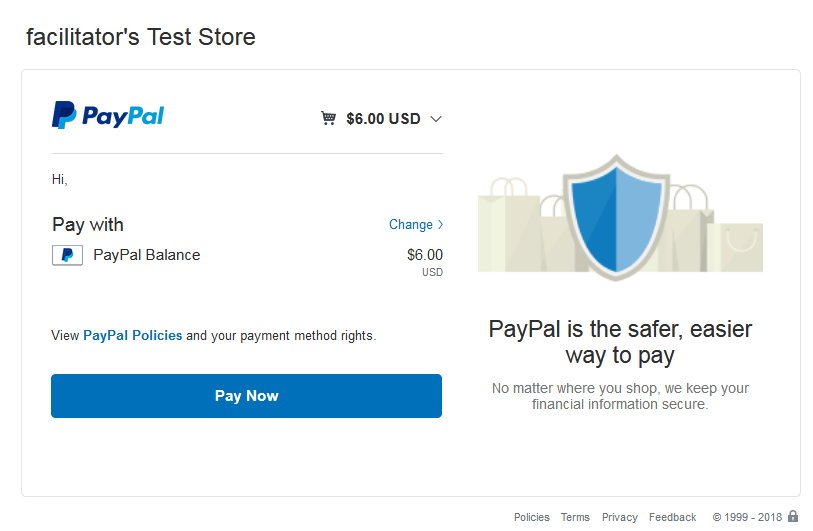
-
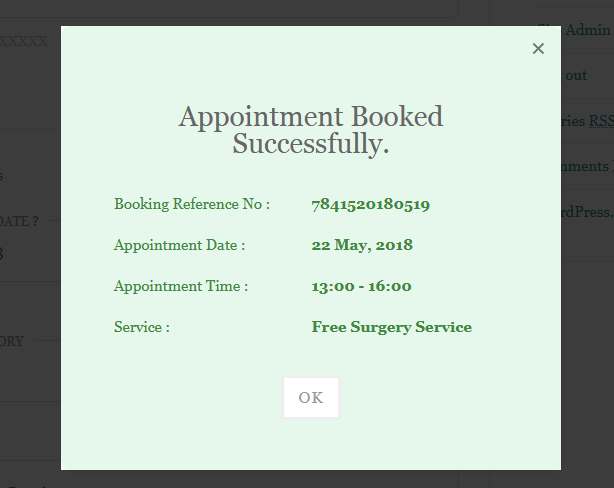
As your payment is done, you will be redirected to thank you page in your site.
-
- Payment with Stripe.
-
As you click on "Proceed", you will see a popup with customer details.
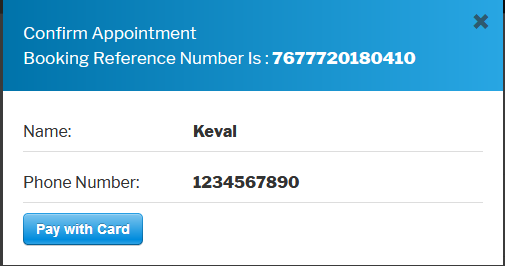
-
As you click on "Pay with Card", an another popup will open asking you, required details like card no, etc.
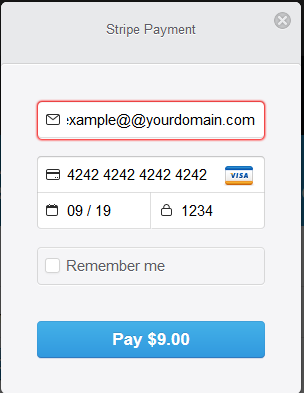
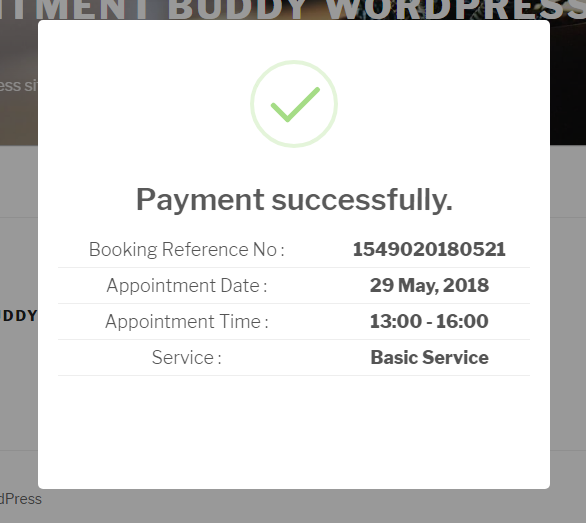
-
As you click on "Proceed ..", it will redirect you to thank you page.
-
- Free Service Booking with 0 Payment.
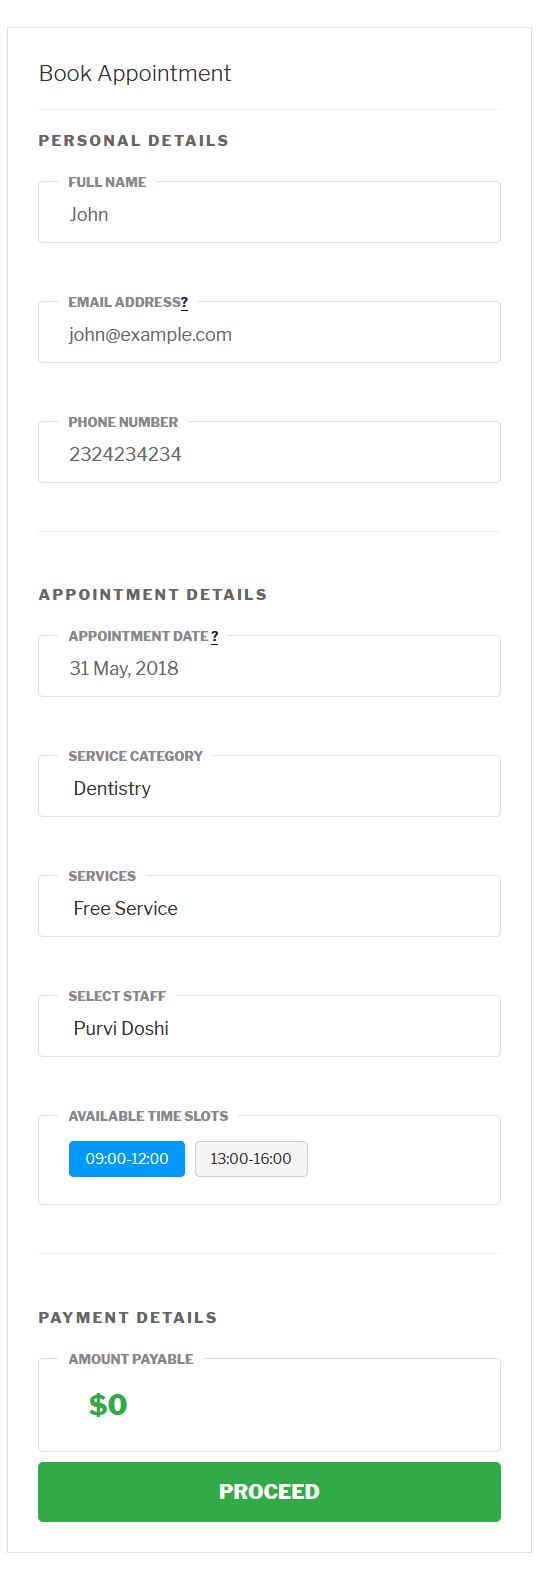
As you click on "Proceed ..", it will redirect you to thank you page.
Book Appoinments From Back End
Here is an example, how to book appointment from back-end (admin side)?
-
To book new appointment, click on "New appointment".
-
Here is the appointment form that will open.
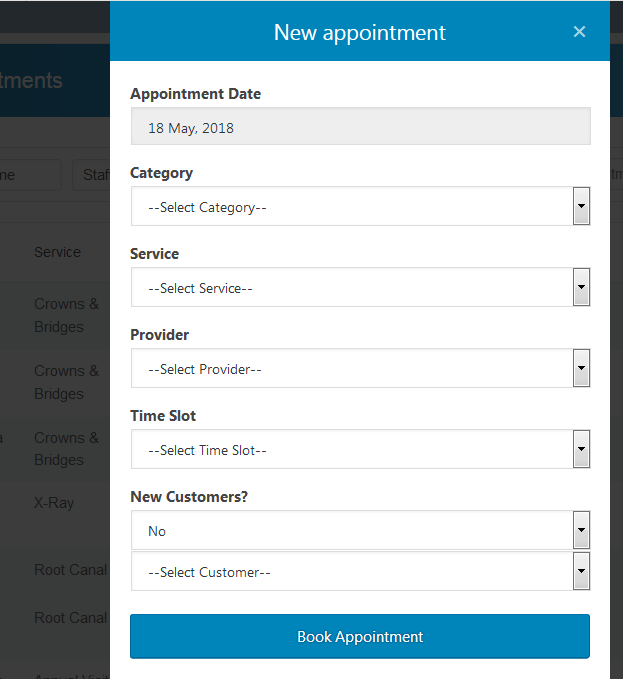
-
While booking, when your open calendar in form, you can see some disabled date. These dates defines holiday. You won't be able to book appointment on these dates.
-
Filled appointment form, with new customer.
-
Filled appointment form, with existing customer.
-
As you click on "Book Appointment", a mail will send regarding appointment to administrator, staff member and customer. And you will also receive a message as your appointment booking is successfull. And you can see your appointment in appointment list.
How to change language?
-
Simply go to setting option form wordpress menu, change language and save settings.
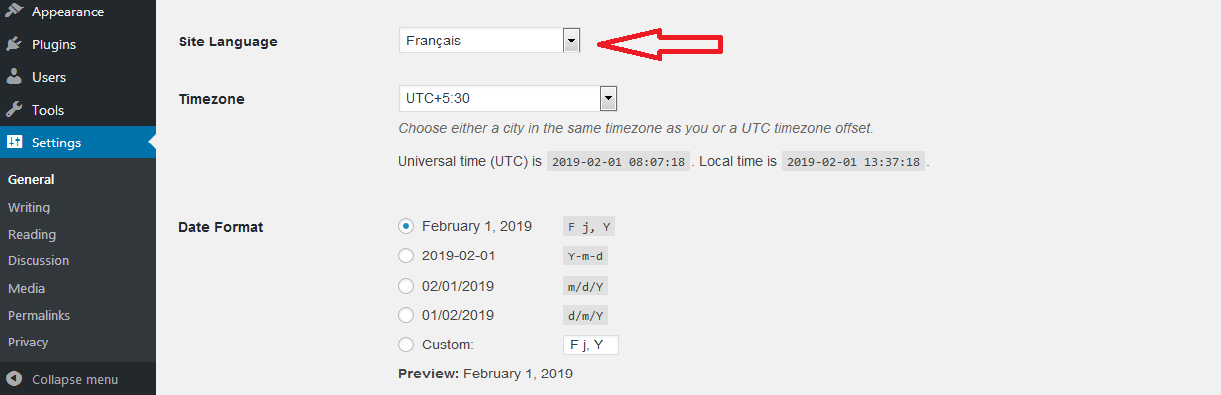
-
Now you can see appointment buddy dashboard and all other pages in french language.
Change Logs
Version 1.0
(Initial) First release
Version 1.1
Bug Fixing and Multi-Currency Support
Dependencies
-
Fullcalendar JQuery - (Reference Link)
- Chosen JQuery - (Reference Link)
- Toggle Switch JQuery - (Reference Link)
- Chosen JQuery - (Reference Link)
Quick Reference
For any inquires you can contact / mail us at developer@accreteinfo.com for support.